
OwnCloud is one of the free and open-source file sharing software like Dropbox, providing good security, has a good way for application users to share and access data that is smoothly integrated with devices whose purpose is to secure, track, and report data usage. OwnCloud was initially developed in 2010, built using open-source technology, ownCloud provides a variety of features such as file sync, team collaboration, calendar, contacts, and more. With ownCloud, we can have full control over our own data, without having to rely on third-party service providers. In this article, we will show you how to install ownCloud on Debian 13.
Conventions
# – given commands should be executed with root privileges either directly as a root user or by use of sudo command
$ – given commands should be executed as a regular user
Step 1. Install and Configure Apache
In this step, we are going to install Apache as the web server. Let’s proceed with the installation of Apache now.
# apt install apache2
On Debian machines, Apache will start automatically after installation. To confirm this, you can execute the following command.
# systemctl status apache2
You will see the status displayed, indicating that Apache is operational.
● apache2.service - The Apache HTTP Server
     Loaded: loaded (/usr/lib/systemd/system/apache2.service; enabled; preset: enabled)
     Active: active (running) since Fri 2025-05-16 21:09:35 CDT; 1min ago
 Invocation: 37abbd144d524594a2c0cc41465de9ac
       Docs: https://httpd.apache.org/docs/2.4/
    Process: 17093 ExecStart=/usr/sbin/apachectl start (code=exited, status=0/SUCCESS)
   Main PID: 17097 (apache2)
      Tasks: 7 (limit: 4644)
     Memory: 13.7M (peak: 14M)
        CPU: 230ms
     CGroup: /system.slice/apache2.service
             ├─17097 /usr/sbin/apache2 -k start
             ├─17099 /usr/sbin/apache2 -k start
             ├─17100 /usr/sbin/apache2 -k start
             ├─17101 /usr/sbin/apache2 -k start
             ├─17102 /usr/sbin/apache2 -k start
             ├─17103 /usr/sbin/apache2 -k start
             └─17104 /usr/sbin/apache2 -k start

May 16 21:09:35 debian13.linuxcloudvps.com systemd[1]: Starting apache2.service - The Apache HTTP Server...
May 16 21:09:35 debian13.linuxcloudvps.com apachectl[17096]: AH00558: apache2: Could not reliably determine the server's fully qualified domain name, using debian13.linuxcloudvps.com. Set the 'S>
May 16 21:09:35 debian13.linuxcloudvps.com systemd[1]: Started apache2.service - The Apache HTTP Server.
OwnCloud requires mod_rewrite and the rewrite module is not enabled by default. Let’s enable it now.
# a2enmod rewrite headers unique_id
After enabling the modules, we need to restart Apache to apply the new configuration.
# systemctl restart apache2
Now, let’s create a directory for our ownCloud installation.
# mkdir -p /var/www/html/yourdomain.com/
The next step is to create an Apache virtual host.
# nano /etc/apache2/sites-enabled/yourdomain.com.conf
Insert the following lines to the file. Make sure to replace yourdomain.com with your actual domain or subdomain name pointing to your server.
<VirtualHost *:80>

ServerAdmin [email protected]
ServerName yourdomain.com
ServerAlias www.yourdomain.com
DocumentRoot /var/www/html/yourdomain.com

ErrorLog ${APACHE_LOG_DIR}/yourdomain.com_error.log
CustomLog ${APACHE_LOG_DIR}/yourdomain.com_access.log combined

<FilesMatch \.php$>
  SetHandler "proxy:unix:/var/run/php/php7.4-fpm.sock|fcgi://localhost"
</FilesMatch>

<Directory /var/www/html/yourdomain.com/>
  Options +FollowSymlinks
  AllowOverride All
</Directory>
 <IfModule mod_dav.c>
  Dav off
 </IfModule>

</VirtualHost>
Save the file then exit. Do not restart Apache at this point, because we added the PHP configuration to the virtual host and we have not installed PHP 7.4 yet and we will do it in the next step.
Step 2. Install PHP and Its Extensions
Since Debian 13 ships with PHP 8.4 and ownCloud at the moment does not support PHP 8 and higher, we need to install PHP 7.4. We suggest adding a third-party source, Ondřej Surý’s PHP source, which offers current PHP packages. Execute the following commands to add the repository
# apt install -y apt-transport-https lsb-release ca-certificates wget
# wget -O /etc/apt/trusted.gpg.d/php.gpg https://packages.sury.org/php/apt.gpg
# echo "deb https://packages.sury.org/php/ $(lsb_release -sc) main" | sudo tee /etc/apt/sources.list.d/php.list
Now, let’s refresh the package index files on the system
# apt update
Since you have set up the necessary PPA on your system and the package index is updated, let’s proceed with installing the required PHP version.
# apt install php7.4-{xml,intl,common,json,curl,fpm,mbstring,mysql,gd,imagick,zip,opcache}
PHP and its required extensions have been installed. Let’s enable PHP 7.4 for Apache now.
# a2enmod proxy_fcgi setenvif
# a2enconf php7.4-fpm
To apply the changes, let’s restart apache
# systemctl restart apache2
Step 3. Install MariaDB Server
There are several database engine we can use to install ownCloud. OwnCloud supports MySQL server version 8.0+ or equivalent MariaDB server, PostgreSQL, Oracle, and SQLite (not for production). In this step, we are going to install MariaDB server from the default Debian 13 repository. To install MariaDB server, simply invoke this command below:
# apt install mariadb-server
MariaDB should be up and running now.
Step 4. Create a Database
On Debian 13, MariaDB will start automatically upon installation. So, let’s log in to MySQL shell and create a database for our ownCloud website.
# mysql
Once logged in to MySQL shell, we can run the following commands.
mysql> CREATE DATABASE owncloud;
mysql> GRANT ALL on owncloud.* to owncloud@localhost identified by 'm0d1fyth15';
mysql> FLUSH PRIVILEGES;
mysql> \q
At this point, we have created a database called ‘owncloud’ with database user ‘owncloud’ and the password is ‘m0d1fyth15’. Do not forget to replace m0d1fyth15 with a stronger password. We will use these information to install ownCloud.
Step 5. Download and Install ownCloud
In this step, we are going to download the latest stable version of ownCloud. To get other versions, you can go to ownCloud download page.
# cd /var/www/html/yourdomain.com
# wget https://download.owncloud.com/server/stable/owncloud-latest.tar.bz2
# tar -xf owncloud-latest.tar.bz2 --strip-components 1
The commands above will download then extract the compressed file in to directory /var/www/html/yourdomain.com. Now, let’s give the correct permissions.
# chown -R www-data: /var/www/html/yourdomain.com/
Step 7. Install ownCloud
The installation should be done in a web browser. We need to go to http://yourdomain.com, make sure to replace yourdomain.com with the domain you configured earlier when setting up Apache virtual host.
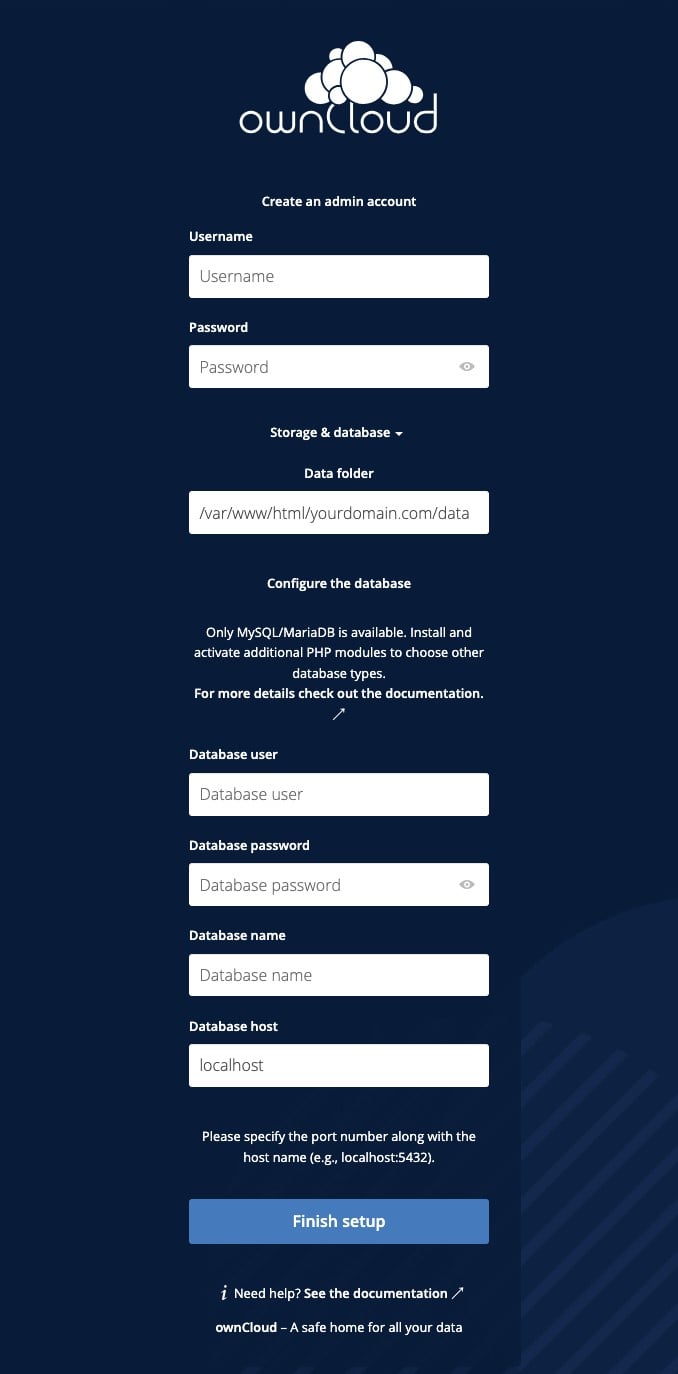
Fill the forms with the administrative user and password you want to create, and also fill the database credentials we created earlier in this post then click on Finish Setup button.

Login with your administrative account you created in the previous step. Now, you can customize your fresh installed ownCloud website.
That’s it! You have successfully installed ownCloud on Debian 13.
If you want to host an ownCloud website with high-end hardware at an affordable price, look no further – our VPS hosting plans will let you host any software you want with dedicated resources.
Thanks for reading this tutorial – please share it with your peers if you found this guide helpful. You can also leave a comment if you liked the post or if you have any suggestions or concerns.
but owncloud desktop app failed to work normally. when i upgrade my debian 12 to 13. this app does not work. how can i fix it?
Thank you for this excellent tutorial.
I just noticed one oversight.
systemctl restart apache => systemctl restart apache2
We are glad that you like our tutorial. Thanks for the feedback — we’ve adjusted that.