
In this article, we will perform an installation of ionCube on an Ubuntu 16.04 server. First, we will explain what is “ionCube”, and then we will proceed with the step-by-step instructions for installing and how to check it is installed on the Ubuntu 16.04. ionCube is an extension of a PHP module that is used to speed up web pages and load encrypted PHP files. In other words, ionCube is an encoder tool used to ensure that your PHP applications are not redistributed illegally and are not being modified or read by anyone.
In order to follow this tutorial you will need:
- Ubuntu 16.04 server
- A web server like Apache or Nginx with PHP installed
Find and choose the right ionCube version
The first thing you need to know is that the version of the ionCube must match your already installed PHP version. So, to continue we need to have some information about which version of PHP is using our web server.
To retrieve information about the current PHP configuration on your server we are going to use a small script. We will create a file named info.php in the root web server directory (by default is /var/www/html unless you’ve changed it) using your favorite text editor or simply use nano as shown in our example.
$ sudo nano /var/www/html/info.php
Add the code shown below and nothing more.
<?php
phpinfo();
Save the changes and close the file.
Now open your favorite browser and visit http://server_ip_address/info.php
The visited page should look like this:
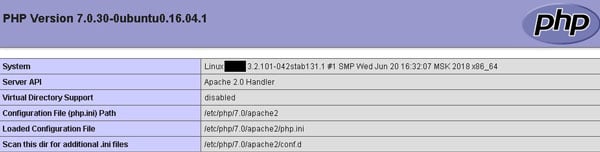
From the page header, we can see which PHP version of our web server uses. In this example, we use PHP Version 7.0.30 and from the Server API line, we can see that we are using Apache 2.0.
Once we have this information on our server, we can proceed with the next step that is downloading and installing.
2. Installation and Setting Up ionCube
We will visit now the official ionCube download page and copy the link location from the version of your OS. In our example, we will use the zip for Linux 64-bit version. You can download on your server with this command:
$ wget https://downloads.ioncube.com/loader_downloads/ioncube_loaders_lin_x86-64.zip
extract the archive with this command:
$ unzip ioncube_loaders_lin_x86-64.zip
When we extract the zip file we just downloaded, it will create a directory that will contain multiple files for different versions of PHP. From the unpacked directory we will search for the version of PHP that we currently use on our server, and in this example will be the version of PHP 7.0. So, we will copy the file ioncube_loader_lin_7.0.so into the PHP extensions directory with the following command:
$ sudo cp ioncube/ioncube_loader_lin_7.0.so /usr/lib/php/20151012/
You can always check the location of the PHP extensions directory at http://server_ip_address/info.php and find the extension_dir as shown below.

The next step is to add the extension to the PHP configuration so that it can load the ionCube extension. There are two ways to do this:
- First, is to modify the main php.ini configuration (which is not recommended).
- Second is to create a separate file and set it to load before the other extensions to evade some possible conflicts.
In this example, we will use the second option and we will create a separate file. Once again we need a location so we can create our own configuration file. To find the location, we return to http://server_ip_address/info.php and search Scan this dir for additional .ini files.

With the following command, we will create a file in the /etc/php/7.0/apache2/conf.d directory named 00-ioncube.ini
$ sudo nano /etc/php/7.0/apache2/conf.d/00-ioncube.ini
In order for this file to be loaded in front of all other PHP configuration files, we use 00 at the beginning of the name of this file.
Add the loading directive and then save the file.
zend_extension = "/usr/lib/php/20151012/ioncube_loader_lin_7.0.so"
Once we restart the web server, the above changes will take effect.
For Nginx web server run:
$ sudo systemctl restart nginx
For Apache web server run:
$ sudo systemctl restart apache2.service
And if you use a php-fpm service, it’s better to restart as well.
$ sudo systemctl restart php7.0-fpm.service
Now let’s check if the ionCube is installed and enabled.
3. Confirm the ionCube installation
In this last step, we will confirm that our ionCube has been successfully installed and enabled. We will go back to our browser and refresh our website http://server_ip_address/info.php. If PHP Loader is enabled, it should look like this:

With this, we are sure that the extension of the PHP ionCube is properly installed and enabled.
Now the last thing we need to do is remove the info.php script. Our recommendation is not to keep this script because it shows a lot of server information that can be used by potential attackers.
$ sudo rm /var/www/html/info.php
Also, we will remove the downloaded ionCube file because we used them and now there are not necessary to take space in our server.
$ sudo rm ioncube_loaders_lin_x86-64.tar.gz

$ sudo rm -rf ioncube_loaders_lin_x86-64
Congratulations, we have fully established and functional ionCube expansion. With this, we secure our environment for all our PHP applications.
Of course, you don’t have to know how to install ionCube Loader on Ubuntu 16.04 if you have a VPS Hosting with us. You can simply ask our administrators to install ionCube Loader on Ubuntu 16.04 for you. They’re available 24/7, and will be able to help you with the installation of ionCube Loader on Ubuntu 16.04.
PS. If you enjoy reading this blog post on How to Install ionCube Loader on Ubuntu 16.04, feel free to share it on social networks using the shortcuts below, or simply leave a comment.