
In this tutorial we are going to install the self-hosted version of Matomo on an Ubuntu 18.04 Cloud VPS with the Apache web server, the MySQL database server, and PHP version 7.2.
![]() Matomo (formerly known as Piwik) is a free and open-source real-time web analytics platform, similar to Google’s own Analytics platform. Matomo provides its users with reports about their websites such as visitors, search engine results, languages, keywords, and much more. The install process is fairly straightforward, so let’s get started.
Matomo (formerly known as Piwik) is a free and open-source real-time web analytics platform, similar to Google’s own Analytics platform. Matomo provides its users with reports about their websites such as visitors, search engine results, languages, keywords, and much more. The install process is fairly straightforward, so let’s get started.
First, let’s see what other features Matomo has that can come in handy:
Matomo comes with tons of useful features, such as:
- Real-time data updates
- Customizable dashboard
- Analytics for Ecommerce
- Goal Conversion Tracking
- Scheduled email reports in PDF and HTML format
- Accurately measure the time spent by visitors on your website
- Custom Dimensions
- Site Search Analytics
- Site speed and page speed reports
and lots more…
Prerequisites
- Ubuntu 18.04 server
- System user with root privileges (or the root user itself)
- Apache, Nginx or IIS web server
- PHP version 5.5.9 or greater. PHP 7+ is recommended
- MySQL or MariaDB database server version 5.5 or greater. Version 5.7+ is recommended
- PHP extension pdo and pdo_mysql, or the mysqli extension.
Step 1. Log in and Update the Server
Login to your Ubuntu 18.04 server via SSH as user root (or as a user with sudo privileges)
ssh root@<span style="color: #ff0000;">IP_Address</span> -p <span style="color: #ff0000;">Port_number</span>
You only need to specify “-p Port_number” if your server uses an SSH port number other than the default port number, 22. Once you’re logged in, run the following commands to update all installed packages to their latest available versions:
apt update && apt upgrade
Step 2. Install the Apache Web Server
Matomo needs a web server on which it will serve its web interface. It can run on almost all of the major web servers. In this tutorial we decided to install the Apache web server, which is one of the most popular web servers in the world. Run the following command to install it on your Ubuntu 18.04 server:
apt install apache2
Once it is installed, you can start the web server and enable it to automatically start after a server reboot:
systemctl start apache2
systemctl enable apache2
You can check if Apache is properly installed and running on your server by checking its status:
systemctl status apache2
Output:
apache2.service - The Apache HTTP Server
   Loaded: loaded (/lib/systemd/system/apache2.service; enabled; vendor preset: enabled)
  Drop-In: /lib/systemd/system/apache2.service.d
           apache2-systemd.conf
   Active: active (running)
  Process: 7031 ExecStop=/usr/sbin/apachectl stop (code=exited, status=0/SUCCESS)
  Process: 7036 ExecStart=/usr/sbin/apachectl start (code=exited, status=0/SUCCESS)
 Main PID: 7040 (apache2)
    Tasks: 7 (limit: 2321)
   CGroup: /system.slice/apache2.service
           7040 /usr/sbin/apache2 -k start
           7042 /usr/sbin/apache2 -k start
Step 3. Install PHP
Matomo is based on the PHP programming language, so we have to install PHP and several PHP extensions required by the application:
apt install php7.2 php7.2-curl php7.2-gd php7.2-cli mysql-server php7.2-mysql php-xml php7.2-mbstring
Verify that PHP is properly installed by checking which version is currently installed:
php -v
Output:
PHP 7.2.10-0ubuntu0.18.04.1 (cli) (built: Sep 13 2018 13:45:02) ( NTS )
Copyright (c) 1997-2018 The PHP Group
Zend Engine v3.2.0, Copyright (c) 1998-2018 Zend Technologies
    with Zend OPcache v7.2.10-0ubuntu0.18.04.1, Copyright (c) 1999-2018, by Zend Technologies
Step 4. Install the MySQL Database Server
Matomo stores its information in an SQL database, so we will install the MySQL database server. MySQL server can be easily installed from the official Ubuntu repository by executing the following command:
apt install mysql-server
You can verify that the database server is properly installed and running by checking its status
systemctl status mysql
Output
mysql.service - MySQL Community Server
   Loaded: loaded (/lib/systemd/system/mysql.service; enabled; vendor preset: enabled)
   Active: active (running)
 Main PID: 24854 (mysqld)
    Tasks: 27 (limit: 2321)
   CGroup: /system.slice/mysql.service
           24854 /usr/sbin/mysqld --daemonize --pid-file=/run/mysqld/mysqld.pid
Next you can set a password for your MySQL root user and additionally strengthen the security of the MySQL server, using the ‘mysql_secure_installation’ script. You can select the following options – we suggest answering with ‘Y’ to all of the prompts:
Set root password? [Y/n] Y
Remove anonymous users? [Y/n] Y
Disallow root login remotely? [Y/n] Y
Remove test database and access to it? [Y/n] Y
Reload privilege tables now? [Y/n] Y
Step 5. Create a MySQL User and Database
Finally, you can log in to the MySQL server as the root user and create a new MySQL user and database for Matomo:
mysql -u root -p mysql> CREATE DATABASE matomo; mysql> GRANT ALL PRIVILEGES ON matomo.* TO 'matomo_user'@'localhost' IDENTIFIED BY '<span style="color: #ff0000;">PASSWORD</span>'; mysql> FLUSH PRIVILEGES; mysql> exit;
Don’t forget to replace ‘PASSWORD‘ with an actual strong password.
Step 6. Download Matomo
Go Matomo’s official website and download the latest stable release of the application. At the moment of writing this tutorial, it is version 3.8.0.
wget https://builds.matomo.org/matomo-latest.zip
Unpack the downloaded ZIP archive of the application to the document root directory of your server. This will create a “piwik” folder containing the files and directories.
unzip matomo-latest.zip -d /var/www/html
Set the correct ownership. All Matomo files and directories have to be readable by the web server user.
chown -R www-data:www-data /var/www/html/matomo/
Step 7. Create an Apache Virtual host
If you want to access Matomo with a domain or subdomain, you have to create Apache virtual host directive for the appropriate domain / subdomain. Create a new file in Apache’s ‘sites-available’ directory with the following content
nano /etc/apache2/sites-available/matomo.conf
<span style="font-family: 'Helvetica Neue', Helvetica, Arial, sans-serif; font-size: 14px; background-color: #ffffff;"><VirtualHost *:80></span>
ServerName <span style="color: #ff0000;">yourdomain.com</span>
ServerAlias www.<span style="color: #ff0000;">yourdomain.com</span>
ServerAdmin admin@<span style="color: #ff0000;">yourdomain.com</span>
DocumentRoot /var/www/html/matomo/
<Directory /var/www/html/matomo/>
Options FollowSymLinks
AllowOverride All
Order allow,deny
allow from all
</Directory>
ErrorLog /var/log/apache2/<span style="color: #ff0000;">yourdomain.com</span>-error_log
CustomLog /var/log/apache2/<span style="color: #ff0000;">yourdomain.com</span>-access_log common
</VirtualHost>
Save the changes and enable the Apache virtual host using the following command
a2ensite matomo.conf
output:
Enabling site matomo.
To activate the new configuration, you need to run:
  systemctl reload apache2
As suggested in the output above, reload the web server for the changes to take effect:
systemctl reload apache2
Step 8. Complete the Installation
To complete Matomo’s installation, open your favorite web browser and navigate it to http://yourdomain.com. If everything is properly installed and configured, you will get Matomo’s welcome screen as shown in the image below:
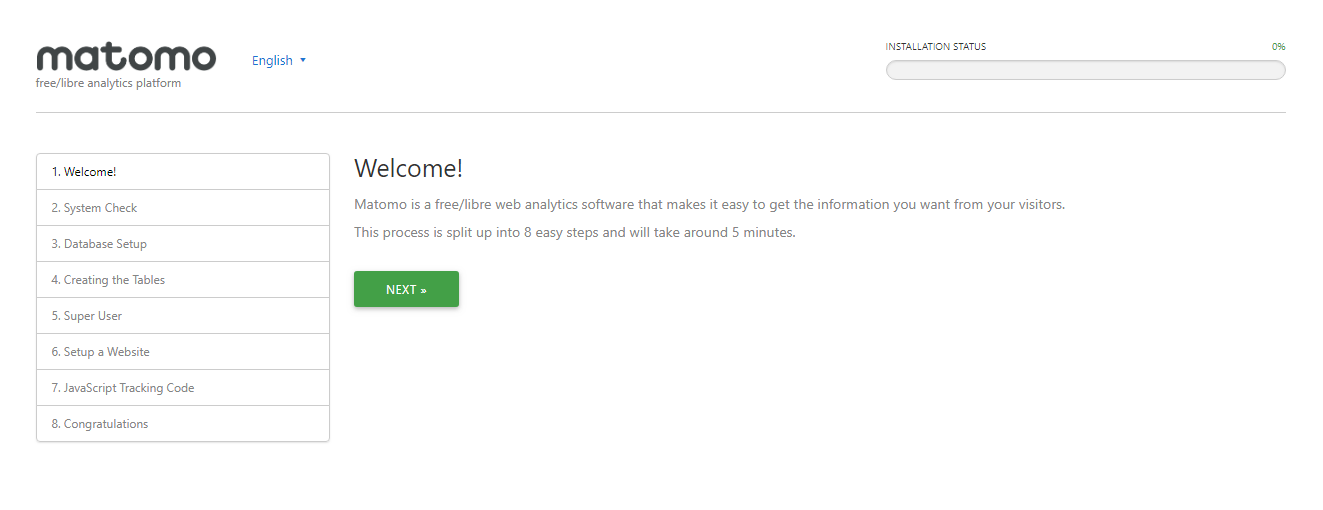
From there, you can follow the installation wizard and enter the MySQL information, create tables in the MySQL database, create your administrative account, and enter the details about your website.
For more details on how to configure and use Matomo, please check their official documentation.
![]() Of course, you don’t have to install and configure Matomo on Ubuntu 18.04, if you use one of our Managed Cloud VPS Hosting solutions, in which case you can simply ask our expert Linux admins to install and configure Matomo on Ubuntu 16.04 for you. They are available 24×7 and will take care of your request immediately.
Of course, you don’t have to install and configure Matomo on Ubuntu 18.04, if you use one of our Managed Cloud VPS Hosting solutions, in which case you can simply ask our expert Linux admins to install and configure Matomo on Ubuntu 16.04 for you. They are available 24×7 and will take care of your request immediately.
PS. If you liked this post on How to Install Matomo on Ubuntu 18.04, please share it with your friends on the social networks using the share shortcuts, or simply leave a comment down below. Thanks.