ownCloud is an open source file sharing server that lets you store and access all your data (files, contacts, etc.) across all of your devices and share your files with others as well.
In this tutorial, we will show you how to install ownCloud 10 on your Linux Cloud VPS.
ownCloud Requirements
Before we start with the installation a few requirements must be met:
- Full SSH access to your server as you will need to connect to your server via SSH.
- A CentOS 7 Cloud VPS. Get one from us and we’ll install ownCloud with all the requirements for you.
- LAMP stack consisting of Linux, Apache web server, MySQL or MariaDB (version 5.5+) and PHP (version 5.6+ or 7.0+). Using Nginx instead of Apache will also do the work and you can check our tutorial about how to set up Nginx for OwnCloud if you prefer it.
It is also recommended to secure your ownCloud with an SSL certificate.
ownCloud Installation
Now let’s move on to installing ownCloud.
Download the latest version of ownCloud 10 at http://download.owncloud.org/ and extract it on your server.
cd /opt
wget https://download.owncloud.org/community/owncloud-10.0.2.zip
unzip owncloud-10.0.2.zip
Then move the extracted ownCloud files to your Apache document root directory
mv owncloud /var/www/html
and change the ownership of the owncloud files to the Apache webserver user, with the following command:
chown -R apache:apache /var/www/html/owncloud/
We also need to create a new database for ownCloud on our server. You can do that with the following commands:
mysql -u root -p
CREATE DATABASE owncloud_db;
GRANT ALL PRIVILEGES ON owncloud_db.* TO 'owncloud_user'@'localhost' IDENTIFIED BY 'your-password' WITH GRANT OPTION;
FLUSH PRIVILEGES;
quit
Make sure you change “your-password” with an actual strong password. You can also generate one from the command line.
Once this is completed you can now open your browser and navigate to “http://your_domain_or_IP_address/owncloud” and continue the installation there.
We will be presented with the following page, asking us to create an admin account.
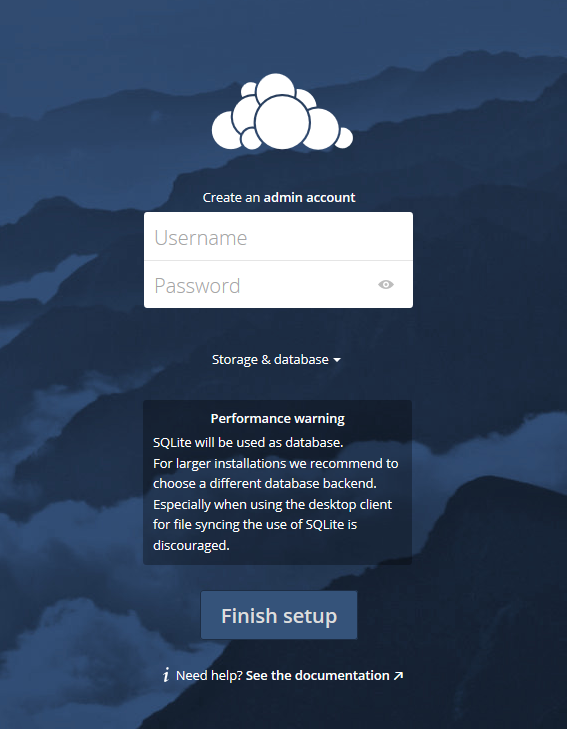
First, enter a username and password for your admin account. Your ownCloud account username and password should not be the same as your database username and password.
Then click on the “Storage & database” drop down menu.
Leave the “Data folder” field information as it is.
Click the “MySql/MariaDB” button and then enter the information of the database we have created earlier (user, password, name)
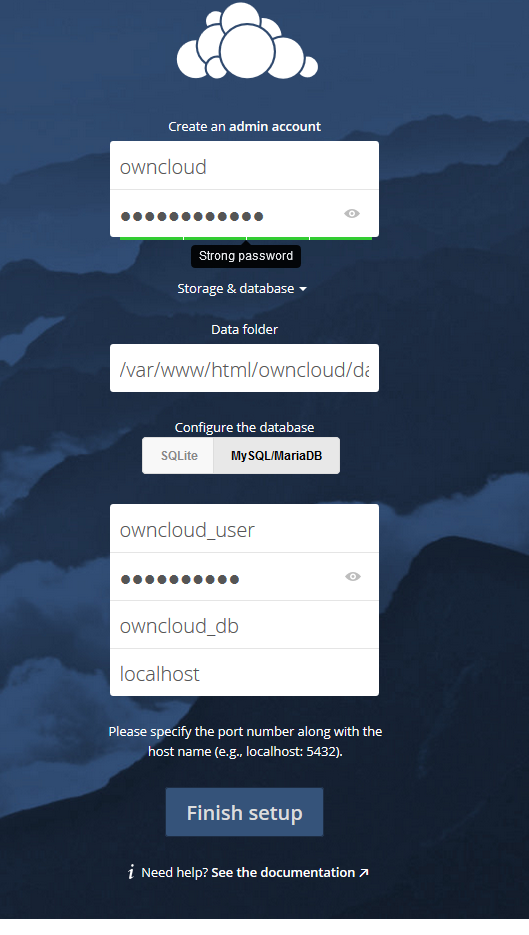
Click on “Finish setup” and with this, your admin account has been created.
You can log in with your account and you’ll be welcomed by the ownCloud home page where you can start uploading your files. And that’s all. You’ve successfully installed ownCloud on your CentOS server.
Of course you don’t have to do any of this if you use one of our Linux Cloud VPS Hosting services, in which case you can simply ask our expert Linux admins to install and configure ownCloud for you. They are available 24×7 and will take care of your request immediately.
PS. If you liked this post please share it with your friends on the social networks using the buttons on the left or simply leave a reply below. Thanks.