This blog post will explain what WordPress Multisite is, its advantages and disadvantages, and most importantly how to set up WordPress Multisite on Debian 13. WordPress Multisite lets you manage multiple websites from a single dashboard without the need for separate WordPress installations. Users can run as many sites as long as there are enough resources on the Linux server where the WordPress installation is hosted. It may sound complicated at first but in the next paragraphs, we will explain in more detail everything about the WordPress multisite. Let’s get started!
What is WordPress Multisite?
WordPress Multisite is a feature offered by WordPress that allows adding multiple sites to existing or newly created WordPress installations. The WordPress Multisite Setup centralizes the creation of an entire network of websites from a single installation. The way of activating the WordPress multisite is very simple adding a few lines of code in the WordPress configuration file and configuring some settings in the WordPress dashboard which will be explained later in this tutorial.
Advantages of WordPress Multisite
These are the advantages of using the WordPress Multisite:
Centralized User Management: WordPress users across all websites are managed from a single dashboard with privileges to multiple sites without creating them separately.
Plugin and Theme Control: Multisite gives control over the plugins and themes on each website.
Rational Maintenance: All sites share the same core files, plugins, and themes, so they only need to be updated once for the entire network. This will save the maintenance time for the WordPress multisite.
Admin Assignement: WordPress multisite allows delegating admins to different sites, which makes it easier for shared tasks.
Disadvantages of WordPress Multisite
These are the possible disadvantages of using WordPress Multisite:
Limitations with Plugins and Themes: Some plugins and themes do not work with WordPress Multisite, so the options for using them may be limited.
Database Backups: All websites share the same database, and when backups are made they are made for all content, not on a site basis.
Risk of Network Outage: If the network goes down, all websites configured in WordPress multisite are inaccessible.
Traffic Spike: If the traffic on the network increases and if one website gets a spike in traffic, it will slow down all websites.
Prerequisites for WordPress Multisite
You need the following prerequisites for configuring WordPress Multisite:
A server running Debian 13 OS
User privileges: root or non-root user with sudo privileges
WordPress Installation
In this tutorial we will also cover the WordPress installation. Let’s proceed to the next step.
Install WordPress
To install WordPress first we need to install the LAMP stack, necessary for one WordPress installation to work effeciently. Under the LAMP stack we will install Apache Web server, PHP with its extensions, and MySQL(MariaDB) database server. Then we will download and install WordPress, and after that will finish the WordPress installation so we can login to the WordPress dashboard for further configuration of WordPress Multisite.
To install Apache Web server execute the following commands one by one:
sudo apt install apache2 -y

sudo systemctl start apache2 && sudo systemctl enable apache2

sudo systemctl status apache2
If everyting is OK with the installation the status should look like this:
root@host:~# systemctl status apache2
● apache2.service - The Apache HTTP Server
     Loaded: loaded (/usr/lib/systemd/system/apache2.service; enabled; preset: enabled)
     Active: active (running) since Wed 2025-05-07 04:17:53 CDT; 2s ago
 Invocation: 4d3b753ba4074b5e80c336da062559b6
       Docs: https://httpd.apache.org/docs/2.4/
    Process: 6818 ExecStart=/usr/sbin/apachectl start (code=exited, status=0/SUCCESS)
   Main PID: 6821 (apache2)
      Tasks: 6 (limit: 4644)
     Memory: 12.6M (peak: 13M)
        CPU: 211ms
     CGroup: /system.slice/apache2.service
To install PHP with its extensions execute the command below:
sudo apt install php8.4 libapache2-mod-php8.4 php8.4-fpm php8.4-mysql php8.4-xml php8.4-mbstring php8.4-curl -y
And the last of the LAMP stack will be the MariaDB database service. Execute the following commands one by one in your terminal:
sudo apt install mariadb-server -y

sudo systemctl start mariadb && sudo systemctl enable mariadb

sudo systemctl status mariadb
If everything is OK with the installation the status of MariaDB should look like this:
root@host:~# sudo systemctl status mariadb
● mariadb.service - MariaDB 11.8.1 database server
     Loaded: loaded (/usr/lib/systemd/system/mariadb.service; enabled; preset: enabled)
     Active: active (running) since Wed 2025-05-07 04:25:28 CDT; 10s ago
 Invocation: fe03edf739de46bd80e1ad515333df0d
       Docs: man:mariadbd(8)
             https://mariadb.com/kb/en/library/systemd/
   Main PID: 12150 (mariadbd)
     Status: "Taking your SQL requests now..."
      Tasks: 15 (limit: 30651)
     Memory: 296.7M (peak: 386.8M)
        CPU: 15.358s
     CGroup: /system.slice/mariadb.service
             └─12150 /usr/sbin/mariadbd
Now, let’s create a Database for WordPress and Database user. Login to the MariaDB terminal with the mysql command via SSH and execute the following lines of code one by one:
CREATE USER 'wpuser'@'localhost' IDENTIFIED BY 'StrongPasswordHere';

CREATE DATABASE wpdatabase;

GRANT ALL PRIVILEGES ON wpdatabase.* TO 'wpuser'@'localhost';

FLUSH PRIVILEGES;

EXIT;
Next we need to download and extract the WordPress files:
cd /var/www/html

wget https://wordpress.org/latest.zip

unzip latest.zip

rm latest.zip
Set the right permissions to files and folders.
chown -R www-data:www-data wordpress/

find . -type d -exec chmod 755 {} \;

find . -type f -exec chmod 644 {} \;
Open the WordPress wp-config.php file and configure the database and user credentials we set above. To do that first rename the wp-config-sample.php
cd /var/www/html/wordpress

mv wp-config-sample.php wp-config.php
The open the wp-config.php file with your favorite editor and edit these lines of code to look like this:
// * Database settings - You can get this info from your web host * //
/** The name of the database for WordPress */
define( 'DB_NAME', 'wpdatabase' );

/** Database username */
define( 'DB_USER', 'wpuser' );

/** Database password */
define( 'DB_PASSWORD', 'StrongPasswordHere' );
Next we need to create Apache configuration file:
sudo touch /etc/apache2/sites-available/wordpress.conf
Open the file and paste the following lines of code
<VirtualHost *:80>
ServerName yourdomain.com
DocumentRoot /var/www/html/wordpress

<Directory /var/www/html/wordpress>
AllowOverride All
</Directory>

ErrorLog ${APACHE_LOG_DIR}/error.log
CustomLog ${APACHE_LOG_DIR}/access.log combined

</VirtualHost>
Save the file and close it.
Enable the Apache configuration files for WordPress along with the rewrite module.
sudo a2enmod rewrite

sudo a2ensite wordpress.conf
Check the Apache2 syntax:
apachectl -t
You should receive the following output:
root@host:/var/www/html/wordpress# apachectl -t
Syntax OK
If the syntax is OK, restartd the Apache service.
systemctl restart apache2
Now you can access and finish the WordPress installation at http://yourdomain.com
To finish the WordPress installation just follow the pictures below. Finishing the installation is intuitive:


Configure WordPress Multisite
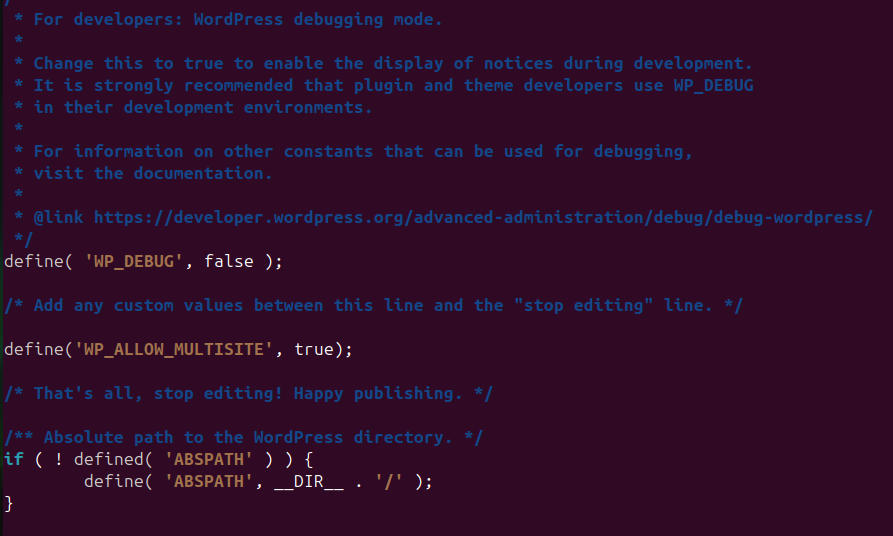
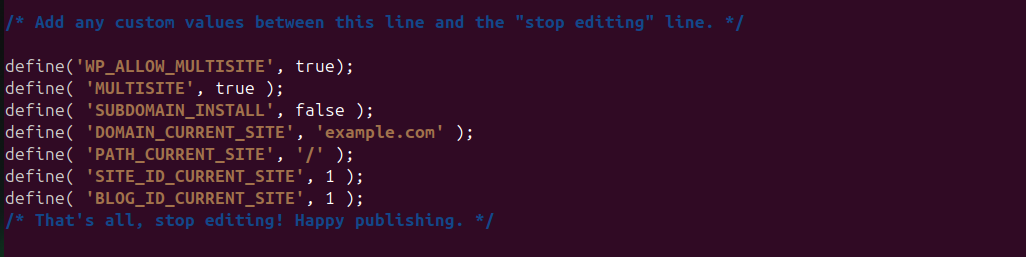
To configure WordPress Multisite we need to enable the WordPress multisite in the wp-config.php file by adding the following line of code:
define('WP_ALLOW_MULTISITE', true);
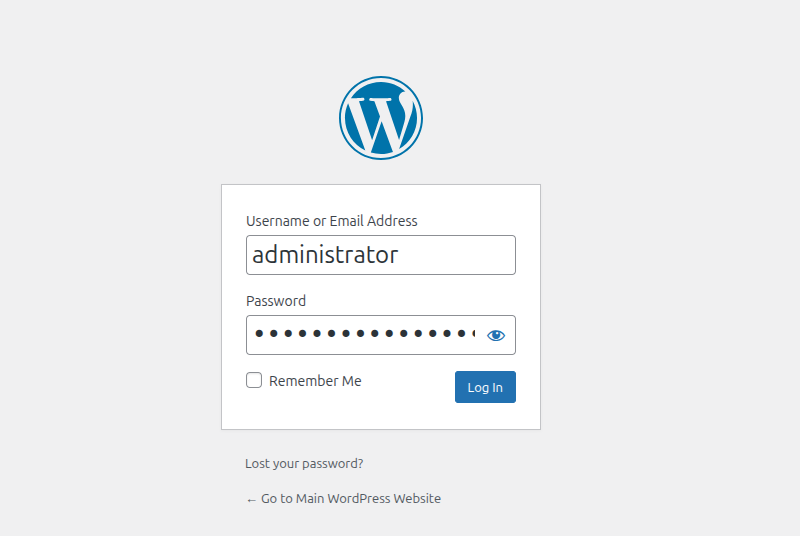
Then login to the WordPress dashboard:
To enable the multisite in WordPress on the left menu click on Tools —> Network Setup —> Install.
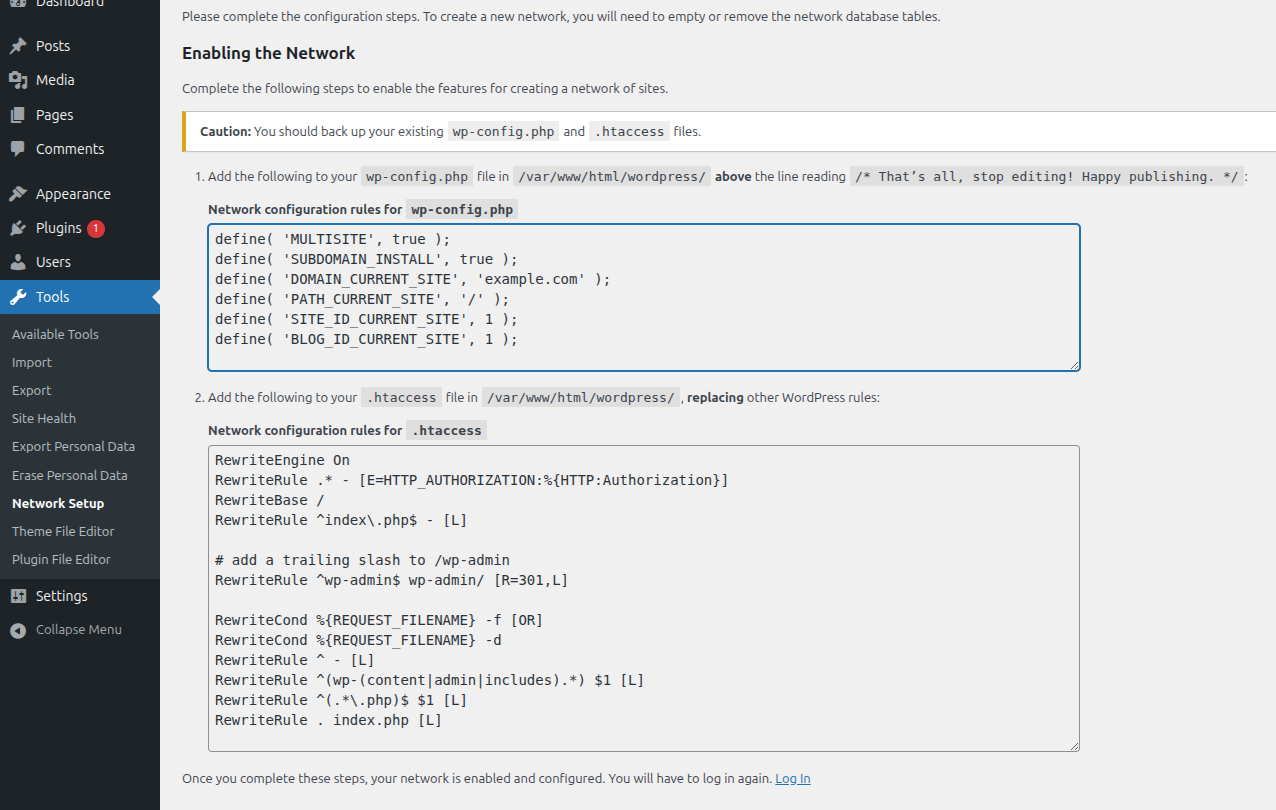
Open the wp-config.php file and paste these lines: (change the example.com with your configured domain).
define( 'MULTISITE', true );
define( 'SUBDOMAIN_INSTALL', false );
define( 'DOMAIN_CURRENT_SITE', 'example.com' );
define( 'PATH_CURRENT_SITE', '/' );
define( 'SITE_ID_CURRENT_SITE', 1 );
define( 'BLOG_ID_CURRENT_SITE', 1 );
Next is to replace all lines in the .htaccess with the following lines of code:
RewriteEngine On
RewriteRule .* - [E=HTTP_AUTHORIZATION:%{HTTP:Authorization}]
RewriteBase /
RewriteRule ^index\.php$ - [L]

# add a trailing slash to /wp-admin
RewriteRule ^([_0-9a-zA-Z-]+/)?wp-admin$ $1wp-admin/ [R=301,L]

RewriteCond %{REQUEST_FILENAME} -f [OR]
RewriteCond %{REQUEST_FILENAME} -d
RewriteRule ^ - [L]
RewriteRule ^([_0-9a-zA-Z-]+/)?(wp-(content|admin|includes).*) $2 [L]
RewriteRule ^([_0-9a-zA-Z-]+/)?(.*\.php)$ $2 [L]
RewriteRule . index.php [L]
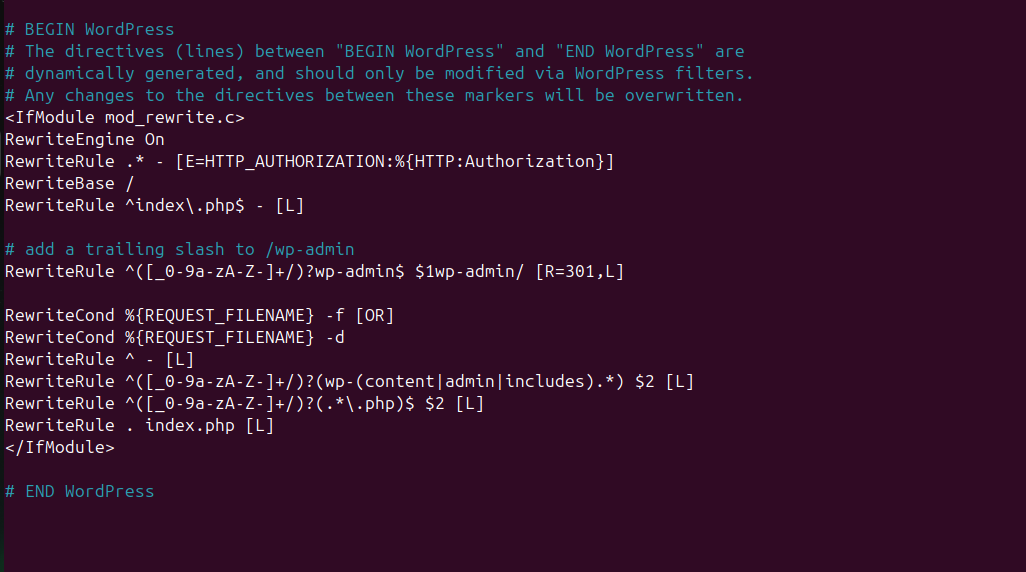
Save the file, close it, refresh the website, and log in again.
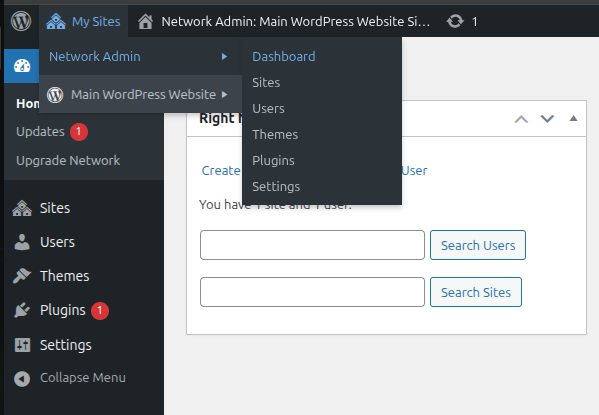
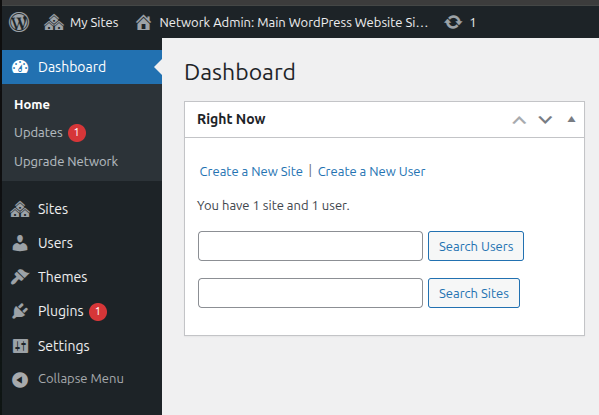
Now, navigate to My Sites —> Network Admin —> Click on Dashboard as on the screenshot below:
Next, click on the Create a new Site button:
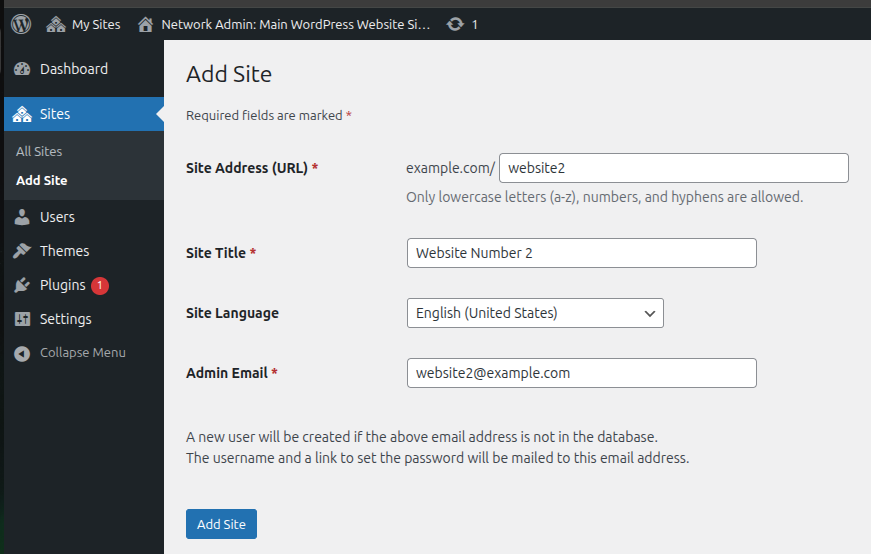
Fill in the info about your second website and click on the Add Site button.
That’s it. You successfully learned how to set up WordPress multisite on Debian 13 OS. This blog post covered multiple installations such as the LAMP stack, WordPress installation, and Multisite Configuration.
If you liked this post about setting up WordPress Multisite on Debian 13, please share it with your friends or leave a comment down below.