
ClickHouse is a fast and open-source column-oriented database management system developed by Yandex. It allows generating analytical data reports in real-time and is built to process analytical queries while including high-availability features that work across clusters. If you are looking for a powerful column-oriented database system with a high-availability system that can manage large volumes of data, you should consider using ClickHouse as your database system of choice. In this tutorial, we will show you how to install Clickhouse on Ubuntu 20.04.
Prerequisites
Ubuntu 20.04 VPS
SSH root access or a regular system user with sudo privileges
Step 1. Log in to the server
First, log in to your Ubuntu 20.04 server through SSH:
ssh root@IP_Address -p Port_number
You will need to replace ‘IP_Address‘ and ‘Port_number‘ with your server’s respective IP address and SSH port number. Additionally, replace ‘root’ with the username of the system user with sudo privileges.
You can check whether you have the proper Ubuntu version installed on your server with the following command:
$ lsb_release -a
You should get this output:
No LSB modules are available.<br>Distributor ID: Ubuntu<br>Description: Ubuntu 20.04.3 LTS<br>Release: 20.04<br>Codename: focal
Before starting, you have to make sure that all Ubuntu OS packages installed on the server are up to date. You can do this by running the following commands:
$ sudo apt update -y<br>$ sudo apt upgrade -y
The commands above will download the package lists for your Ubuntu 20.04 VPS. It will update the list of the newest versions of packages and their dependencies available on your system.
Step 2. Install Dependencies
The apt-transport package is required to proceed with Clickhouse installation, and it is not installed by default in Ubuntu 20.04. Let’s run the command below to install it and other required packages.
$ sudo apt install apt-transport-https dirmngr ca-certificates
Step 3. Add Clickhouse Repository
There are some methods to install ClickHouse on Ubuntu. We can install it from the repository, use docker image, compile it from the source, etc. In this article, we will show you how to install ClickHouse from the repository.
Run the following commands to add the key and its repository.
$ sudo apt-key adv --keyserver hkp://keyserver.ubuntu.com:80 --recv E0C56BD4
You will get an output like this if the key is successfully imported:
Executing: /tmp/apt-key-gpghome.353DRTy0G9/gpg.1.sh --keyserver hkp://keyserver.ubuntu.com:80 --recv E0C56BD4<br>gpg: key C8F1E19FE0C56BD4: public key "ClickHouse Repository Key <a href="mailto:[email protected]">[email protected]</a>" imported<br>gpg: Total number processed: 1<br>gpg: imported: 1
Then, add the ClickHouse repository
$ echo "deb https://repo.clickhouse.com/deb/stable/ main/" | sudo tee /etc/apt/sources.list.d/clickhouse.list
Do not forget to run an apt update after adding a repository.
$ sudo apt update
Step 4. Install ClickHouse
After adding the repository and running the apt update command to download the package list, simply run this command below to install the ClickHouse server and Clickhouse client.
$ sudo apt install clickhouse-server clickhouse-client -y
On Ubuntu 20.04, ClickHouse is configured to start running upon installation, you can check them by running this command:
$ sudo systemctl status clickhouse-server
Now, you can connect to clickhouse-server using clickhouse-client. Simply run the command below.
$ clickhouse-client
Invoke the command above then hit ENTER, you will be brought to clickhouse shell, like this:
ClickHouse client version 18.16.1.
Connecting to localhost:9000.
Connected to ClickHouse server version 18.16.1 revision 54412.

ubuntu20.rosehosting.com 🙂
You can run some queries, like these:
ClickHouse client version 18.16.1.
Connecting to localhost:9000.
Connected to ClickHouse server version 18.16.1 revision 54412.

ubuntu20.rosehosting.com 🙂 show databases

SHOW DATABASES

┌─name────┐
│ default │
│ system  │
└─────────┘

2 rows in set. Elapsed: 0.001 sec.

ubuntu20.rosehosting.com 🙂 use system

USE system

Ok.

0 rows in set. Elapsed: 0.001 sec.

ubuntu20.rosehosting.com 🙂 show tables

SHOW TABLES

┌─name───────────────────────────┐
│ aggregate_function_combinators │
│ asynchronous_metrics           │
│ build_options                  │
│ clusters                       │
│ collations                     │
│ columns                        │
│ contributors                   │
│ data_type_families             │
│ databases                      │
│ dictionaries                   │
│ events                         │
│ formats                        │
│ functions                      │
│ graphite_retentions            │
│ macros                         │
│ merge_tree_settings            │
│ merges                         │
│ metrics                        │
│ models                         │
│ mutations                      │
│ numbers                        │
│ numbers_mt                     │
│ one                            │
│ parts                          │
│ parts_columns                  │
│ processes                      │
│ replicas                       │
│ replication_queue              │
│ settings                       │
│ table_engines                  │
│ table_functions                │
│ tables                         │
└────────────────────────────────┘

32 rows in set. Elapsed: 0.002 sec.

ubuntu20.rosehosting.com 🙂
Step 5. Configure ClickHouse
5.1 – Change listening IP address
By default, the ClickHouse server listen only on localhost. If you want to access your ClickHouse server from another location, you can modify the configuration file. To change the listening IP address, we need to remove or uncomment the tagline of the “listen_host” string in the /etc/clickhouse-server/config.xml file.
$ sudo nano /etc/clickhouse-server/config.xml
In that file, find
<!-- <listen_host>0.0.0.0</listen_host> -->
and remove uncomment the tag line.
For example, change
<!-- <listen_host>0.0.0.0</listen_host> -->
to
<listen_host>0.0.0.0</listen_host>
This will make ClickHouse listen on all IPv4 available on that server.
Do not forget to restart ClickHouse server after making changes.
5.2 – Enable GUI
If you want to access the ClickHouse server using a web browser, you can enable Tabix by editing the same config.xml.
$ sudo nano /etc/clickhouse-server/config.xml
Find the string http_server_default_response, then uncomment the tag line.
Again, restart ClickHouse server for changes to take effect.
$ sudo systemctl restart clickhouse-server
That’s it. You should be able to access ClickHouse at http://YOUR_SERVER_IP_ADDRESS:8123/
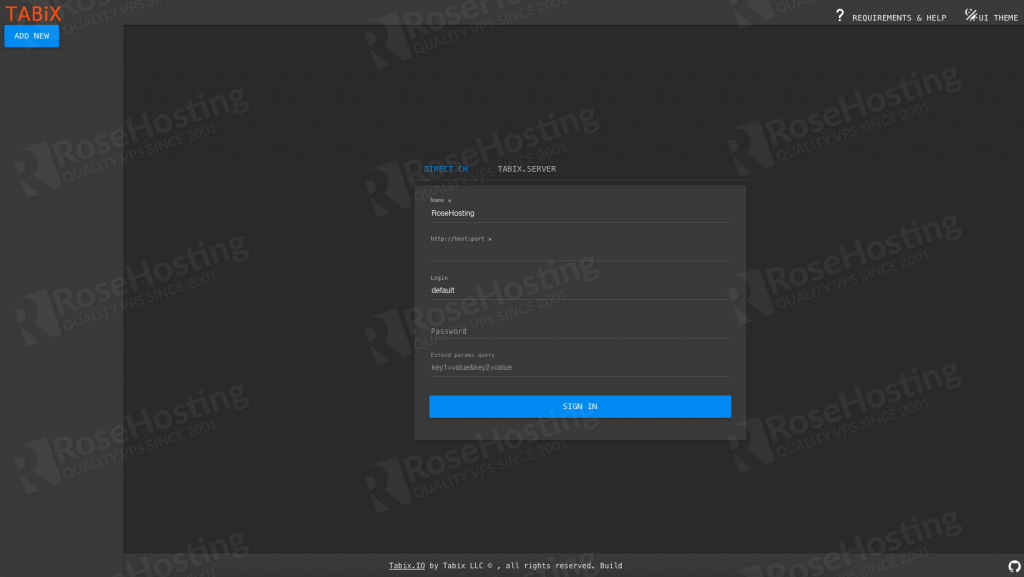
If during the installation you were not asked to create a clickhouse password, then you can use the following credential to access ClickHouse server:
Username: default<br>Password: [BLANK]
Yes, let the password field blank and you should be able to log in to the backend.

Congratulations! You have successfully installed ClickHouse on your Ubuntu VPS. For more information about ClickHouse, please refer to the ClickHouse website.
PS. If you liked this post on how to install ClickHouse On Ubuntu 20.04, please share it with your friends on the social networks using the buttons on the left or simply leave a reply below. Thanks.