In this tutorial, we will show you how to install DokuWiki on an Ubuntu 18.04 Cloud VPS with Apache and PHP.
 DokuWiki is a free and open source lightweight wiki software platform. What makes it different from other similar wiki applications is that DokuWiki works without the need for a database. Instead, it stores its data in PHP data-files, which makes it pretty fast and simpler to set up. The installation is pretty easy and it should take no longer than 10 minutes, so let’s get started.
DokuWiki has a lot of handy features that will ease our usage and enhance our user experience:
- Simple syntax which makes the datafiles as readable as possible
- You can easily embed raw HTML or PHP code
- Unlimited page revisions that can be compared with the diff tool
- Uploading and embedding of images and other media
- Easily configurable through different config options including the Configuration Manager
- Easy navigation through breadcrumbs
- Content can be categorized in namespaces that can be easily browsable through an automatic index
- Automatic save to avoid content lost during editing
- Simple support for read only pages
- Spam blacklist
- Delayed Indexing
and many more useful features…
Prerequisites
- Ubuntu 18.04 Server – for the purposes of this tutorial we will use our LC VPS-2 plan.
- System user with root privileges – all our VPS hosting plans come with full root access
- It supports almost all of the major web servers such as Apache, IIS, nginx and LiteSpeed web server
- PHP version 5.6 or newer – In this tutorial we will use PHP version 7.2
Step 1. Log in and Update the Server Packages
Login to your Ubuntu 18.04 server via SSH as user root
ssh root@IP_Address -p Port_number
where IP_Address and Port_number are your server’s actual IP address and SSH port number.
and run the following commands to ensure that all installed packages are updated to the latest available version.
apt update && apt upgrade
Step 2. Install Apache web server
As we already mentioned, DokuWiki can run on almost all of the popular web servers that support PHP, but in this tutorial we will install and use the Apache web server instead. It is available in the official Ubuntu repository and it can be easily installed using the following command:
apt install apache2 -y
Once the web server is installed, start it and enable it to automatically start upon a reboot
systemctl start apache2
systemctl enable apache2
To check if Apache is up and running use the following command
systemctl status apache2
Output:
apache2.service - The Apache HTTP Server
   Loaded: loaded (/lib/systemd/system/apache2.service; enabled; vendor preset: enabled)
  Drop-In: /lib/systemd/system/apache2.service.d
           ââapache2-systemd.conf
   Active: active (running)
 Main PID: 13784 (apache2)
    Tasks: 55 (limit: 2321)
   CGroup: /system.slice/apache2.service
           ââ13784 /usr/sbin/apache2 -k start
Enable Apache’s rewrite module:
a2enmod rewrite
Output:
Enabling module rewrite.
To activate the new configuration, you need to run:
  systemctl restart apache2
As suggested, restart Apache to activate the new configuration
systemctl restart apache2
Step 3. Install PHP
DokuWiki is PHP based application, so the next step will be to install PHP on the server. We will install PHP version 7.2 and several PHP modules required by DokuWiki.
apt install php7.2 php7.2-cli libapache2-mod-php7.2 php7.2-gd php7.2-curl php7.2-json php7.2-xml
Verify that PHP is properly installed
php -v
Output:
PHP 7.2.15-0ubuntu0.18.04.1 (cli) (built: Feb  8 2019 14:54:22) ( NTS )
Copyright (c) 1997-2018 The PHP Group
Zend Engine v3.2.0, Copyright (c) 1998-2018 Zend Technologies
    with Zend OPcache v7.2.15-0ubuntu0.18.04.1, Copyright (c) 1999-2018, by Zend Technologies
Step 4. Download DokuWiki
Go to DokuWiki’s download page and download the latest stable release of the wiki to your server. You may need to use a different download link, as it may stop working as DokuWiki updates their software.
wget https://download.dokuwiki.org/out/dokuwiki-8a269cc015a64b40e4c918699f1e1142.tgz
Unpack the downloaded tarball to the document root directory for your web server. Usually, it is the ‘/var/www/html‘ directory.
tar xvf dokuwiki-8a269cc015a64b40e4c918699f1e1142.tgz -C /var/www/html/
All of DokuWiki’s files will be stored in a new ‘dokuwiki’ directory inside the document root. This directory needs to be accessible by the web server user, so we have to set the proper ownership
chown -R www-data:www-data /var/www/html/dokuwiki/
The DokuWiki installation has its own distribution copy of the .htaccess file named .htaccess.dist. Rename this file
cd /var/www/html/dokuwiki && mv .htaccess.dist .htaccess
and run the following command to uncomment the ‘RewriteEngine on’ line in the .htaccess file
sed -i s/"# RewriteEngine on"/"RewriteEngine on"/g .htaccess
Step 5. Create an Apache Virtual Host
Next, we will create Apache virtual host, so you can access DokuWiki with a domain name or subdomain instead of an IP address. For example, we will use ‘mydomain.com‘. Please make sure to replace that domain name with your actual registered domain name.
Create a virtual host directive with the following content:
nano /etc/apache2/sites-available/dokuwiki.conf
VirtualHost *:80
    ServerName mydomain.com
    ServerAlias www.mydomain.com
    ServerAdmin [email protected]
    DocumentRoot /var/www/html/dokuwiki/
Directory /var/www/html/dokuwiki/
    Options FollowSymLinks
    AllowOverride All
    Order allow,deny
    allow from all
/Directory
    ErrorLog /var/log/apache2/mydomain.com-error_log
    CustomLog /var/log/apache2/mydomain.com-access_log common
/VirtualHost
Activate the virtual host by creating a symbolic link to Apache’s ‘sites-enabled’ directory
ln -s /etc/apache2/sites-available/dokuwiki.conf /etc/apache2/sites-enabled/
Check the Apache configuration files for errors:
apachectl configtest
Syntax OK
If the syntax is OK, restart the web server for the changes to take effect.
systemctl restart apache2
Step 6. Complete the Installation
Now, that we have everything installed and configured on our Ubuntu 18.04 server, we can proceed with DokuWiki’s web installation. To do that, open a web browser and navigate to http://mydomain.com/install.php . This installation script will help you with the initial DokuWiki configuration and it will check if all server requirements are met.
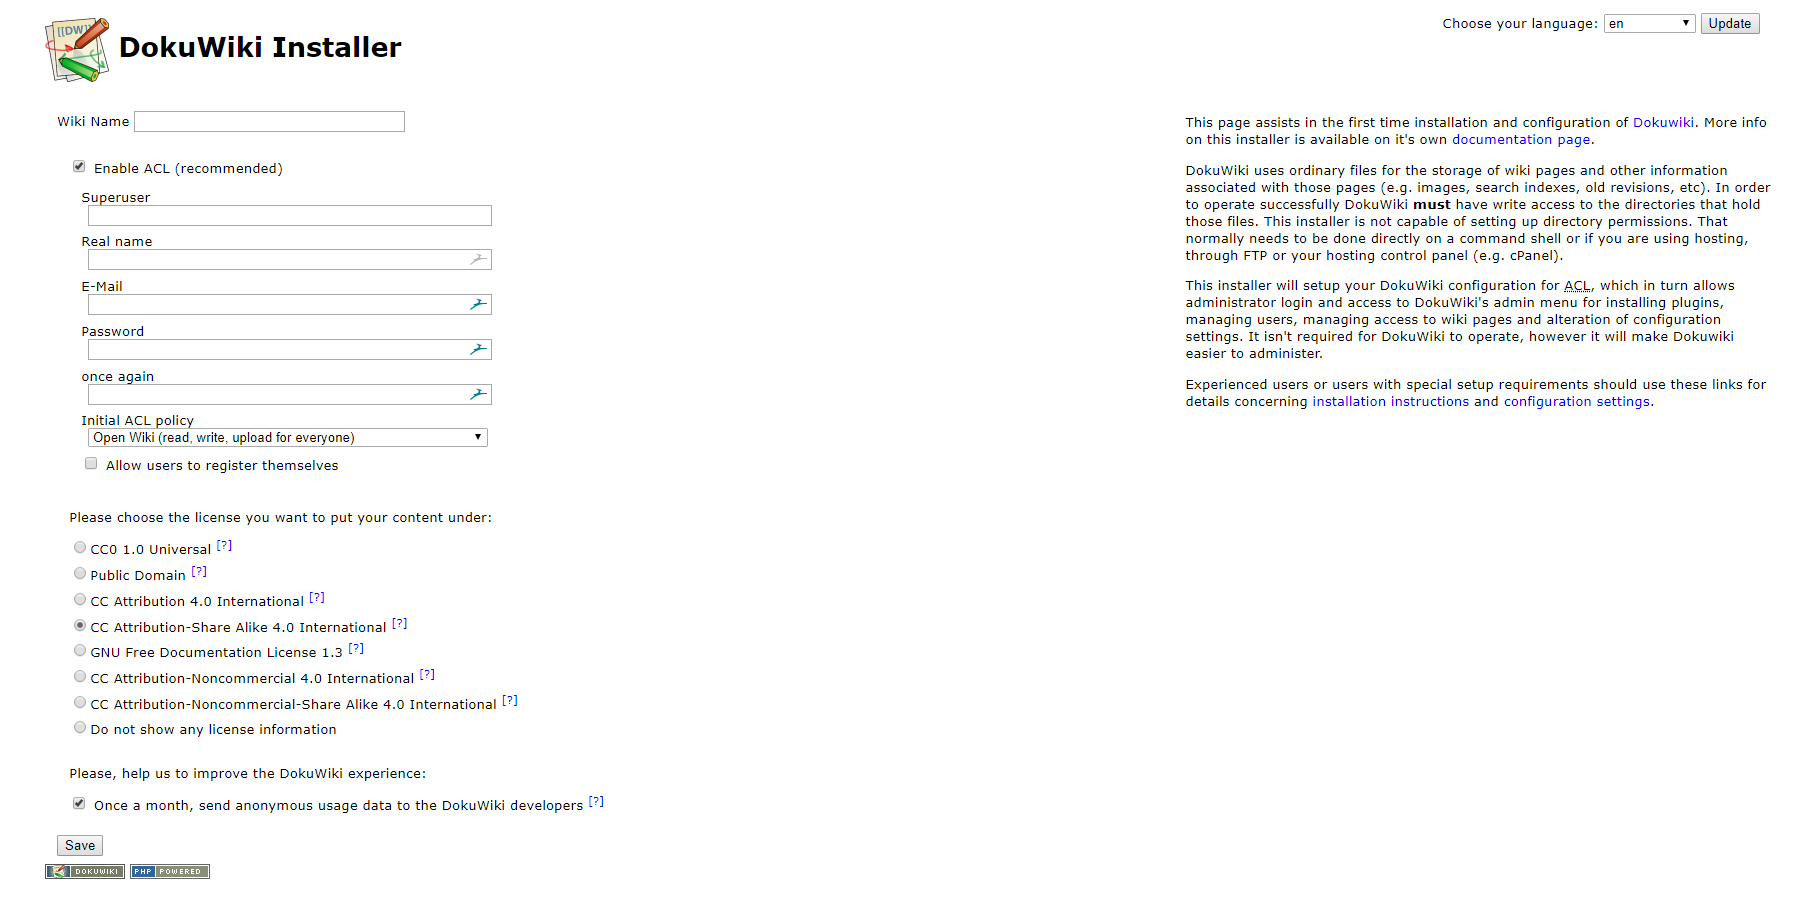
That’s it! You now have a functioning DokuWiki set up to use for whatever you need. For more information on how to configure and use DokuWiki you can check their official documentation.
 Of course, you don’t have to install DokuWiki on Ubuntu 18.04 if you use one of our Ubuntu Cloud VPS Hosting services, in which case you can simply ask our expert Linux admins to setup this for you. They are available 24×7 and will take care of your request immediately.
PS. If you liked this post on how to install DokuWiki on Ubuntu 18.04, please share it with your friends on the social networks using the buttons on the left or simply leave a reply below. Thanks.
Correct VirtualHost code:
ServerName mydomain.com
ServerAlias mydomain.com
ServerAdmin [email protected]
DocumentRoot /var/www/html/dokuwiki/
Options FollowSymLinks
AllowOverride All
Order allow,deny
allow from all
ErrorLog /var/log/apache2/mydomain.com-error_log
CustomLog /var/log/apache2/mydomain.com-access_log common
The VirtualHost configuration in the blog post works without any issues as well.
Hey There. I found your blog using msn. This is an extremely
well written article. I’ll make sure to bookmark it and return to read more of your useful information. Thanks for the post.
I’ll definitely return.