
In this tutorial, we are going to explain in step-by-step detail how to install Gitea on AlmaLinux 9 OS.
Gitea is an open-source software used for hosting software development version control using Git. It is written in “Go” language and is compatible with different operating systems such as Linux, Windows, MacOS and etc. Gitea is similar to GitHub and GitLab. The information can be stored in multiple databases such as MySQL, MariaDB, PostgreSQL, SQLite, and many more.
Installing Gitea on AlmaLinux is a straightforward process and may take up to 20 minutes. Let’s get started!
Prerequisites
- A server with AlmaLinux 9 as OS
- Valid domain pointed to the servers IP address
- User privileges: root or non-root user with sudo privileges
Step 1. Update the System
For Every fresh install of the OS, we need to update the system packages to their latest versions available:
sudo dnf update -y && sudo dnf upgrade -y
Step 2. Install MySQL
We mentioned that Gitea stores the data in different databases, and in this tutorial, we will install and use the MySQL database server. You can use any of the databases mentioned in the introduction paragraph above.
To install the MySQL database server execute the following command:
sudo dnf install mysql-server mysql -y
Start and enable the mysqld.service with the following commands:
sudo systemctl start mysqld && sudo systemctl enable mysqld
Check the status of the mysqld.service
sudo systemctl status mysqld
You should receive the following output:
[root@host ~]# sudo systemctl status mysqld
● mysqld.service - MySQL 8.0 database server
     Loaded: loaded (/usr/lib/systemd/system/mysqld.service; enabled; vendor preset: disabled)
     Active: active (running) since Fri 2023-04-21 15:49:32 CDT; 1s ago
   Main PID: 1974 (mysqld)
     Status: "Server is operational"
      Tasks: 39 (limit: 24796)
     Memory: 457.4M
        CPU: 9.001s
     CGroup: /system.slice/mysqld.service
             └─1974 /usr/libexec/mysqld --basedir=/usr

Apr 21 15:49:18 host.test.vps systemd[1]: Starting MySQL 8.0 database server...
Apr 21 15:49:19 host.test.vps mysql-prepare-db-dir[1892]: Initializing MySQL database
Apr 21 15:49:32 host.test.vps systemd[1]: Started MySQL 8.0 database server.
Step 3. Create a Gitea database and user
To create a Gitea database, and user login to the MySQL command prompt and execute the following commands:
CREATE DATABASE gitea;
CREATE USER 'gitea'@'localhost' IDENTIFIED BY 'strongpasswordhere';
GRANT ALL ON gitea.* TO 'gitea'@'localhost';
ALTER DATABASE gitea CHARACTER SET = utf8mb4 COLLATE utf8mb4_unicode_ci;
FLUSH PRIVILEGES;
exit;
Step 4. Install Gitea
First, create a Gitea system user with the following command:
adduser --system --shell /bin/bash --comment 'Git Version Control' --create-home --home /home/git git
Next is to download the Gitea with the following command:
wget -O /opt/gitea https://dl.gitea.io/gitea/1.19.1/gitea-1.19.1-linux-amd64
Once, Gitea is downloaded, move the Gitea binary file to “/usr/local/bin“
mv /opt/gitea /usr/local/bin
Make it executable:
chmod +x /usr/local/bin/gitea
Next is to set the right permissions to folders and files:
mkdir -p /var/lib/gitea/{data,custom,indexers,public,log}
chmod 750 /var/lib/gitea/{data,indexers,log}
chown git: /var/lib/gitea/{data,indexers,log}
mkdir /etc/gitea
chown root:git /etc/gitea
chmod 770 /etc/gitea
Once the permissions are set, create a Gitea service file:
touch /etc/systemd/system/gitea.service
Open the file, and paste the following lines of code:
[Unit]
Description=Gitea
After=syslog.target
After=network.target
After=mysql.service

[Service]
RestartSec=2s
Type=simple
User=git
Group=git
WorkingDirectory=/var/lib/gitea/
ExecStart=/usr/local/bin/gitea web -c /etc/gitea/app.ini
Restart=always
Environment=USER=git HOME=/home/git GITEA_WORK_DIR=/var/lib/gitea

[Install]
WantedBy=multi-user.target
Reload the daemon tools, and start and enable the gitea service:
sudo systemctl daemon-reload

sudo systemctl enable gitea && sudo systemctl start gitea
To check the status of the Gitea service, execute the following command:
sudo systemctl status gitea
You should receive the following output:
[root@host]# sudo systemctl status gitea
● gitea.service - Gitea
     Loaded: loaded (/etc/systemd/system/gitea.service; enabled; vendor preset: disabled)
     Active: active (running) since Fri 2023-04-21 16:38:19 CDT; 2min 39s ago
   Main PID: 2593 (gitea)
      Tasks: 8 (limit: 24796)
     Memory: 114.5M
        CPU: 1.027s
     CGroup: /system.slice/gitea.service
             └─2593 /usr/local/bin/gitea web -c /etc/gitea/app.in
Step 5. Finish Gitea Installation
To access Gitea in the browser, you need to know that the Gitea service is running on port 3000. The URL will be http://YourServerIPAddress:3000.
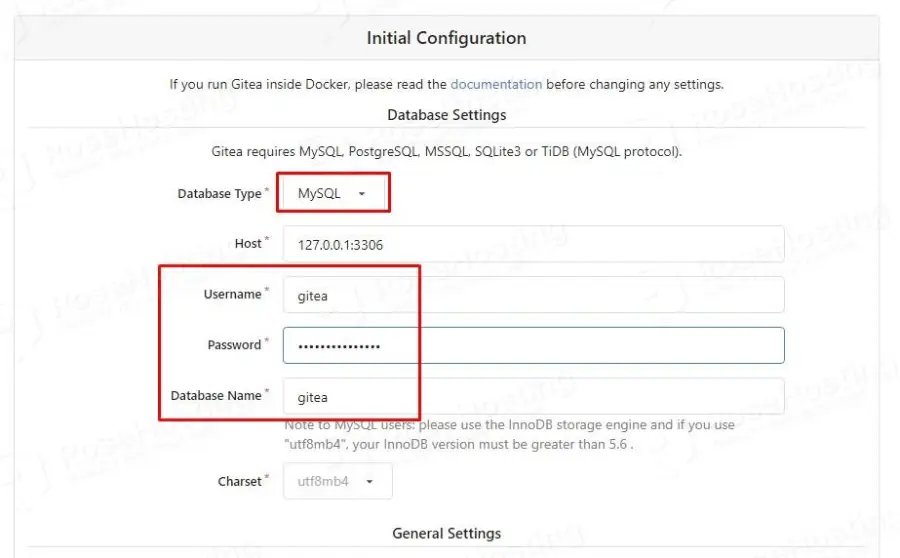
On the first window, enter the Gitea database, username, and password. Leave the other fields as they are and hit the Install button at the bottom of the page.
After this, the Gitea will be installed in the background, and when the process is finished, you should see the following login form.
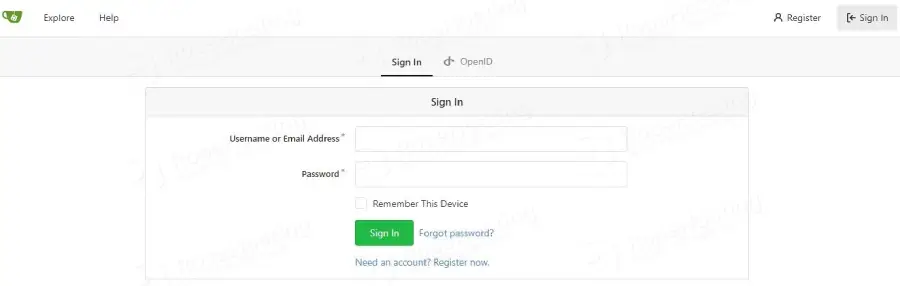
Since this is a fresh installation, there is no user yet. You will need to register the users.
By now, we hope you’ve learned how to smoothly install Gitea on AlmaLinux 9 from our post. Now, it’s your opportunity to share:
Did you find any of the steps confusing, or do you think we left something out? Is there any specific topic or how-to guide you’re keen to see us delve into next?
We look forward to hearing your thoughts, so please leave a comment below.