
In this tutorial, we will show you how to install Gitea on a CentOS 7 Cloud VPS.
 Gitea is an alternative to GitHub, GitLab, and BitBucket. Gitea is a self-hosted Git service forked from Gogs, making it lightweight and written entirely in Golang. Gitea additionally is released under the MIT license. If you find yourself needing a version control platform, but you’d prefer to use a self-hosted solution as opposed to GitHub, Gitea is an excellent choice to keep track of your projects and have a team collaborate on ideas in a completely self-hosted environment.
Prerequisites:
- For the purposes of this tutorial, we will be using a CentOS Cloud VPS.
- Full SSH root access or a user with sudo privileges is also required.
Step 1: Update your System to the Latest Version
Before we begin, we need to connect to your server via SSH as the root user or as any other user that has sudo privileges.
We start by logging in to our VPS using the SSH command.
# ssh root@IP_Address -p Port_number
Replace root with a user that has sudo privileges if necessary. Additionally, replace IP_Address and Port_Number with your server’s respective IP address and SSH port (the default SSH port is 22).
Once that is done, you can check whether you have the proper CentOS 7 version installed on your server with the following command:
# cat /etc/redhat-release
You should get this output:
CentOS Linux release 7.6.1810 (Core)
Then, run the following command to make sure that all installed packages on the server are updated to their latest available versions:
# yum update
# yum install wget git nano epel-release
Step 2: Add a ‘git’ system user
Create a new system user that will be used later by Gitea – we’ll be calling this user ‘git’, but you can name it anything you prefer:
# useradd git
We will also need to create some directories where certain parts of Gitea will store its data – let’s issue the following commands:
# mkdir -p /etc/gitea /var/lib/gitea/{custom,data,indexers,public,log}
# chown git:git /var/lib/gitea/{data,indexers,log}
# chmod 750 /var/lib/gitea/{data,indexers,log}
# chown root:git /etc/gitea
# chmod 770 /etc/gitea
Step 3: Install MariaDB Server
In order to be able to install Gitea, we need to install MySQL (or MariaDB, an open-source variant) onto our server.
# yum install mariadb-server
Once installed, let’s enable it on boot and start the service.
# systemctl enable mariadb
# systemctl start mariadb
At this point, MariaDB is running and we are now going to create a password for the MariaDB root user. Run the following command to create a root password, remove the test database, remove the anonymous user, before finally reloading the privileges.
# mysql_secure_installation
When prompted, answer the questions below by following the guide.
Enter current password for root (enter for none): Press the [Enter] key on your keyboard. No password is set by default
Set root password? [Y/n]: Y
New password: Enter a new password
Re-enter new password: Repeat the new password
Remove anonymous users? [Y/n]: Y
Disallow root login remotely? [Y/n]: Y
Remove test database and access to it? [Y/n]: Y
Reload privilege tables now? [Y/n]: Y
3.1 Create a New Database
We now need to create a database for Gitea to be able to store its data. We can create one using the following commands. Please note that you will be asked for the MariaDB root password that you created earlier in the previous step:
# mysql -u root -p
mysql> create database gitea;
Query OK, 1 row affected (0.00 sec)

mysql> grant all on gitea.* to gitea@localhost identified by 'm0d1fyth15';
Query OK, 0 rows affected, 1 warning (0.00 sec)

mysql> flush privileges;
Query OK, 0 rows affected (0.00 sec)

mysql> quit
Please change the password ‘m0d1fyth15‘ above to your desired one – make sure it’s a strong password.
Step 4: Download and Install Gitea
In this tutorial, we are going to install Gitea version 1.8.3, which was the latest version at the time of writing this tutorial. You will want to check their latest stable version at https://github.com/go-gitea/gitea/releases before downloading, just in case. Set the variable to the latest version:
# export GITEAVER=1.8.3
Download the specified version of Gitea:
# wget https://github.com/go-gitea/gitea/releases/download/v${GITEAVER}/gitea-${GITEAVER}-linux-amd64 -O /usr/local/bin/gitea
Change the file permissions so that it is executable:
# chmod +x /usr/local/bin/gitea
Then see what version of Gitea is installed:
[root@centos7 ~]# gitea -v
Gitea version 1.8.3 built with go1.12.5 : bindata, sqlite, sqlite_unlock_notify
Now, let’s create a systemd file for Gitea.
# nano /etc/systemd/system/gitea.service
Paste the following content to the file.
[Unit]
Description=Gitea
After=syslog.target
After=network.target
After=mariadb.service

[Service]
RestartSec=2s
Type=simple
User=git
Group=git
WorkingDirectory=/var/lib/gitea/
ExecStart=/usr/local/bin/gitea web -c /etc/gitea/app.ini
Restart=always
Environment=USER=git HOME=/home/git GITEA_WORK_DIR=/var/lib/gitea

[Install]
WantedBy=multi-user.target
Save then exit nano.
Every time we make changes to a systemd file, we need to run the following command so that the changes we made are saved:
# systemctl daemon-reload
It is time to run Gitea – issue this command to start the Gitea service:
# systemctl start gitea
To verify the status of it, we can run this command:
[root@centos7 ~]# systemctl status gitea
● gitea.service - Gitea
Loaded: loaded (/etc/systemd/system/gitea.service; disabled; vendor preset: disabled)
Active: active (running) since Mon 2019-07-22 04:53:33 CEST; 4s ago
Main PID: 10492 (gitea)
CGroup: /system.slice/gitea.service
└─10492 /usr/local/bin/gitea web -c /etc/gitea/app.ini

Jul 22 04:53:33 centos7.yourdomain.com gitea[10492]: 2019/07/22 04:53:33 [T] Log path: /var/lib/gitea/log
Jul 22 04:53:33 centos7.yourdomain.com gitea[10492]: 2019/07/22 04:53:33 [I] Gitea v1.8.3 built with go1.12.5 : bindata, sqlite, sqlite_unlock_notify
Jul 22 04:53:33 centos7.yourdomain.com gitea[10492]: 2019/07/22 04:53:33 [I] Log Mode: Console(Info)
Jul 22 04:53:33 centos7.yourdomain.com gitea[10492]: 2019/07/22 04:53:33 [I] XORM Log Mode: Console(Info)
Jul 22 04:53:33 centos7.yourdomain.com gitea[10492]: 2019/07/22 04:53:33 [I] Cache Service Enabled
Jul 22 04:53:33 centos7.yourdomain.com gitea[10492]: 2019/07/22 04:53:33 [I] Session Service Enabled
Jul 22 04:53:33 centos7.yourdomain.com gitea[10492]: 2019/07/22 04:53:33 [I] SQLite3 Supported
Jul 22 04:53:33 centos7.yourdomain.com gitea[10492]: 2019/07/22 04:53:33 [I] Run Mode: Development
Jul 22 04:53:34 centos7.yourdomain.com gitea[10492]: 2019/07/22 04:53:34 Serving [::]:3000 with pid 10492
Jul 22 04:53:34 centos7.yourdomain.com gitea[10492]: 2019/07/22 04:53:34 [I] Listen: http://0.0.0.0:3000
As we can see, Gitea is now running and listening on port 3000.
Step 5: Install and Configure Nginx
If you want to access your Gitea installation using a domain name or a subdomain name, we can configure a web server to act as a reverse proxy. This time, we will use Nginx, a popular and highly-customizable web server to serve as our reverse proxy.
# yum install nginx
Create a new Nginx configuration file:
# nano /etc/nginx/conf.d/gitea.conf
Paste the following into the file:
upstream gitea {
     server 127.0.0.1:3000
}

server {
     listen 80;
     server_name git.example.com;

     location / {
        proxy_pass http://gitea;
     }
}
Make sure to replace example.com with your unique and registered domain name.
Save the file and restart nginx
# systemctl restart nginx
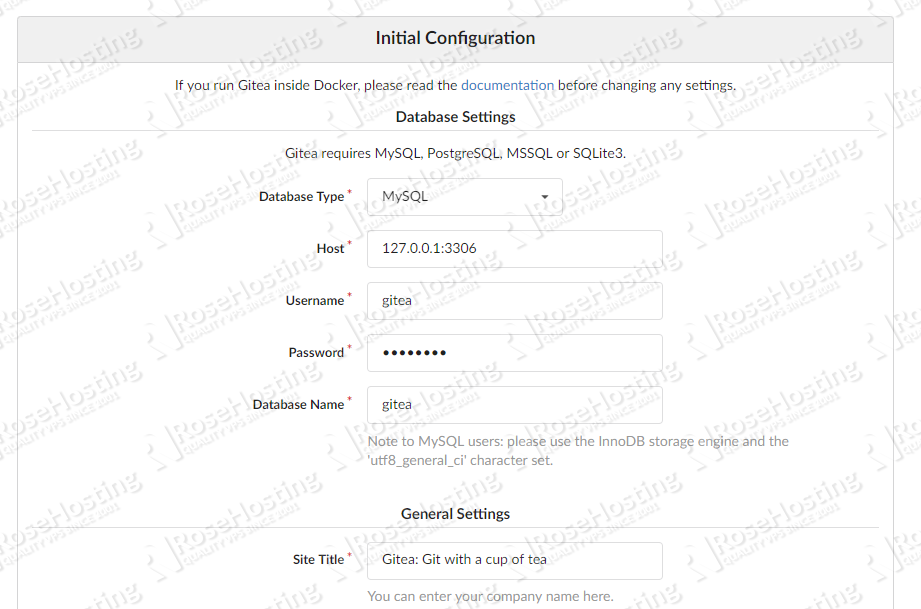
Now, let’s proceed to http://git.example.com/install
From there, we need to fill the database information that we created earlier in the previous step. We can also scroll down and configure additional settings. In this step, creating an administrator account is optional. The first registered user will automatically become an administrator.
Follow the installation instructions – once completed, you can access Gitea at http://git.yourdomain.com.
Step 6: Install an SSL Certificate (Optional)
In this step, we will show you how to install an SSL certificate from Let’s Encrypt.
# yum install certbot-nginx
Then invoke the Certbot program by running it:
# certbot
You will then be asked for your email address, after which you will need to agree with their ToS in order to proceed with the certificate installation.
If there is no issue when requesting the certificate, and you choose HTTP to HTTPS redirection, Certbot will automatically edit your /etc/nginx/conf.d/gitea.conf file so that it automatically redirects all requests to the SSL variant.
Lastly, do not forget to run the following command to create a cronjob for LetsEncrypt SSL certificate autorenewal.
# echo "0 0,12 * * * root python -c 'import random; import time; time.sleep(random.random() * 3600)' && certbot renew" | sudo tee -a /etc/crontab > /dev/null
That’s it! At this point, you can access your Gitea installation from https://gitea.example.com.
 Of course, you don’t have to install Gitea on CentOS 7 if you use one of our CentOS Cloud VPS Hosting services, in which case you can simply ask our expert Linux admins to install Gitea onto your CentOS 7 Cloud VPS for you. They are available 24×7 and will take care of your request immediately.
PS. If you liked this post on how to install Gitea on CentOS 7, please share it with your friends on the social networks using the share buttons, or simply leave a reply in the comments section. Thanks.
you didn’t include the /etc/gitea/app.ini, the service can’t fully start.
It was included, you can check step 4 to verify it.