
In this tutorial we will guide you through steps of installing Jetty 9 and all necessary components on an Ubuntu 16.04 Cloud VPS.
![]() Jetty is free and open source, Java HTTP (Web) server and Java Servlet container similar to Tomcat, GlassFish and WildFly. It provides support for SPDY, WebSocket, OSGi, JMX, JNDI, JAAS, and many other integrations. It is often used for machine to machine communications within larger software frameworks. Jetty is used in a wide variety of projects and products, both in development and production, such as Yahoo Hadoop Cluster, Google AppEngine, Yahoo, Zimbra, Eclipse, and many more. It can be easily embedded in devices, tools, frameworks, application servers, and clusters. Let’s get started with the installation.
Jetty is free and open source, Java HTTP (Web) server and Java Servlet container similar to Tomcat, GlassFish and WildFly. It provides support for SPDY, WebSocket, OSGi, JMX, JNDI, JAAS, and many other integrations. It is often used for machine to machine communications within larger software frameworks. Jetty is used in a wide variety of projects and products, both in development and production, such as Yahoo Hadoop Cluster, Google AppEngine, Yahoo, Zimbra, Eclipse, and many more. It can be easily embedded in devices, tools, frameworks, application servers, and clusters. Let’s get started with the installation.
Jetty has a lot of handy features such as:
- Full-featured and standards-based
- Open-source and commercially usable license
- Flexible and extensible
- Full featured with Small footprint
- Easily embeddable
- Asynchronous HTTP handling
- Enterprise scalable
- Dual licensed under Apache and Eclipse
and many more…
Prerequisites
- Ubuntu 16.04 server. We will use our LC VPS-2 plan.
- User with root privileges (or access to the root user itself)
- Java version 8
Step 1. Log in and Update the Server
First of all, login to your Ubuntu 16.04 server via SSH as user root
ssh root@<span style="color: #ff0000;">IP_Address</span> -p <span style="color: #ff0000;">Port_Number</span>
and run the following commands to make sure that all installed packages are updated to the latest available version:
apt update && apt upgrade
Step 2. Install Java 8
Java version 8 is available in the official Ubuntu 16.04 repository and it can be easily installed by using the apt package manager. We will install the default-jre (Java Runtime Environment) package which contains everything that is needed for running a compiled Java program. It contains Java Virtual Machine (JVM), core classes, and all supporting files. We can install it by running the following command
apt install default-jre
Once the installation of Java 8 and all necessary dependencies is completed. We can verify that it is properly installed using the following command
java -version
output:
openjdk version "1.8.0_191"
OpenJDK Runtime Environment (build 1.8.0_191-8u191-b12-0ubuntu0.16.04.1-b12)
OpenJDK 64-Bit Server VM (build 25.191-b12, mixed mode)
Step 3. Install Jetty 9
Go to their official website, and download the latest stable release of Jetty to your server. At the moment of writing this article it is version 9.4.14, but this is subject to change with time.
cd /opt
wget https://repo1.maven.org/maven2/org/eclipse/jetty/jetty-distribution/9.4.14.v20181114/jetty-distribution-9.4.14.v20181114.zip
Once the zip archive is downloaded, unpack it using the following command
unzip jetty-distribution-9.4.14.v20181114.zip
All files will be store in a new ‘jetty-distribution-9.4.14.v20181114’ directory. We will rename it so something simpler
mv jetty-distribution-9.4.14.v20181114/ jetty9
It is not recommended to run Jetty as the root user, so we will create a new system user instead:
useradd -m jetty9
After the user is created, set it as the owner of all Jetty files:
chown -R jetty9:jetty9 /opt/jetty9/
Create a configuration file for Jetty:
nano /etc/default/jetty9
Then add the following content to it:
JETTY_HOME=/opt/jetty9
JETTY_USER=jetty9
JETTY_PORT=8080
JETTY_HOST=<span style="color: #ff0000;">your_server_IP</span>
JETTY_LOGS=/opt/jetty9/logs/
Don’t forget to replace ‘your_server_IP‘ with the actual IP address of your server.
Jetty comes with demo (demo-base), which enables several demonstration webapps and server configurations. In order to activate the demo, remove the current ‘webapps’ directory
rm -rf webapps/
and copy the one from the ‘demo-base’ directory
cp -r demo-base/webapps/ /opt/jetty/
Finally, you can start Jetty using the script located in the ‘bin’ diretory
bin/jetty.sh  start

Starting Jetty: OK Thu Dec 20 06:37:16 CST 2018
In Conclusion
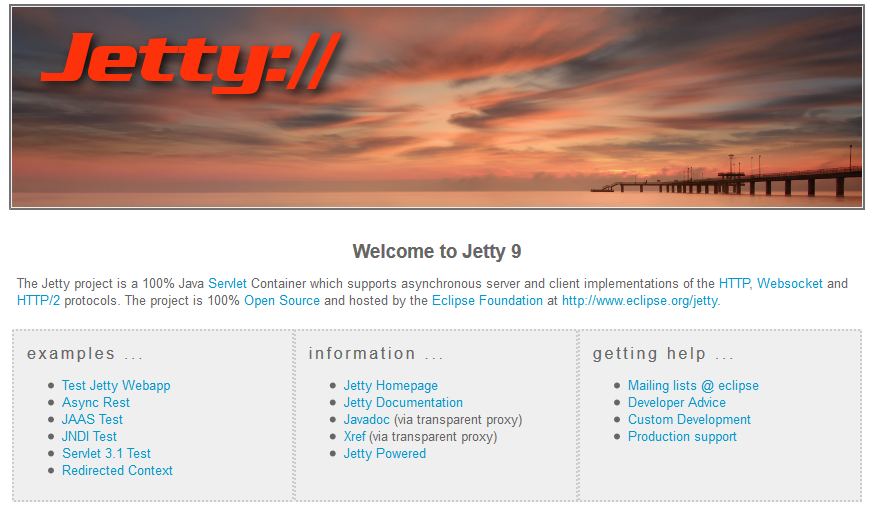
With this step the installation of Jetty 9 on your Ubuntu 16.04 is completed. To verify that Jetty is properly installed and running on your server, open your favorite web browser and navigate to http://IP_Address:8080. If everything is OK, you should get the following screen:
If you already have a WAR file of your Java application, you can easily deploy it by placing the WAR file in the ‘webapps’ directory and restarting Jetty using the following command:
/opt/jetty9/bin/jetty.sh restart
For more information on how to configure and use Jetty 9, please check their official documentation.
![]() You don’t need to Install Jetty 9 on Ubuntu 16.04 if you use one of our Managed Cloud VPS hosting plans, in which case you can simply ask our expert Linux admins to set up Jetty 9 on your Ubuntu 16.04 server for you. They are available 24×7 and will take care of your request immediately.
You don’t need to Install Jetty 9 on Ubuntu 16.04 if you use one of our Managed Cloud VPS hosting plans, in which case you can simply ask our expert Linux admins to set up Jetty 9 on your Ubuntu 16.04 server for you. They are available 24×7 and will take care of your request immediately.
PS. If you liked this post on how to Install Jetty 9 on Ubuntu 16.04, please share it with your friends on the social networks using the share shortcuts, or simply leave a reply below. Thanks.
This page is really very helpful for the beginners.
interesting post