
OpenEMR is a popular open-source software for the healthcare industry. It offers electronic health records and medical practice management solutions. OpenEMR provides a fully integrated Workflow Management inside healthcare facilities. Any healthcare facility would be able to capture and control patient data using the following features in OpenEMR.
- CMS Reporting
- Lab Integration
- Clinical Decision Rules
- Advanced Scheduling
- E-Prescribing
- Advanced Security
- Multilingual Support
OpenEMR runs on many platforms, including Linux machines. In this tutorial, we will show you how to install OpenEMR on Ubuntu 20.04 with LAMP Stack.
Prerequisites
- An Ubuntu 20.04 VPS
- root SSH access enabled or a regular user with sudo privileges
1. Update the System
Log in to your Ubuntu 20.04 VPS with SSH as root or as a regular user with sudo privileges
ssh SSH_User@IP_Address -p Port_number
Remember to replace “SSH_User” with a user that has sudo privileges, or root. Additionally, replace “IP_Address” and “Port_Number” with your server’s respective IP address and SSH port.
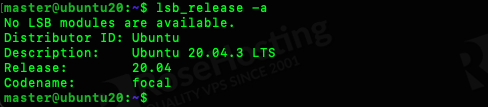
You can check whether you have the proper Ubuntu version installed on your server with the following command:
$ lsb_release -a
You should get this output:
No LSB modules are available.<br>Distributor ID: Ubuntu<br>Description: Ubuntu 20.04.3 LTS<br>Release: 20.04<br>Codename: focal
2. Install Apache
To install Apache on an Ubuntu server, we can run the following command:
$ sudo apt install apache2
Now, let’s first create the document root for OpenEMR. You can create a document root anywhere, just make sure you match it with the one in your virtual host configuration file.
$ sudo mkdir -p /var/www/html/yourdomain
After creating the document root, we will create an apache virtual host. Let’s assume that we are going to use yourdomain.com, please change it to your actual domain name.
$ sudo nano /etc/apache2/sites-available/yourdomain.com.conf
Insert these into the virtual host configuration file
<VirtualHost *:80>
ServerAdmin [email protected]
DocumentRoot "/var/www/html/yourdomain/"
ServerName yourdomain.com
ServerAlias www.yourdomain.com
ErrorLog ${APACHE_LOG_DIR}/yourdomain.com_error.log
CustomLog ${APACHE_LOG_DIR}/yourdomain.com_access.log combined

<Directory "/var/www/html/yourdomain/">
DirectoryIndex index.php index.html
Options FollowSymLinks
AllowOverride FileInfo
Require all granted
</Directory>

<Directory "/var/www/html/yourdomain/sites">
AllowOverride None
</Directory>

<Directory "/var/www/html/yourdomain/sites/*/documents">
Require all denied
</Directory>

</VirtualHost>
Save the file then exit. Now, since Apache mod_rewrite is disabled by default in Ubuntu, we need to enable it and restart apache to load the module.
$ sudo a2enmod mod_rewrite<br>$ sudo systemctl restart apache2
3. Install MariaDB
Next, we will install MariaDB server from the repository. To do this, simply run the following command:
$ sudo apt install mariadb-server
Once installed, we can proceed with creating a new database and its user for our Magento website.
$ sudo mysql
mysql> CREATE USER 'openemr'@'localhost' IDENTIFIED BY 'm0d1fyth15';<br>mysql> CREATE DATABASE openemr;<br>mysql> GRANT ALL PRIVILEGES ON openemr.* TO 'openemr'@'localhost';<br>mysql> FLUSH PRIVILEGES;<br>mysql> \q
4. Install PHP
The most recent OpenEMR requires at least PHP 7.3 to run. Ubuntu 20.04 comes with PHP 7.4 in its repositories as the default PHP version. It means that we do not need to specify the version when installing PHP 7.4.
$ sudo apt install php-{common,curl,gd,imagick,intl,json,mbstring,mysql,pear,xml,zip} libapache2-mod-php
Next, we need to modify the default PHP settings to meet OpenEMR requirements. Let’s run the commands below.
$ sudo sed -i 's/;max_input_vars = 1000/max_input_vars = 3000/g' /etc/php/7.4/apache2/php.ini
$ sudo sed -i 's/upload_max_filesize = 2M/upload_max_filesize = 64M/g' /etc/php/7.4/apache2/php.ini
$ sudo sed -i 's/post_max_size = 8M/post_max_size = 64M/g' /etc/php/7.4/apache2/php.ini
$ sudo sed -i 's/max_input_time = 60/max_input_time = -1/g' /etc/php/7.4/apache2/php.ini
$ sudo sed -i 's/max_execution_time = 30/max_execution_time = 90/g' /etc/php/7.4/apache2/php.ini
$ sudo sed -i 's/memory_limit = 128M/memory_limit = 256M/g' /etc/php/7.4/apache2/php.ini
$ sudo sed -i 's/;mysqli.allow_local_infile = On/mysqli.allow_local_infile = On/g' /etc/php/7.4/apache2/php.ini
For the changes to take effect, we need to restart apache.
$ sudo systemctl restart apache2
5. Install OpenEMR
Before proceeding to the installation, we need to go to the document root we created earlier then download OpenEMR file.
$ cd /var/www/html/yourdomain
Now, download the installation file. At the time of writing this blog post, the latest version of OpenEMR is 6.0.0. You can check the latest stable version at OpenEMR’s official website.
$ sudo wget https://sourceforge.net/projects/openemr/files/OpenEMR%20Current/6.0.0/openemr-6.0.0.tar.gz/download -O openemr-6.0.0.tar.gz
Let’s extract the downloaded file then change the permissions.
$ sudo tar -xzvf openemr-6.0.0.tar.gz --strip-components 1<br>$ sudo chown -R www-data. /var/www/html/yourdomain
Now, open your web browser and go to http://yourdomain.com to start installing OpenEMR.
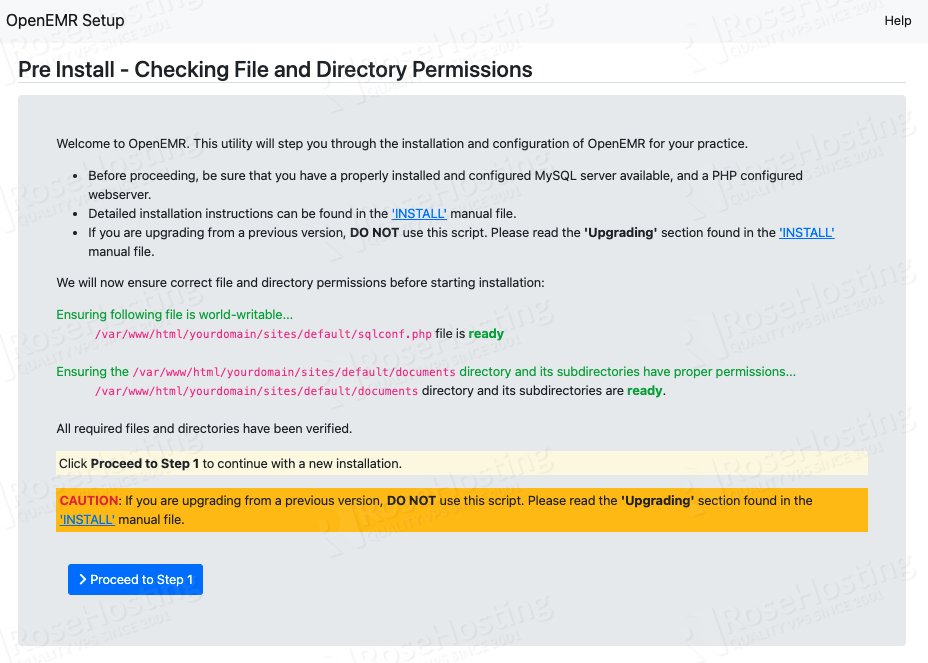
Click Proceed to Step 1 blue button to continue
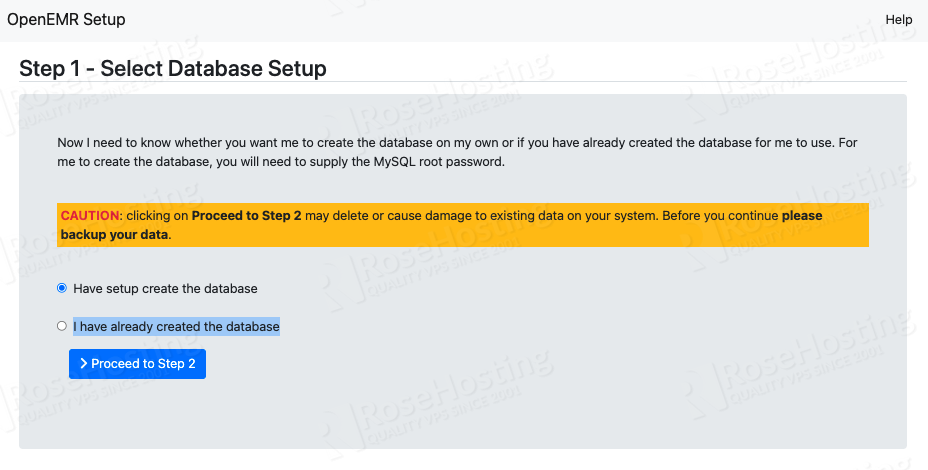
In this step, you will be asked to choose whether to create a new database or use the existing one. We created a database for OpenEMR after installing MariaDB in the previous step, so we will choose the second option “I have already created the database” then click on Proceed to Step 2 button.
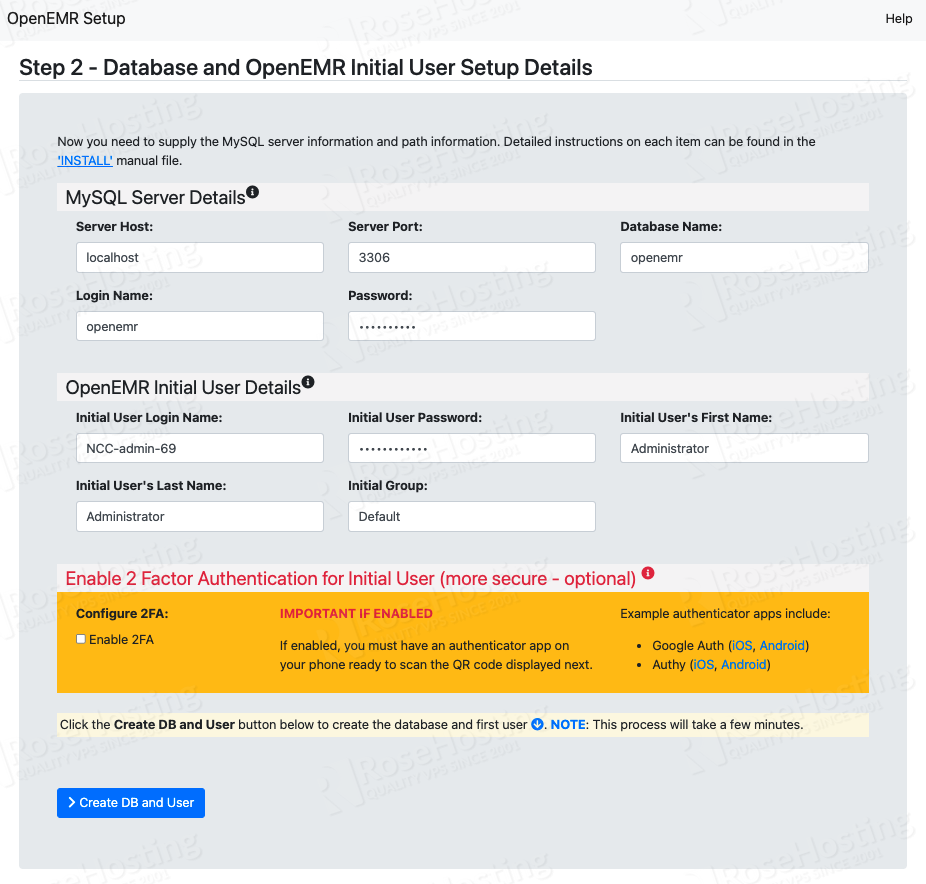
In Step 2 of the installation, you will be asked to fill in the database details you created earlier. You would also need to create an initial user login name and password. When making an initial user password, make sure it contains 12 characters or more.
Once filled, click on Create DB and User button to continue.
Once the database is imported, you will be brought to the next step. In this page, you will see the initial user name and password, please remember or create a note of it.
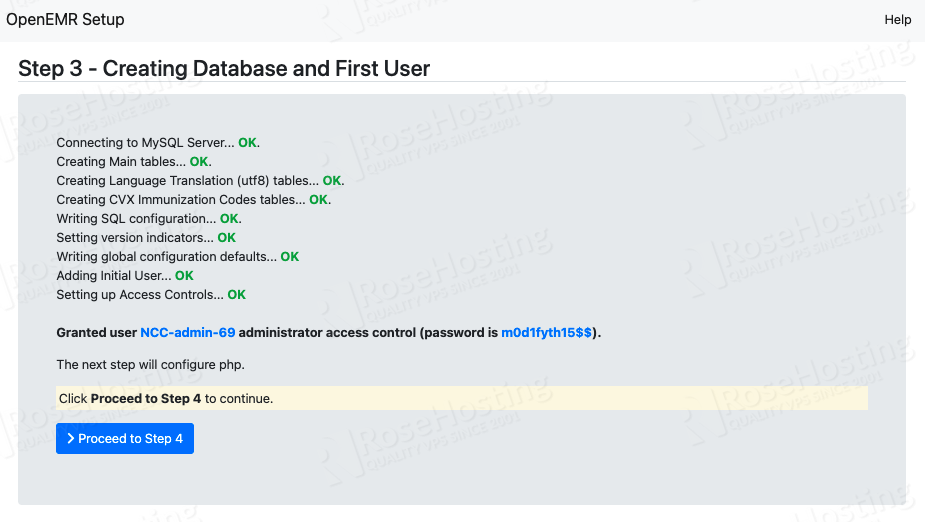
Click Proceed to Step 4 to continue
In this step, the OpenEMR installation script will check the PHP configuration. You will see that the PHP requirements are met, we modified the PHP settings after installing PHP.
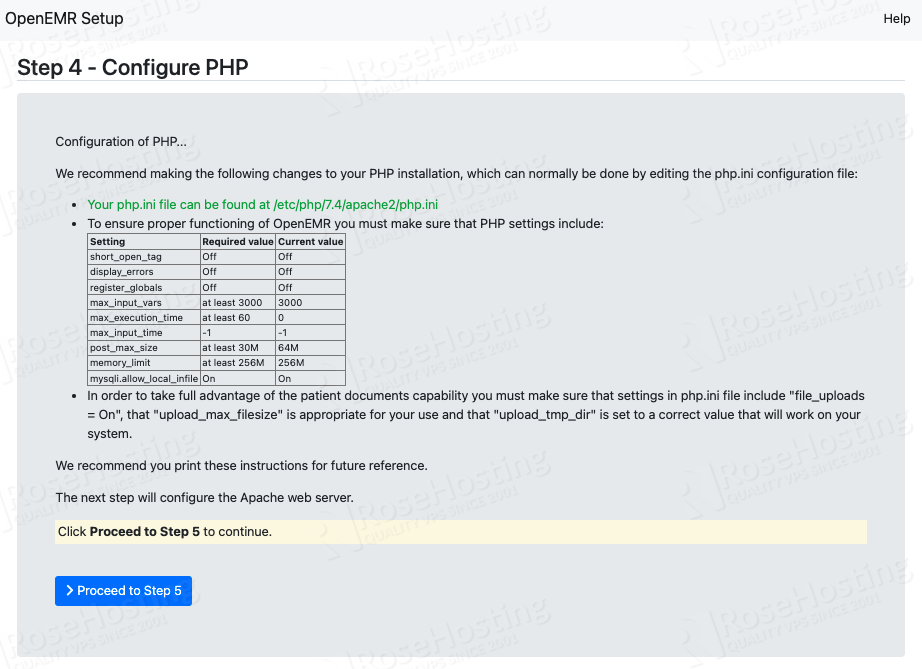
Now, let’s proceed to the next step
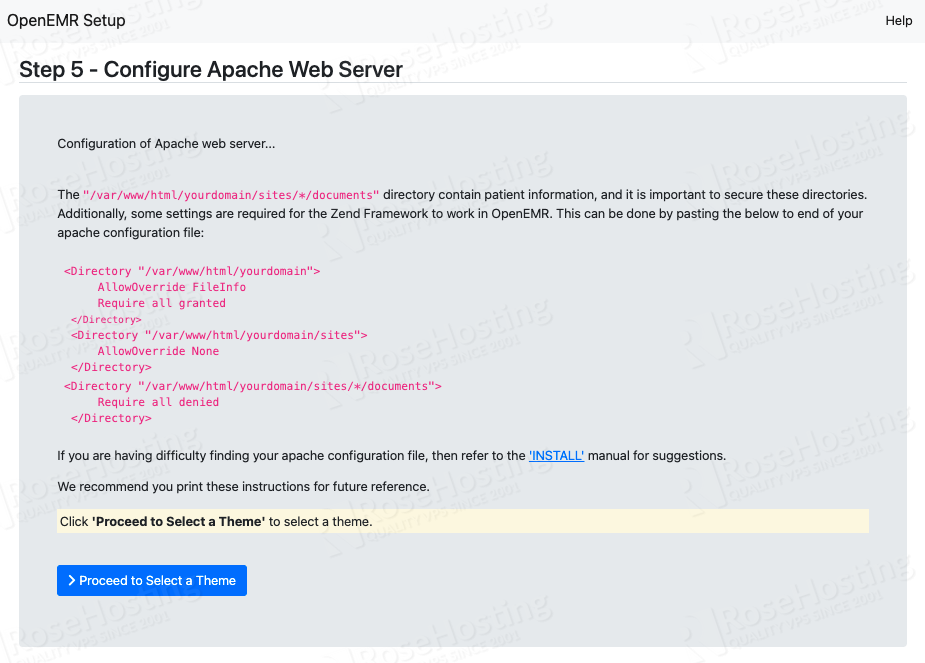
In Step 5, the installation script will check our Apache virtual host for OpenEMR website. Since we already configured it when creating the virtual host, we can click on the Proceed to Select a Theme button to continue.
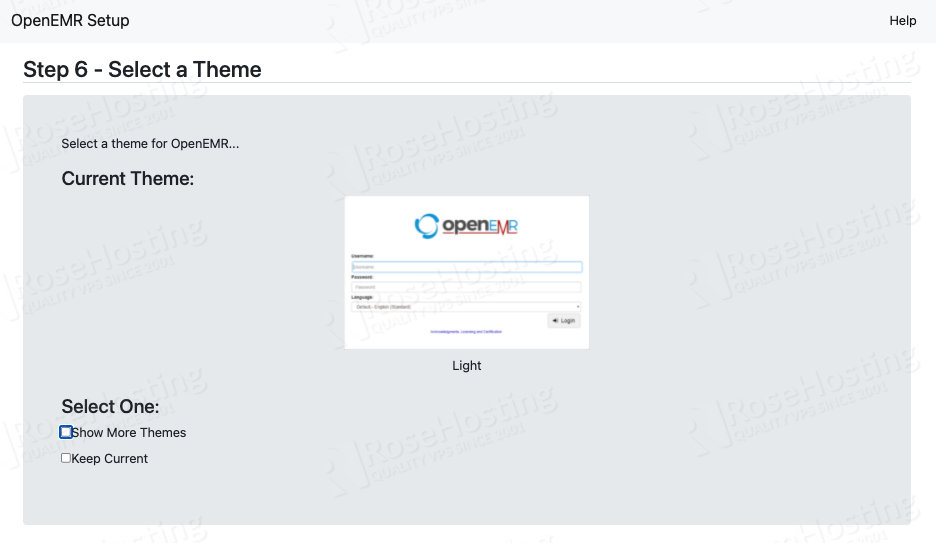
In the 6th step of OpenEMR installation, you can select a theme. By clicking on the ‘Show More Themes’ tickbox, it will show you more themes to select. Select a theme you like to proceed to the final step.
As seen in the image below, we have successfully installed OpenEMR.
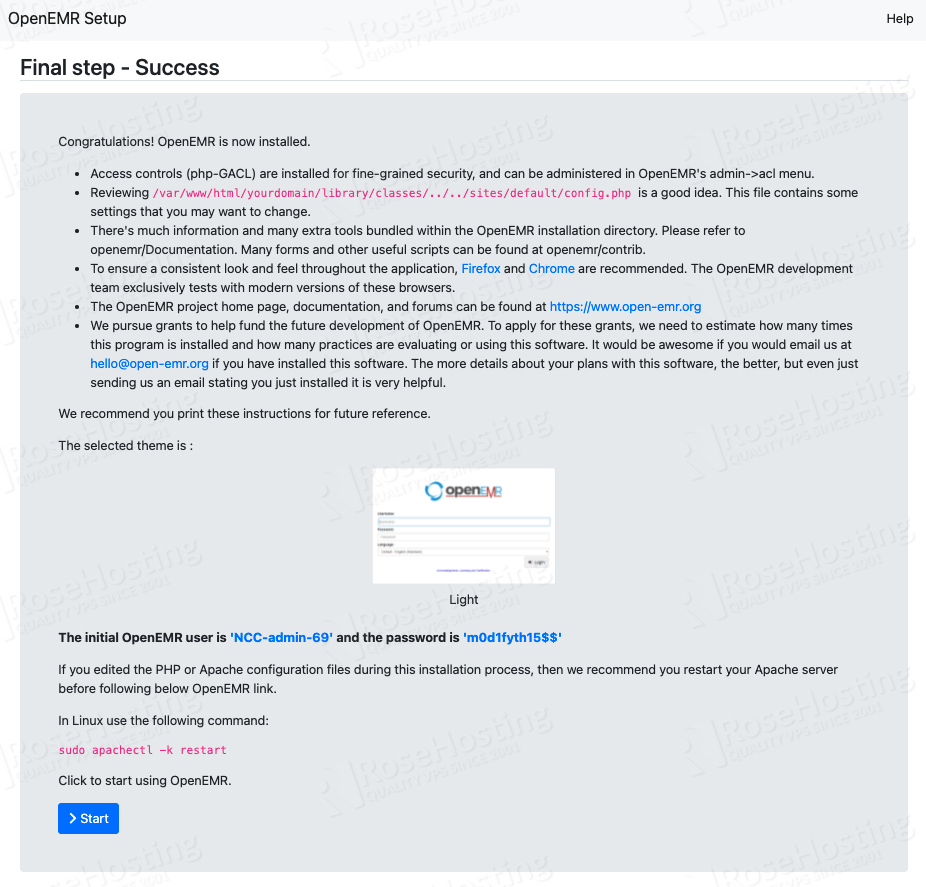
The OpenEMR developer recommends we restart Apache before opening our newly installed OpenEMR website.
$ sudo systemctl restart apache2
Once Apache is restarted, we can click on the Start button in the final step to open our website.
Now, there will be a pop-up message asking you to register the OpenEMR installation by submitting your email address.
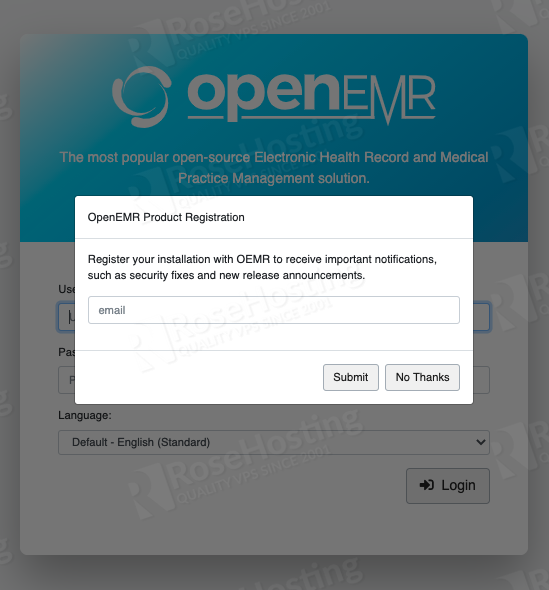
Log in to your OpenEMR website using the credentials you created in step 3
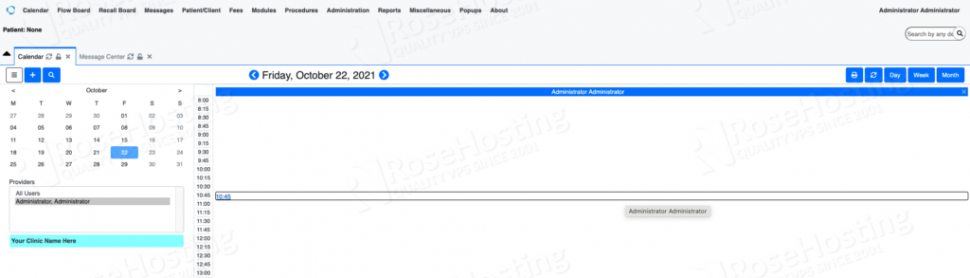
Once logged in, you will be brought to OpenEMR dashboard.
Post Installation
To secure the installation, we need to change some of the file permissions.
$ sudo chmod 644 /var/www/html/yourdomain/library/sqlconf.php
$ sudo chmod 600 /var/www/html/yourdomain/{acl_upgrade.php,setup.php,sql_upgrade.php,ippf_upgrade.php}
Of course, you don’t have to do any of this if you use our Managed Ubuntu VPS, in which case you can simply ask our expert Linux admins to set up this for you. They are available 24×7 and will take care of your request immediately.
PS. If you liked this post please share it with your friends on the social networks using the buttons on the left or simply leave a reply below. Thanks.