In this tutorial, we will show you how to install PostgreSQL 11 on an Ubuntu 18.04 Cloud VPS. PostgreSQL is an open-source and general purpose object-relational database management system (ORDBMS).

The latest version of PostgreSQL, PostgreSQL 11, focuses on performance improvements. It comes packed with several advanced features and enhancements which include:
- Enhanced Capabilities for Query Parallelism which allows faster query execution
- Just-in-Time (JIT) compilation of SQL Statements
- Automatic index creation
- Advanced partitioning features
- Other performance improvements, like command line improvements, improved statistics and more…
Let’s start installing.
Connect to your server
To connect to the server via SSH as the root user, use the following command:
ssh root@IP_ADDRESS -p PORT_NUMBER
and replace IP_ADDRESS and PORT_NUMBER with the actual server IP address and SSH port number.
Update OS packages
Before we can start with the installation, we have to make sure that all Ubuntu OS packages installed on the server are up to date. We can do this by running the following commands:
sudo apt-get update sudo apt-get upgrade
Install PostgreSQL 11
Install the required packages:
sudo apt install wget ca-certificates
Import the repository signing key:
cd /opt
wget https://www.postgresql.org/media/keys/ACCC4CF8.asc
sudo apt-key add ACCC4CF8.asc
Add the repository to the server:
sudo sh -c 'echo "deb http://apt.postgresql.org/pub/repos/apt/ $(lsb_release -sc)-pgdg main" > /etc/apt/sources.list.d/postgresql.list'
Then fetch the metadata from the newly created repository:
sudo apt update
Now we can install PostgreSQL 11 using the following command:
sudo apt-get install postgresql-11
In order to start the postgreSQL service, use the following command:
sudo systemctl start postgresql.service
By default, PostgreSQL is listening on localhost only. Let’s configure it to listen on all IP addresses available on the server and allow connections from remote IPs.
Edit the main PostgreSQL configuration file:
vi /etc/postgresql/11/main/postgresql.conf
Locate this line: #listen_addresses = 'localhost' (it should be under the ‘connections and authentication’ section). Uncomment it and replace localhost with * so that it looks like this:
listen_addresses = '*'
Save and close that file, then edit the pg_hba.conf configuration file and add the following lines at the very end:
vi /etc/postgresql/11/main/pg_hba.conf
host    all             all              0.0.0.0/0                       md5
host    all             all              ::/0                            md5
Restart the PostgreSQL service for the changes to take effect:
sudo systemctl restart postgresql
This will let PostgreSQL listen for incoming TCP/IP connections on all IP addresses available on the server.
PostgreSQL is listening on port 5432, so if you use UFW (uncomplicated firewall), allow port 5432.
Check the UFW status using:
sudo ufw status
Status: active
Run the following command to allow PostgreSQL through the firewall:
sudo ufw allow 5432/tcp
In order to enable PostgreSQL to start on server boot, run:
sudo systemctl enable postgresql.service
To check the status of PostgreSQL service, run:
sudo systemctl status postgresql.service
The status command should show an output similar to this one:
● postgresql.service - PostgreSQL RDBMS
   Loaded: loaded (/lib/systemd/system/postgresql.service; enabled; vendor preset: enabled)
   Active: active (exited) since Sun 2019-02-17 02:13:35 CST; 3min 0s ago
  Process: 14586 ExecStart=/bin/true (code=exited, status=0/SUCCESS)
 Main PID: 14586 (code=exited, status=0/SUCCESS)
To connect to the PostgreSQL database server, log in as the postgres user using the following command:
# su -l postgres
$ psql
psql (11.1 (Ubuntu 11.1-1.pgdg18.04+1))
Type "help" for help.
postgres=#
We can use the \l command to list the all the databases in PostgreSQL.
Type ‘Control + D’ or \q to exit the PostgreSQL prompt.
/q
To quit the console, run:
exit
This will bring us back to the Linux command prompt.
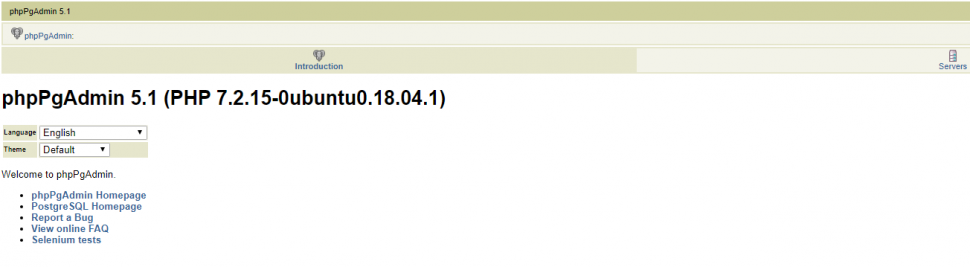
If you want to install a PostgreSQL web client, such as phpPgAdmin (which is very much like phpMyAdmin), use the following command:
sudo apt-get install phppgadmin
In order to access phpPgAdmin through a web browser, the Apache web server needs to be configured accordingly. Therefore, we need to edit the phppgadmin.conf Apache configuration file:
vi /etc/apache2/conf-available/phppgadmin.conf
Locate and comment the ‘Require local‘ line by adding a ‘#‘ at the front of the line and add ‘Allow From all‘ below that line. Save and close the file.
After editing, the section should look like this:
# Only allow connections from localhost:
#Require local
Allow From all
Let’s tweak some settings for phpPgAdmin. Open the config.inc.php phpPgAdmin configuration file:
vi /etc/phppgadmin/config.inc.php
Locate this line:
$conf['extra_login_security'] = true;
Replace the value from ‘true’ to ‘false’ so we can log in to phpPgAdmin as the postgres user.
Save and close the file.
Restart Apache service for the changes to take effect:
sudo systemctl restart apache2.service
That is it. We successfully installed PostgreSQL with phpPgAdmin on an Ubuntu 18.04 VPS. We can now open http://your_server_IP/phppgadmin in a web browser, log in to phpPgAdmin, and use this great tool to create and manage databases in PostgreSQL.

Of course, you don’t have to install PostgreSQL on Ubuntu 18.04 if you use one of our Ubuntu Cloud Hosting services, in which case you can simply ask our expert Linux admins to install and configure PostgreSQL and phpPgAdmin on Ubuntu 18.04 for you. They are available 24×7 and will take care of your request immediately.
PS. If you liked this post on how to install PostgreSQL on Ubuntu 18.04, please share it with your friends on the social networks using the buttons on the left or simply leave a reply below. Thanks.