In this blog post, we will show you how to install Roadiz CMS on an Ubuntu 18.04 Cloud VPS.
“A modern content management system” – according to the developers and maintainers of Roadiz CMS, this is what their platform was designed and developed for. Based on a polymorphic node system, they say that this architecture can provide a new and different user experience.

Roadiz’s advanced theming system is built to be processed independently from the back-office (the editor backend) providing hassle-free switching of multiple themes. Basically, it allows users to create one theme for your desktop website and another one for your mobile with the same node hierarchy, plus a separate theme for your writers and editors.
The Roadiz CMS is developed using PHP with Composer, and it supports both Apache and Nginx web servers. For the database, it is compatible with MySQL, MariaDB and PostgreSQL database systems. The Roadiz CMS source code is released under the MIT license, and is available on GitHub. Let’s start with the installation.
Requirements:
- A publicly-accessible VPS with a fresh copy of Ubuntu 18.04 installed
- Apache or Nginx as the web server. We will be using Nginx for this tutorial.
- PHP version 7.1.0 and above + PHP extensions
- MySQL or MariaDB for the database. We will be using MariaDB for this tutorial.
- Composer
- Git
If you don’t have some or any of the software mentioned, don’t worry, we’ll be covering the installation of each requirement in this tutorial as well.
1. Checking for Updates and Installing Dependencies
Log in to your server via SSH:
ssh [username]@[server_ip_address]
Modify [username] with the account name of a root-privileged user found on the server (or the root user itself), and replace [server_ip_address] with the public IP address assigned to your public-facing server. If needed, specify a custom port number using -p port_number, where port_number is the custom SSH port.
Before starting with the installation, it is best to update all of our Ubuntu packages to their latest versions:
apt-get update
apt-get upgrade
We also recommend installing basic libraries and dependencies to ensure that we won’t encounter any missing library or dependency issues throughout these installation steps. Just run this next command to install them:
apt-get install software-properties-common build-essential zip unzip curl wget git -y
2. Installing the LEMP Stack
2.1. Installing the Nginx Web Server
To begin with our LEMP stack install, we will first need to install a web server. Since we will be installing a CMS platform, we recommend using Nginx for this as it is better in handling concurrent connections.
To proceed with the install, supply the following command in your terminal:
apt-get install nginx
Once the package has been installed, start and enable the automatic boot of the Nginx service by running these two commands:
systemctl enable nginx
systemctl start nginx
To check if our Nginx service has been started properly, use the following command:
systemctl status nginx
You should see similar, if not the same output:
● nginx.service - A high performance web server and a reverse proxy server
Loaded: loaded (/lib/systemd/system/nginx.service; enabled; vendor preset: enabled)
Active: active (running) since Thu 2019-07-11 22:00:32 CDT; 14min ago
Now that our Nginx server is running, we can continue by installing PHP.
2.2. Installing and Configuring PHP 7.2 with PHP-FPM
Roadiz CMS supports PHP versions greater than 7.1.0. For this tutorial, we will be using the stable version of PHP, which (at the time of this article being written) is currently PHP version 7.2.
To proceed, use the following commands. This repository will ensure that we will get the latest release of PHP 7.2:
add-apt-repository ppa:ondrej/php
apt-get update
After updating the repository, use the following command to install PHP 7.2 and all PHP extensions required:
apt-get install -y php7.2 php7.2-cli php7.2-fpm php7.2-common php7.2-mysql php7.2-mbstring php7.2-gd php7.2-intl php7.2-xml php7.2-curl php7.2-zip php7.2-pgsql php7.2-sqlite3 php7.2-opcache php-apcu
To verify the PHP version installed, supply the following command:
php -v
You should almost the same output follow:
PHP 7.2.20-1+ubuntu18.04.1+deb.sury.org+1 (cli) (built: Jul 10 2019 06:59:02) ( NTS )
Copyright (c) 1997-2018 The PHP Group
Zend Engine v3.2.0, Copyright (c) 1998-2018 Zend Technologies
with Zend OPcache v7.2.20-1+ubuntu18.04.1+deb.sury.org+1, Copyright (c) 1999-2018, by Zend Technologies
Finally, let’s enable and verify our PHP-FPM service installation:
systemctl enable php7.2-fpm
systemctl start php7.2-fpm
systemctl status php7.2-fpm
The following output should appear:
● php7.2-fpm.service - The PHP 7.2 FastCGI Process Manager
Loaded: loaded (/lib/systemd/system/php7.2-fpm.service; enabled; vendor preset: enabled)
Active: active (running) since Thu 2019-07-11 22:08:18 CDT; 6min ago
Roadiz CMS requires increases in the PHP configuration variables, especially for the file size limitations. For this, modify the following files:
/etc/php/7.2/fpm/php.ini and /etc/php/7.2/cli/php.ini
Set these values to the ones shown below.
post_max_size = 16M
upload_max_filesize = 16M
For the changes to take effect, let’s restart our PHP-FPM service:
systemctl restart php7.2-fpm
We can now start installing our database server: MariaDB.
2.3. Installing MariaDB Server
Roadiz, like most other CMSes, requires a database where it stores all content and media. We recommend MariaDB (an open-source version of MySQL) for this. To install the MariaDB server, run the following command.
apt-get install mariadb-server
After a successful installation, it is recommended to configure the basic security settings of our database server by using the built-in security script that comes pre-installed with MariaDB.
mysql_secure_installation
Most of the prompts should be answered with ‘Yes’:
Enter current password for root (enter for none): (press enter)
Set root password? [Y/n] Y
Remove anonymous users? [Y/n] Y
Disallow root login remotely? Y
Remove test database and access to it? Y
Reload privilege tables now? Y
To verify the installed version of MariaDB, supply the following command:
mysql -V
You should see the following output:
mysql Ver 15.1 Distrib 10.1.40-MariaDB, for debian-linux-gnu (x86_64) using readline 5.2
Save and exit. Finally, to apply the changes, restart, enable, and verify the status of our MariaDB database service:
systemctl enable mariadb
systemctl start mariadb
systemctl status mariadb
You should see the following text:
● mariadb.service - MariaDB 10.1.40 database server
Loaded: loaded (/lib/systemd/system/mariadb.service; enabled; vendor preset: enabled)
Active: active (running) since Thu 2019-07-11 22:10:09 CDT; 3min 55s ago
Additional changes in the default MariaDB configuration are required by Roadiz. Modify the MariaDB configuration file:
nano /etc/mysql/mariadb.conf.d/50-server.cnf
Now add/modify the following lines:
innodb_file_format = Barracuda
innodb_large_prefix = 1
innodb_default_row_format = dynamic
Save and exit the file, and then restart the MariaDB service:
systemctl restart mariadb
And with that, our LEMP stack install and setup is complete. Now we can configure the database.
3. Creating the Roadiz CMS Database
After installing and securing our database server, we can now continue by creating the database for our Roadiz CMS installation.
First, log in to database shell using root as the username. Then enter the password that you set when running mysql_secure_installation. If you chose not to run that script, your default password is blank, and you only need to press the [Enter] key once to log in:
mysql -u root -p
Second, use these commands one by one to create the database roadiz_db and assign the database user roadiz_user with all privileges granted. Always remember to use a very strong password, especially with databases.
CREATE DATABASE roadiz_db;
CREATE USER 'roadiz_user'@'localhost' IDENTIFIED BY '[$tr0ng_p@$w0rd]';
GRANT ALL PRIVILEGES ON roadiz_db.* TO 'roadiz_user'@'localhost' IDENTIFIED BY '<span class="has-inline-color has-vivid-red-color">[$tr0ng_p@$w0rd]</span>' WITH GRANT OPTION;
FLUSH PRIVILEGES;
EXIT;
Replace [$tr0ng_p@$w0rd] with the real password you want to use to secure your database.
4. Installing Composer
Composer is required by the Roadiz CMS for easier and more straightforward update and dependency installation. To install Composer, apply the commands one by one:
cd /opt
php -r "copy('https://getcomposer.org/installer', 'composer-setup.php');"
php -r "if (hash_file('sha384', 'composer-setup.php') === '48e3236262b34d30969dca3c37281b3b4bbe3221bda826ac6a9a62d6444cdb0dcd0615698a5cbe587c3f0fe57a54d8f5') { echo 'Installer verified'; } else { echo 'Installer corrupt'; unlink('composer-setup.php'); } echo PHP_EOL;"
php composer-setup.php
php -r "unlink('composer-setup.php');"
mv composer.phar /usr/local/bin/composer
Verify the composer version with:
composer --version
You should see the latest compiled composer version:
Composer version 1.8.6 2019-06-11 15:03:05
5. Installing Roadiz CMS
Now that we have everything we need set up for Roadiz, we can finally install it. At the time of writing, the latest stable version of RoadizCMS is v1.2.0. First, let’s create the main directory for our Roadiz CMS installation:
mkdir -p /var/www/roadiz
Switch to the newly created directory and create the project using Composer:
cd /var/www/roadiz
composer create-project roadiz/standard-edition .
After applying the command, the composer will now handle all required packages.
Finally, apply the correct folder and files permission for our web server:
chown -R www-data:www-data /var/www/roadiz
6. Configuring a Roadiz CMS Nginx Virtual Block
First, create the virtual host file with this command:
nano /etc/nginx/sites-available/roadiz.conf
Paste the following. Note that you will need to modify according to your preference and needs:
server {
    listen 80;
    listen [::]:80;

    server_name roadiz.<span class="has-inline-color has-vivid-red-color">example.com</span>;
    root /var/www/roadiz/web;

    index index.php;

    location / {
        try_files $uri $uri/ /index.php$is_args$args;
    }

    location ~ ^/(dev|install|preview|clear_cache)\.php(/|$) {
        fastcgi_pass unix:/var/run/php/php7.2-fpm.sock;
        fastcgi_split_path_info ^(.+\.php)(/.*)$;
        include fastcgi_params;
        fastcgi_param SCRIPT_FILENAME $realpath_root$fastcgi_script_name;
        fastcgi_param DOCUMENT_ROOT $realpath_root;
    }

    location ~ ^/index\.php(/|$) {
        fastcgi_pass unix:/var/run/php/php7.2-fpm.sock;
        fastcgi_split_path_info ^(.+\.php)(/.*)$;
        include fastcgi_params;
        fastcgi_param SCRIPT_FILENAME $realpath_root$fastcgi_script_name;
        fastcgi_param DOCUMENT_ROOT $realpath_root;
        internal;
     }
}
Make sure you replace example.com with your own registered domain name.
Save the file and exit. Activate the new virtual host file by creating a symbolic link:
ln -s /etc/nginx/sites-available/roadiz.conf /etc/nginx/sites-enabled/
Verify if the configuration’s syntax is correct by typing:
nginx -t
It should show this exact message:
nginx: the configuration file /etc/nginx/nginx.conf syntax is ok
nginx: configuration file /etc/nginx/nginx.conf test is successful
Finally, let’s restart our Nginx service for the changes to take effect:
systemctl restart nginx
7. Accessing Roadiz CMS
By default, the Roadiz web installer cannot be accessed unless the IP access is allowed. To be able to access the installer page, we will need to add our IP in the allowed IP array:
nano /var/www/roadiz/web/install.php
Then add your public IP address in the $allowedIp array by adding the line xxx.xxx.xxx.xxx. Change each xxx with your IP address:
$allowedIp = [ '10.0.2.2', '192.168.33.1', '127.0.0.1', 'fe80::1', '::1', ':ffff:127.0.0.1', '::ffff:127.0.0.1', <code>xxx.xxx.xxx.xxx</code> ]
Save the file and exit.
You should now be able to access the installer by visiting the PHP installer page at http://roadiz.example.com/install.php
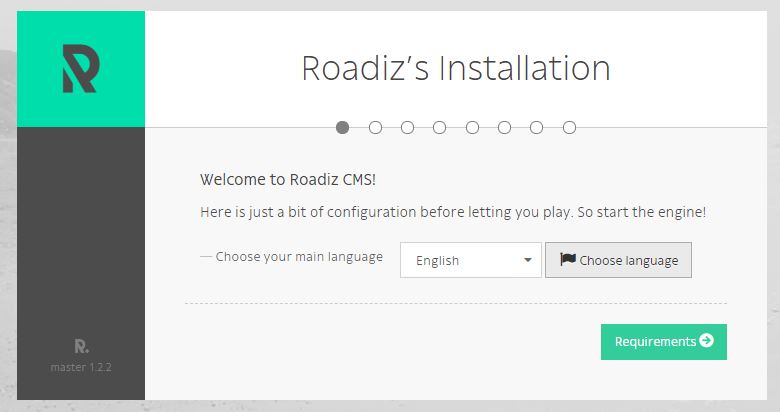
The installation steps should be self-explanatory as it will only ask for your preferred website values and details for the database that we created earlier. After finishing the installation, you will need to remove the install.php file.
rm -f /var/www/roadiz/web/install.php
Once deleted, you can now access the Administrator login page at http://roadiz.example.com/rz-admin:
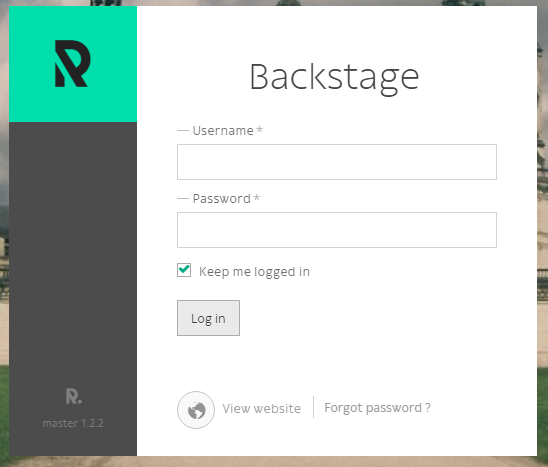
That’s it! – Roadiz CMS has been installed and configured successfully on your Ubuntu 18.04 server. Now you can freely start adding content and share your ideas with the world.

The Roadiz CMS is straightforward to install – but that doesn’t mean that you have to do so yourself. If you use one of our Ubuntu Cloud VPS hosting services, all you need to do is ask our admins. They’ll install and set everything up exactly as you want it, along with any other requests or support that you might need.
If reading this blog post on how to install Roadiz CMS on Ubuntu 18.04 was helpful to you, feel free to share it on social networks using the share shortcuts, or simply leave a comment in the comments section. Thanks.