
In this post, we will show you how to install YetiForce CRM on a Debian 9 VPS with MariaDB, PHP 7.2 and Apache.
 YetiForce is an open-source and innovative CRM system. It is built on top of Vtiger and has hundreds of changes that help to accomplish even the most challenging tasks in the simplest way. This guide should work on other Linux VPS systems as well but was tested and written for a Debian 9 Cloud VPS.
Step 1: Install Required packages
Log in to your VPS via SSH as root or as a sudo user:
ssh userame@<span style="color: #ff0000;">IP_Address</span>
Replace IP_Address with your server’s public IP address. Also, if your server uses a non-standard SSH port number, add “-p Port_Number” to the end of the command, replacing Port_Number with your server’s SSH port number. Once logged in, issue the following commands to update all installed packages to their latest available versions:
sudo apt-get update
sudo apt-get upgrade
Afterwards, install the required packages using the following command:
sudo apt-get install unzip wget apt-transport-https lsb-release ca-certificates
Step 2: Install LAMP
The LAMP (Linux, Apache, MySQL, PHP) stack is a combination of open source software that is typically installed on a server used for hosting dynamic websites and web applications.
First, we will install Apache, the most widely used web server in the world. It is fast, secure, reliable, and can be easily customized depending on your needs.
To install Apache on your Debian 9 server, type the following command:
sudo apt-get install apache2
Once the installation is complete, enable the Apache service to start automatically upon system boot:
sudo systemctl enable apache2
Next, we will install PHP and the modules needed to run YetiForce.
YetiForce requires PHP 7.1 or higher. Run the following commands to import the repository signing key and configure the Sury PPA on your Debian 9 system:
sudo wget -O /etc/apt/trusted.gpg.d/php.gpg https://packages.sury.org/php/apt.gpg
echo "deb https://packages.sury.org/php/ $(lsb_release -sc) main" | sudo tee /etc/apt/sources.list.d/php.list
sudo apt-get update
sudo apt install php7.2 php7.2 libapache2-mod-php7.2 php7.2-common php7.2-sqlite3 php7.2-json php7.2-curl php7.2-intl php7.2-mbstring php7.2-xmlrpc php7.2-mysql php7.2-gd php7.2-xml php7.2-cli php7.2-zip php7.2-soap php7.2-imap php7.2-bcmath
Restart the Apache web server so that the PHP module is loaded:
sudo systemctl restart apache2.service
The last step is to install MariaDB:
sudo apt-get install mariadb-server
Enable the MariaDB service to start automatically upon system boot:
sudo systemctl enable mariadb
Once the installation is complete, it is recommended to run the following command to improve the security of your MariaDB server:
sudo mysql_secure_installation
When the program asks for your MySQL root password, just press the [Enter] key, as there is no password set by default. We suggest answering each prompt with ‘Y’.
Step 3: Download and Extract YetiForce CRM
Download the latest version of YetiForce from their Github repository. At the time of writing, the latest version is YetiForce version 5.1.0. It may be newer by the time you read this, so make sure to replace the download link with the latest one.
wget https://github.com/YetiForceCompany/YetiForceCRM/releases/download/5.1.0/YetiForceCRM-5.1.0-complete.zip
Create a directory and unzip the archive:
sudo mkdir -p /var/www/html/yetiforce
sudo unzip YetiForceCRM-5.1.0-complete.zip -d /var/www/html/yetiforce
Next, set the proper ownership to the yetiforce directory with the following command:
chown -R www-data:www-data /var/www/html/yetiforce
Step 4: Configure Apache and PHP
Open the php.ini configuration file with your preferred text editor and make the following changes:
sudo nano /etc/php/7.0/apache2/php.ini
Find and modify the following values:
max_execution_time = 600
max_input_time = 600
default_socket_timeout = 600
memory_limit = 1025M
post_max_size = 50M
upload_max_filesize = 100M
display_errors = Off
html_errors = Off
display_startup_errors = Off
max_input_vars = 10000
log_errors = On
short_open_tag = Off
output_buffering = On
Next, create a new virtual host configuration file so that we can access our YetiForce application with a domain name instead of an IP address:
sudo nano /etc/apache2/sites-available/<span style="color: #ff0000;">domain-name.com</span>.conf
add the following content to the file:
<VirtualHost *:80>
ServerAdmin [email protected]
DocumentRoot /var/www/html/yetiforce
ServerName <span style="color: #ff0000;">domain-name.com</span>
ServerAlias www.<span style="color: #ff0000;">domain-name.com</span>
<Directory /var/www/html/yetiforce/>
Options FollowSymlinks
AllowOverride All
Require all granted
</Directory>
ErrorLog ${APACHE_LOG_DIR}/error.log
CustomLog ${APACHE_LOG_DIR}/access.log combined
</VirtualHost>
Of course, you will need to make sure you replace all instances of domain-name.com with your actual domain name.
Once you have configured the virtual host, you can enable it by executing the following commands.
sudo a2ensite <span style="color: #ff0000;">domain-name.com</span>
Also, make sure that the mod rewrite is enabled:
sudo a2enmod rewrite
Restart Apache for the changes to take effect:
sudo systemctl restart apache2.service
Step 5: Create a Database
Log in to the MySQL console:
mysql -u root -p
Create a database and user that will be able to interact with the database:
CREATE DATABASE yetiforcedb;
GRANT ALL PRIVILEGES ON yetiforcedb.* TO 'yetiforceuser'@'localhost' IDENTIFIED BY '<span style="color: #ff0000;">strong_password</span>' WITH GRANT OPTION;
quit;
Do not forget to change ‘strong_password‘ with an actual strong password.
Step 6: Install YetiForce CRM
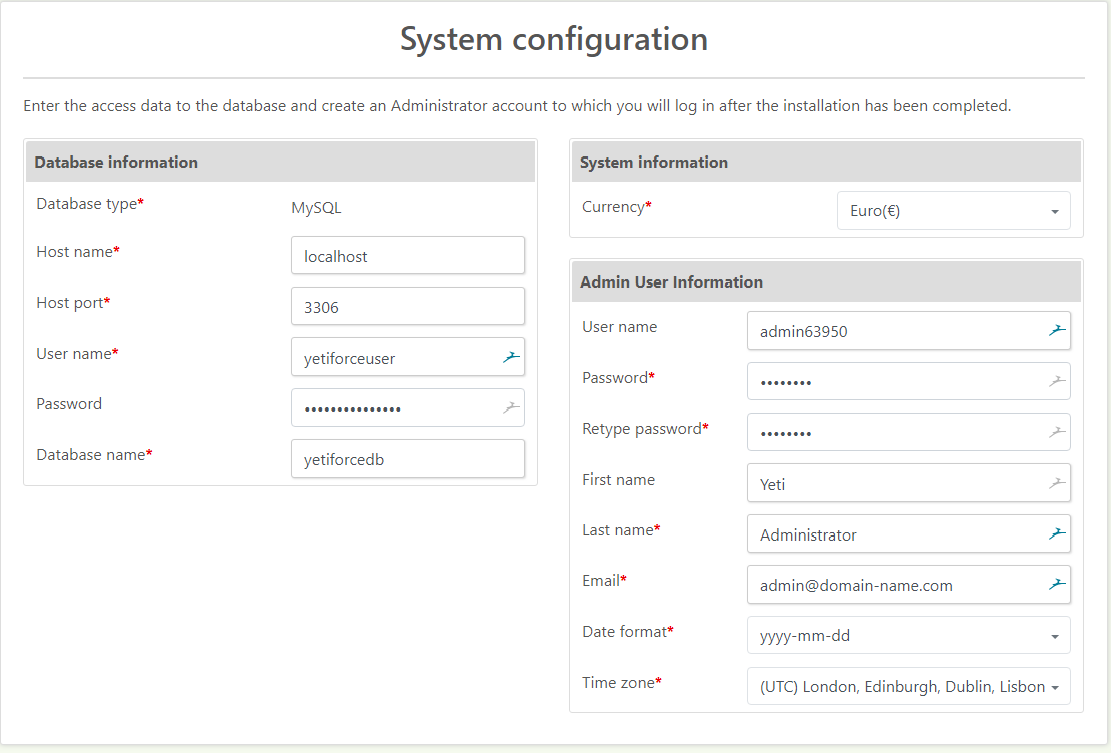
Open http://domain-name.com/in your preferred web browser – after doing so, you should see the YetiForce CRM installation wizard. Accept the license and the next page you’ll need to enter the database details you created earlier and YetiForce CRM admin details.
Finally, follow the installation wizard instructions and finish the installation.
That’s it. You have successfully installed YetiForce CRM on your Debian 9 VPS. For more information about how to manage your YetiForce CRM installation, please refer to the official YetiForce CRM documentation.
 Of course, you won’t need to do any of this if you use one of our Managed Cloud VPS Hosting services, in which case you can simply ask our expert Linux admins to set YetiForce up for you. They are available 24×7 and will take care of your request immediately.
PS. If you liked this post, or if you found it helpful, please share it with your friends on the social networks using the share shortcuts, or simply leave a reply below. Thanks.
chown -R www-data:www-data /var/www/html/yetiforce
does not work, multiple attempts from a clean start it always returns:
chown: changing ownership of ‘/var/www/html/yetiforce/api/webservice’: Operation not permitted
chown: changing ownership of ‘/var/www/html/yetiforce/api’: Operation not permitted
chown: changing ownership of ‘/var/www/html/yetiforce/CONTRIBUTING.md’: Operation not permitted
chown: changing ownership of ‘/var/www/html/yetiforce’: Operation not permitted
for each line even when I run it as SU.
Help?
You have to be root to change the owner of files/directories.
Have you tried the following:
sudo chown -R www-data: /var/www/html/yetiforceIf you still have the same error even you are using sudo, please list the yestiforce directory with,
ls -lahcommand and send us the output.