
In this tutorial we are going to provide you with step-by-step instructions on how to install and configure Zimbra mail server on a CentOS 7 VPS. Zimbra is an enterprise-class open source email collaboration software.
Before we start with the installation procedure, we need to install the required packages:
yum install sudo openssh-clients libaio unzip net-tools sysstat perl-core nmap-ncat libstdc++.so.6
Install Zimbra:
Download the latest version of Zimbra from the official website at https://www.zimbra.com/downloads/zimbra-collaboration-open-source/archives/ , then extract it:
cd /opt
wget https://files.zimbra.com/downloads/8.7.10_GA/zcs-8.7.10_GA_1829.RHEL7_64.20170524161336.tgz
tar xfz zcs-8.7.10_GA_1829.RHEL7_64.20170524161336.tgz
Run the install script:
cd zcs-8.7*
./install.sh
Follow the easy instructions and install Zimbra packages:
Do you agree with the terms of the software license agreement? [N] Y

Use Zimbra's package repository [Y] Y

 install the zimbra packages, press Y to install the packages you need, e.g.:

Select the packages to install

Select the packages to install

Install zimbra-ldap [Y] y

Install zimbra-logger [Y] y

Install zimbra-mta [Y] y

Install zimbra-dnscache [Y] y

Install zimbra-snmp [Y] n

Install zimbra-store [Y] y

Install zimbra-apache [Y] y

Install zimbra-spell [Y] y

Install zimbra-memcached [Y] y

Install zimbra-proxy [Y] y

Install zimbra-chat [Y] n

Install zimbra-drive [Y] n
The system will be modified. Continue? [N] y
Main menu

   1) Common Configuration:
   2) zimbra-ldap:                             Enabled
   3) zimbra-logger:                           Enabled
   4) zimbra-mta:                              Enabled
   5) zimbra-dnscache:                         Enabled
   6) zimbra-store:                            Enabled
        +Create Admin User:                    yes
        +Admin user to create:                 [email protected]
******* +Admin Password                        UNSET
        +Anti-virus quarantine user:           [email protected]
        +Enable automated spam training:       yes
        +Spam training user:                   [email protected]
        +Non-spam(Ham) training user:          [email protected]
        +SMTP host:                            mail.yourdomain.com
        +Web server HTTP port:                 8080
        +Web server HTTPS port:                8443
        +Web server mode:                      https
        +IMAP server port:                     7143
        +IMAP server SSL port:                 7993
        +POP server port:                      7110
        +POP server SSL port:                  7995
        +Use spell check server:               yes
        +Spell server URL:                     http://mail.yourdomain.com:7780/aspell.php
        +Enable version update checks:         TRUE
        +Enable version update notifications:  TRUE
        +Version update notification email:    [email protected]
        +Version update source email:          [email protected]
        +Install mailstore (service webapp):   yes
        +Install UI (zimbra,zimbraAdmin webapps): yes

   7) zimbra-spell:                            Enabled
   8) zimbra-proxy:                            Enabled
   9) Default Class of Service Configuration:
   s) Save config to file
   x) Expand menu
   q) Quit

Address unconfigured (**) items  (? - help) 6
Please note, when configuring Zimbra, you need to use the actual hostname of your server, not ‘mail.yourdomain.com’.
Store configuration

   1) Status:                                  Enabled
   2) Create Admin User:                       yes
   3) Admin user to create:                    [email protected]
** 4) Admin Password                           UNSET
   5) Anti-virus quarantine user:              [email protected]
   6) Enable automated spam training:          yes
   7) Spam training user:                      [email protected]
   8) Non-spam(Ham) training user:             [email protected]
   9) SMTP host:                               mail.yourdomain.com
  10) Web server HTTP port:                    8080
  11) Web server HTTPS port:                   8443
  12) Web server mode:                         https
  13) IMAP server port:                        7143
  14) IMAP server SSL port:                    7993
  15) POP server port:                         7110
  16) POP server SSL port:                     7995
  17) Use spell check server:                  yes
  18) Spell server URL:                        http://mail.yourdomain.com:7780/aspell.php
  19) Enable version update checks:            TRUE
  20) Enable version update notifications:     TRUE
  21) Version update notification email:       [email protected]
  22) Version update source email:             [email protected]
  23) Install mailstore (service webapp):      yes
  24) Install UI (zimbra,zimbraAdmin webapps): yes

Select, or 'r' for previous menu [r] 4
Set an administrator password:
Password for [email protected] (min 6 characters): [3GsHkCmZF] Enter a strong password
Select, or 'r' for previous menu [r] r
Main menu

   1) Common Configuration:
   2) zimbra-ldap:                             Enabled
   3) zimbra-logger:                           Enabled
   4) zimbra-mta:                              Enabled
   5) zimbra-dnscache:                         Enabled
   6) zimbra-store:                            Enabled
   7) zimbra-spell:                            Enabled
   8) zimbra-proxy:                            Enabled
   9) Default Class of Service Configuration:
   s) Save config to file
   x) Expand menu
   q) Quit

*** CONFIGURATION COMPLETE - press 'a' to apply
Select from menu, or press 'a' to apply config (? - help) a

Save configuration data to a file? [Yes] Yes

Save config in file: [/opt/zimbra/config.5540]

Saving config in /opt/zimbra/config.5540...done.
The system will be modified - continue? [No] Yes


Configuration complete - press return to exit
Configure memcached to listen on localhost only:
su - zimbra
 /opt/zimbra/bin/zmprov ms 'zmhostname' zimbraMemcachedBindAddress 127.0.0.1
 /opt/zimbra/bin/zmprov ms 'zmhostname' zimbraMemcachedClientServerList 127.0.0.1
Restart memcached for the changes to take effect:
zmmemcachedctl restart
exit
Log in to the Zimbra administration back-end at https://yourdomain.com:7071:
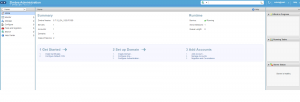
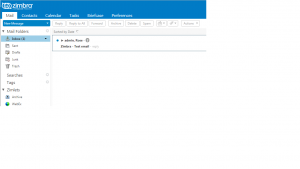
Once logged in, install a new SSL certificate (a self-signed or commercially signed certificate), add your domain and create a new user account/accounts, email accounts etc.
That is it. Zimbra is successfully installed on CenOS 7.
Of course you don’t have to How to install and configure Zimbra mail server on CentOS 7, if you use one of our VPS Hosting services, in which case you can simply ask our expert Linux admins to install and configure Zimbra mail server for you. They are available 24×7 and will take care of your request immediately.
PS. If you liked this post, on How to install and configure Zimbra mail server on CentOS 7, please share it with your friends on the social networks using the buttons on the left or simply leave a reply below. Thanks.
Thanks, it’s very usefull for me although I use Zimbra 8.8.7! please make tutorial about Zimbra 8.8.7! 🙂