Let’s Encrypt is a completely free and automated, new certificate authority developed by the Internet Security Research Group (ISRG) and recognized by all major browsers. They make it a breeze to set up TLS certificates for your web server. And for free! Let’s Encrypt is supported by major players like Mozilla, Akamai, Cisco, the EFF and managed by the Linux Foundation. Let’s Encrypt provides free, automatic and secure certificates. The website owners can easily obtain security certificates within minutes, enabling a safer web experience for all.
As of version 1.50.0, DirectAdmin supports Let’s Encrypt. Using this DirectAdmin feature, it is possible to secure your domain without purchasing an expensive SSL certificate.
1. Login to DirectAdmin VPS via SSH
Login to your DirectAdmin VPS via SSH as user root
ssh root@IP_Adress -p Port_number
2. Update installed packages
Run the following command to make sure that all installed packages are up to date
yum -y update
3. Get the latest Let’s Encrypt script
Also, we will clean the software list and make sure we’ve got the latest Let’s Encrypt script.
cd /usr/local/directadmin/custombuild/
./build clean all
./build update
./build letsencrypt
and rewrite the configuration files
./build rewrite_confs
3. Configure DirectAdmin
Once the update is completed, open the DirectAdmin configuration file ‘directadmin.conf’ and enable the Let’s Encrypt option by adding or modifying the following line
nano /usr/local/directadmin/conf/directadmin.conf

letsencrypt=1
4. Enable SNI in DirectAdmin
You should also make sure that SNI is enabled in DirectAdmin by adding/modifying this line
enable_ssl_sni=1
5. Restart DirectAdmin
save the file and restart DirectAdmin for the changes to take effect
echo "action=directadmin&value=restart" >> /usr/local/directadmin/data/task.queue; /usr/local/directadmin/dataskq d2000
6.Proceed with the installation in DirectAdmin control panel
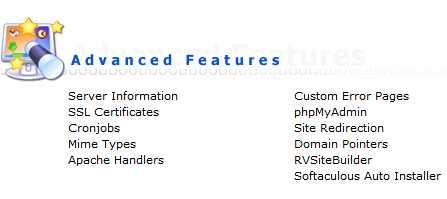
With this step Let’s Encrypt is enabled in DirectAdmin and we can proceed with the installation. Login to the control panel at https://yourdomain:2222 with your username and go to ‘SSL Certificates’ under ‘Advanced Features’
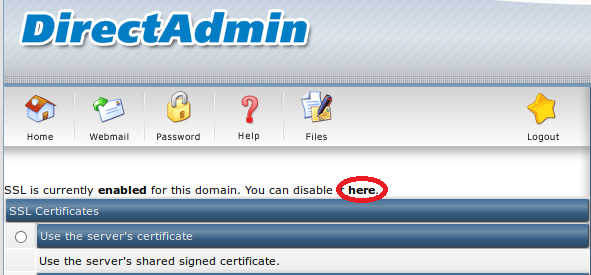
If the SSL option is disabled for the selected domain as shown in the screenshot below, you need to enable it by clicking ‘here’
If you properly enabled Let’s Encrypt, you will see the ‘Free & automatic certificate from Let’s Encrypt’ option. Check the check-box next to the Let’s Encrypt option and enter all necessary details for your domain below
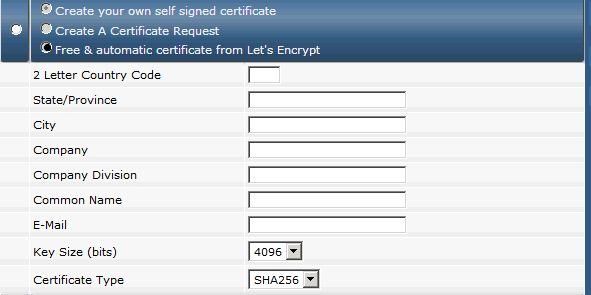
Then click the ‘Save’ button and a free Let’s Encrypt SSL certificate will be automatically installed. The Let’s Encrypt certificates are valid for 90 days and DirectAdmin will automatically try to renew the certificate after 85 days.
Restart the web server for the changes to take effect
systemctl restart httpd
If you have Nginx web serevr, run the following command
systemctl restart nginx
That’s all. If you followed the steps, a free Let’s Encrypt SSL certificate should be successfully installed on your domain name. You can follow the steps above to install unlimited number of SSL certificates on your domains.
Of course you don’t have to do any of this if you use one of our Linux VPS Hosting services, in which case you can simply ask our expert Linux admins to install Let’s Encrypt SSL certificate on your server with DirectAdmin control panel. They are available 24×7 and will take care of your request immediately.
PS. If you liked this post on How to install Let’s Encrypt SSL using DirectAdmin please share it with your friends on the social networks using the buttons on the left or simply leave a reply below. Thanks.
This guide on installing Let’s Encrypt SSL with DirectAdmin is clear and well-structured. It’s a great resource for ensuring secure, encrypted connections with minimal hassle. The step-by-step approach makes it easy for beginners to follow.