
Moodle is an open-source platform for online learning. It is a Learning Management System used by educational institutions that enable them to create online courses, training, learning and assignments. Originally, Moodle was known as an acronym for Modular Object-Oriented Dynamic Learning Environment. In this tutorial, we will show you how to install Moodle on AlmaLinux 9.
Prerequisites
- An AlmaLinux 9 VPS
- root access or a regular user with sudo privileges
Step 1. Log in to your server via SSH
First, you will need to log in to your AlmaLinux 9 VPS via SSH as the root user:
ssh root@IP_Address -p Port_number
You will need to replace ‘IP_Address’ and ‘Port_number’ with your server’s respective IP address and SSH port number. Additionally, replace ‘root’ with the username of the system user with sudo privileges.
You can check whether you have the proper AlmaLinux version installed on your server with the following command:
# cat /etc/almalinux-release
[root@almalinux8 ~]# cat /etc/almalinux-release
AlmaLinux release 9.1 (Lime Lynx)
We will use ‘root’ in this article to execute the shell commands. If you want to use your own regular user with sudo privileges to run the commands, make sure to append ‘sudo’ in front of the commands.
Step 2. Update the system
Before starting, let’s check if all AlmaLinux OS packages installed on the server are up to date. You can do this by running the following commands:
# dnf update
# dnf upgrade
We also need to install the additional packages.
# dnf install epel-release git
Step 3. Install PHP
The latest Moodle version supports PHP 8, and AlmaLinux 9 ships PHP 8.0 in the repository. To install it, let’s execute the following command.
# dnf install php-{bcmath,common,curl,fpm,gd,intl,mbstring,mysqlnd,soap,xml,xsl,zip,cli,devel,pear,json,opcache,sodium} libsodium libsodium-devel
Now that PHP 8 and its extensions are installed, we need to modify the PHP variable max_input_vars. The default value is 1000, and we need to increase it by at least 5000.
# nano /etc/php.ini
Then, append this line below.
max_input_vars = 10000
Save the file, then exit from the editor. And we can start PHP-FPM and enable it on boot.
# systemctl enable --now php-fpm
Step 4. Install and Configure Nginx
In this tutorial, we will use nginx as the web server. Let’s create an nginx server block for our Moodle website.
# nano /etc/nginx/conf.d/moodle.conf
Insert the following into the file.
server{
   listen 80;
   server_name moodle.yourdomain.com;
   root /opt/moodle;
   index index.php;

   location / {
      try_files $uri $uri/ /index.php?$query_string;
   }

   location ~ ^(.+\.php)(.*)$ {
      fastcgi_split_path_info ^(.+\.php)(.*)$;
     fastcgi_index index.php;
     fastcgi_pass php-fpm;
     include /etc/nginx/mime.types;
     include fastcgi_params;
     fastcgi_param PATH_INFO $fastcgi_path_info;
     fastcgi_param SCRIPT_FILENAME $document_root$fastcgi_script_name;
     }
}
Save the file and exit from the nano editor. Do not forget to start and enable nginx.
# systemctl enable --now nginx
Step 5. Install SSL/TLS Certificate
This is an optional but highly recommended step. We are going to use a free SSL/TLS certificate from Let’s Encrypt for our Moodle website.
First, we need to install it.
# dnf install python3-certbot-nginx
Now, let’s generate an SSL/TLS certificate for our Moodle website.
# cerbot --nginx
You will be prompted to choose which website we are going to install the certificate for. In the example below, we only have one nginx server block.
[root@rh ~]# certbot --nginx
Saving debug log to /var/log/letsencrypt/letsencrypt.log

Which names would you like to activate HTTPS for?
We recommend selecting either all domains, or all domains in a VirtualHost/server block.
- - - - - - - - - - - - - - - - - - - - - - - - - - - - - - - - - - - - - - - -
1: moodle.yourdomain.com
- - - - - - - - - - - - - - - - - - - - - - - - - - - - - - - - - - - - - - - -
Select the appropriate numbers separated by commas and/or spaces, or leave input
blank to select all options shown (Enter 'c' to cancel): 1
Requesting a certificate for moodle.yourdomain.com

Successfully received certificate.
Certificate is saved at: /etc/letsencrypt/live/moodle.yourdomain.com/fullchain.pem
Key is saved at: /etc/letsencrypt/live/moodle.yourdomain.com/privkey.pem
This certificate expires on 2023-05-08.
These files will be updated when the certificate renews.
Certbot has set up a scheduled task to automatically renew this certificate in the background.

Deploying certificate
Successfully deployed certificate for moodle.yourdomain.com to /etc/nginx/conf.d/moodle.conf
Congratulations! You have successfully enabled HTTPS on https://moodle.yourdomain.com

- - - - - - - - - - - - - - - - - - - - - - - - - - - - - - - - - - - - - - - -
If you like Certbot, please consider supporting our work by:
* Donating to ISRG / Let's Encrypt: https://letsencrypt.org/donate
* Donating to EFF: https://eff.org/donate-le
- - - - - - - - - - - - - - - - - - - - - - - - - - - - - - - - - - - - - - - -
That’s it. An SSL/TLS certificate has been issued and enabled.
Now, you will see that certbot also update your moodle nginx server block; it also redirects HTTP to HTTPS. You can confirm this by opening /etc/nginx/conf.d/moodle.conf
Step 6. Install MariaDB Server
Moodle supports several database servers, and this time we are going to use MariaDB. Let’s run this command below to install the MariaDB server.
# dnf install mariadb-server
Once installed, we can start the service and then create a database for this Moodle installation purpose.
# systemctl enable --now mariadb
After the service is running, we can run the commands below in the MariaDB shell.
# mysql
MariaDB [(none)]> CREATE DATABASE moodle DEFAULT CHARACTER SET utf8mb4 COLLATE utf8mb4_unicode_ci;
MariaDB [(none)]> CREATE USER 'moodle'@'localhost' IDENTIFIED BY 'm0d1fyth15';
MariaDB [(none)]> GRANT ALL ON moodle.* TO 'moodle'@'localhost';
MariaDB [(none)]> FLUSH PRIVILEGES;
MariaDB [(none)]> \q
Step 7. Install Moodle
In this tutorial, we are going to use Git to install Moodle. With this method, it will be easier to upgrade Moodle in the future.
Now, we are going to install Moodle in /opt/moodle and save the Moodle data in /opt/moodledata
# cd /opt
# git clone https://github.com/moodle/moodle.git
The command above will clone Moodle from the GitHub repository to /opt/moodle and you will see an output similar to this:
[root@almalinux opt]# git clone https://github.com/moodle/moodle.git
Cloning into 'moodle'...
remote: Enumerating objects: 1346551, done.
remote: Counting objects: 100% (4/4), done.
remote: Compressing objects: 100% (4/4), done.
remote: Total 1346551 (delta 0), reused 0 (delta 0), pack-reused 1346547
Receiving objects: 100% (1346551/1346551), 646.21 MiB | 7.88 MiB/s, done.
Resolving deltas: 100% (948479/948479), done.
Updating files: 100% (25395/25395), done.
Once cloned, we can go into moodle directory then check the available Moodle branch.
# cd moodle/
# git branch -a
It will show you an output like this.
* master
remotes/origin/HEAD -> origin/master
remotes/origin/MOODLE_13_STABLE
remotes/origin/MOODLE_14_STABLE
remotes/origin/MOODLE_15_STABLE
remotes/origin/MOODLE_16_STABLE
remotes/origin/MOODLE_17_STABLE
remotes/origin/MOODLE_18_STABLE
remotes/origin/MOODLE_19_STABLE
remotes/origin/MOODLE_20_STABLE
remotes/origin/MOODLE_21_STABLE
remotes/origin/MOODLE_22_STABLE
remotes/origin/MOODLE_23_STABLE
remotes/origin/MOODLE_24_STABLE
remotes/origin/MOODLE_25_STABLE
remotes/origin/MOODLE_26_STABLE
remotes/origin/MOODLE_27_STABLE
remotes/origin/MOODLE_28_STABLE
remotes/origin/MOODLE_29_STABLE
remotes/origin/MOODLE_30_STABLE
remotes/origin/MOODLE_310_STABLE
remotes/origin/MOODLE_311_STABLE
remotes/origin/MOODLE_31_STABLE
remotes/origin/MOODLE_32_STABLE
remotes/origin/MOODLE_33_STABLE
remotes/origin/MOODLE_34_STABLE
remotes/origin/MOODLE_35_STABLE
remotes/origin/MOODLE_36_STABLE
remotes/origin/MOODLE_37_STABLE
remotes/origin/MOODLE_38_STABLE
remotes/origin/MOODLE_39_STABLE
remotes/origin/MOODLE_400_STABLE
remotes/origin/MOODLE_401_STABLE
remotes/origin/master
Choose the latest stable branch, then checkout. At the time of writing this article, the last stable version is 401.
# git branch --track MOODLE_401_STABLE origin/MOODLE_401_STABLE
# git checkout MOODLE_401_STABLE
Finally, check the status using this command below.
# git status
You will see an output like this:
On branch MOODLE_401_STABLE
Your branch is up to date with 'origin/MOODLE_401_STABLE'.
nothing to commit, working tree clean
Not, it is time to change the file permission.
# mkdir -p /opt/moodledata
# chown -R apache. /opt/moodle*
Suppose you wonder why the permission is set to apache, not nginx. It is because PHP-FPM uses the user ‘apache’ by default. You can modify it to ‘nginx’. Just make sure to match the files/directories ownership with php-fpm user.
Now, it is time to go to https://moodle.yourdomain.com and finish the installation instruction wizard.
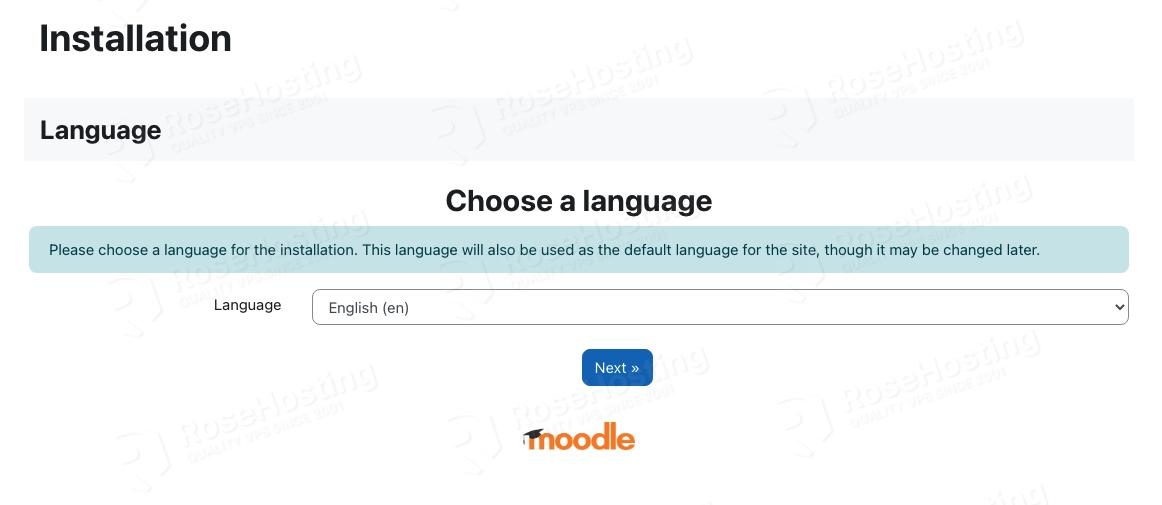
Click Next to continue.
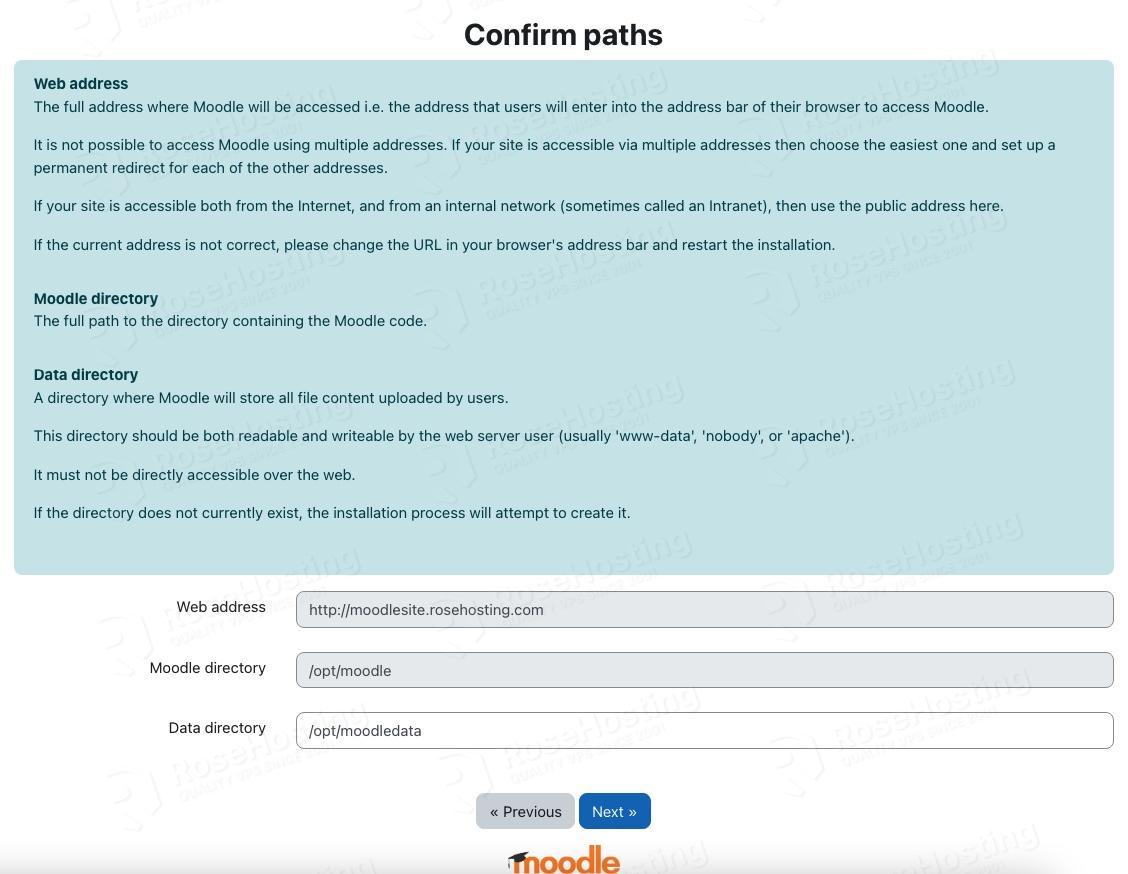
Click Next again.
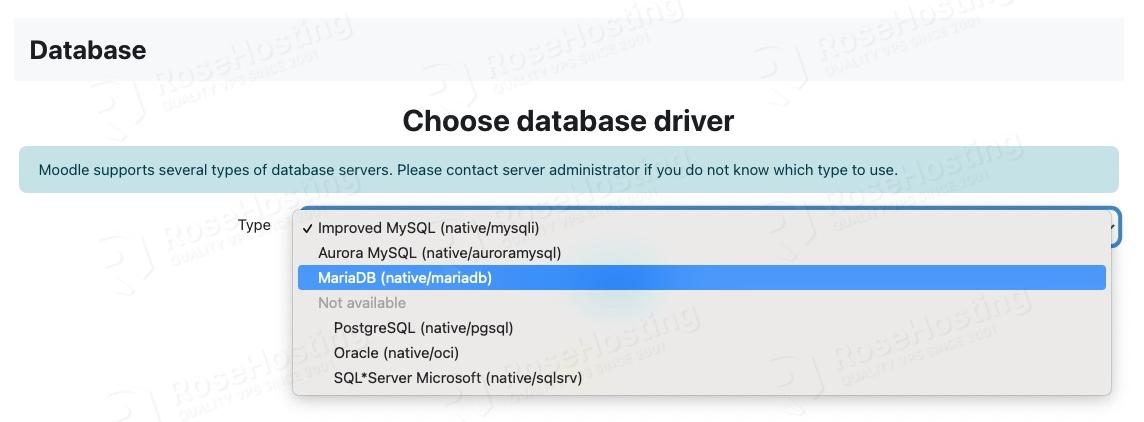
In this step, we need to choose MariaDB instead of MySQL.
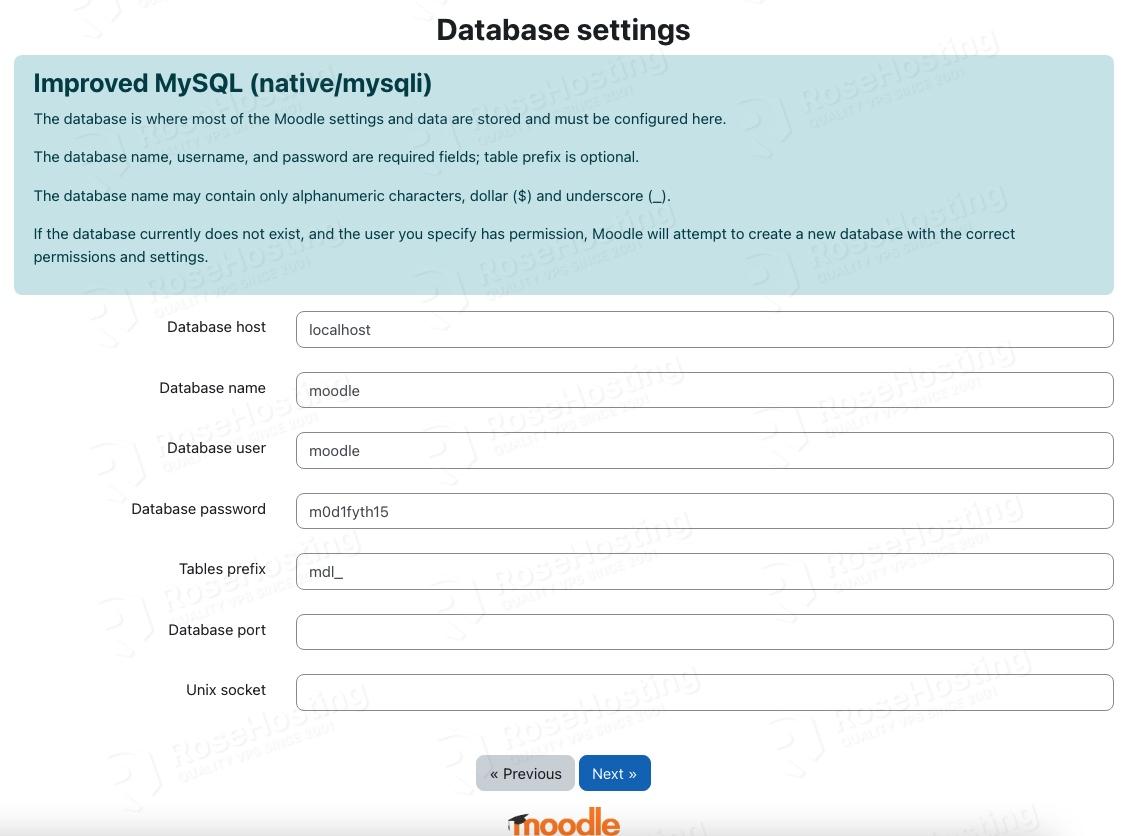
In this step, you need to fill them in with the database credentials we created in the previous step. You can let the database port and unix socket empty, then click on the Next button.

Click Continue
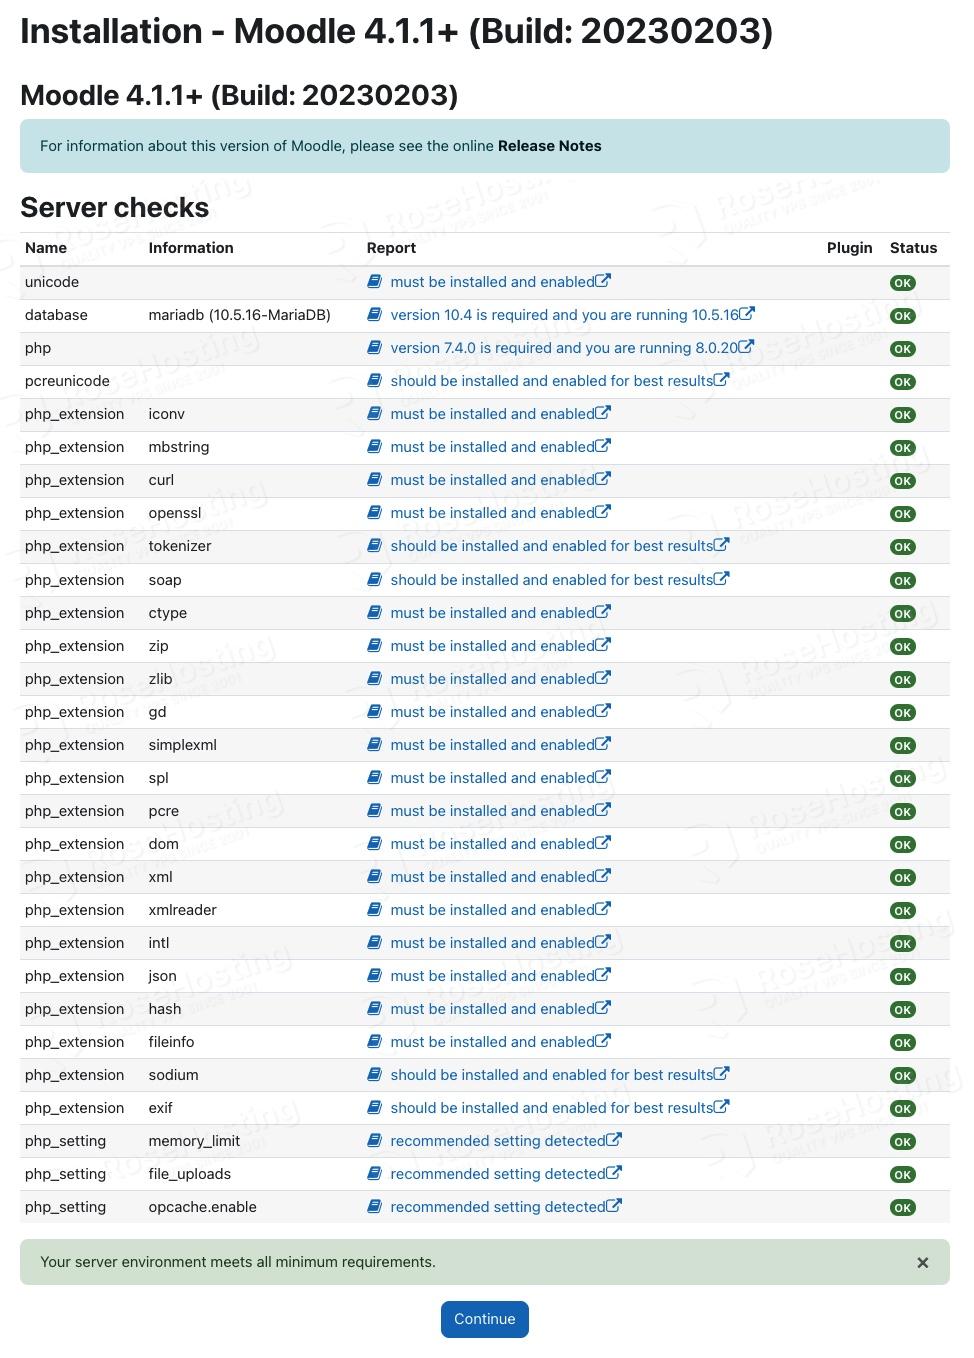
If everything is okay, click Continue to proceed. The installation will install the required Moodle modules, and it will take a few minutes to complete.

After installing the modules, click Continue to proceed to the next step.
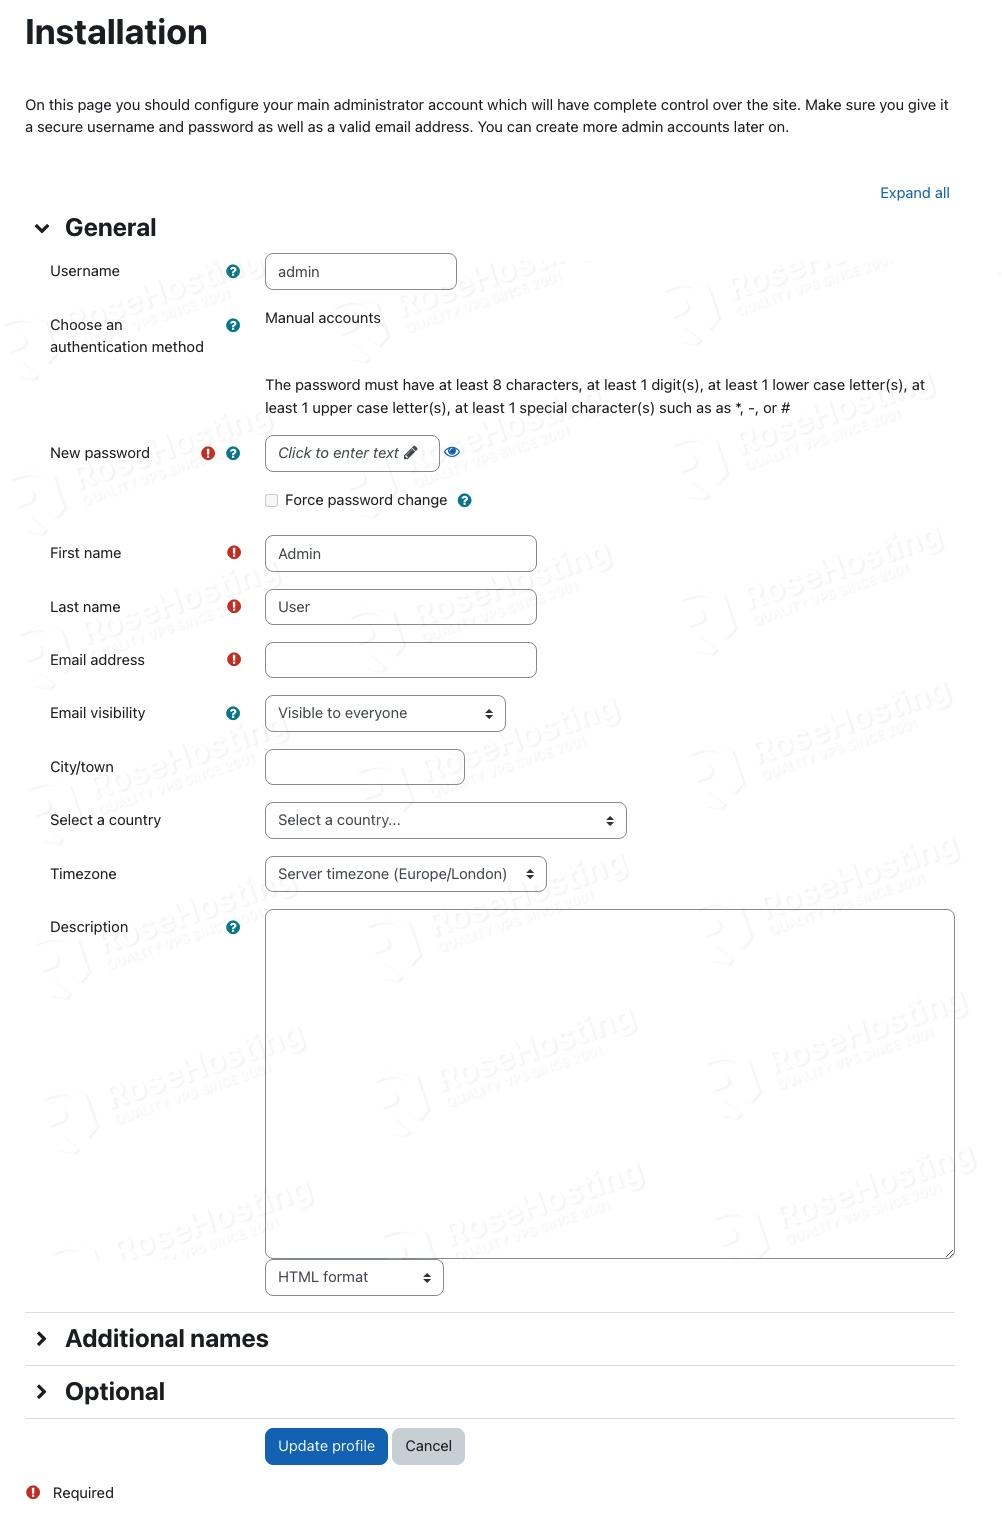
In this step, you need to fill in the required fields before you can continue.
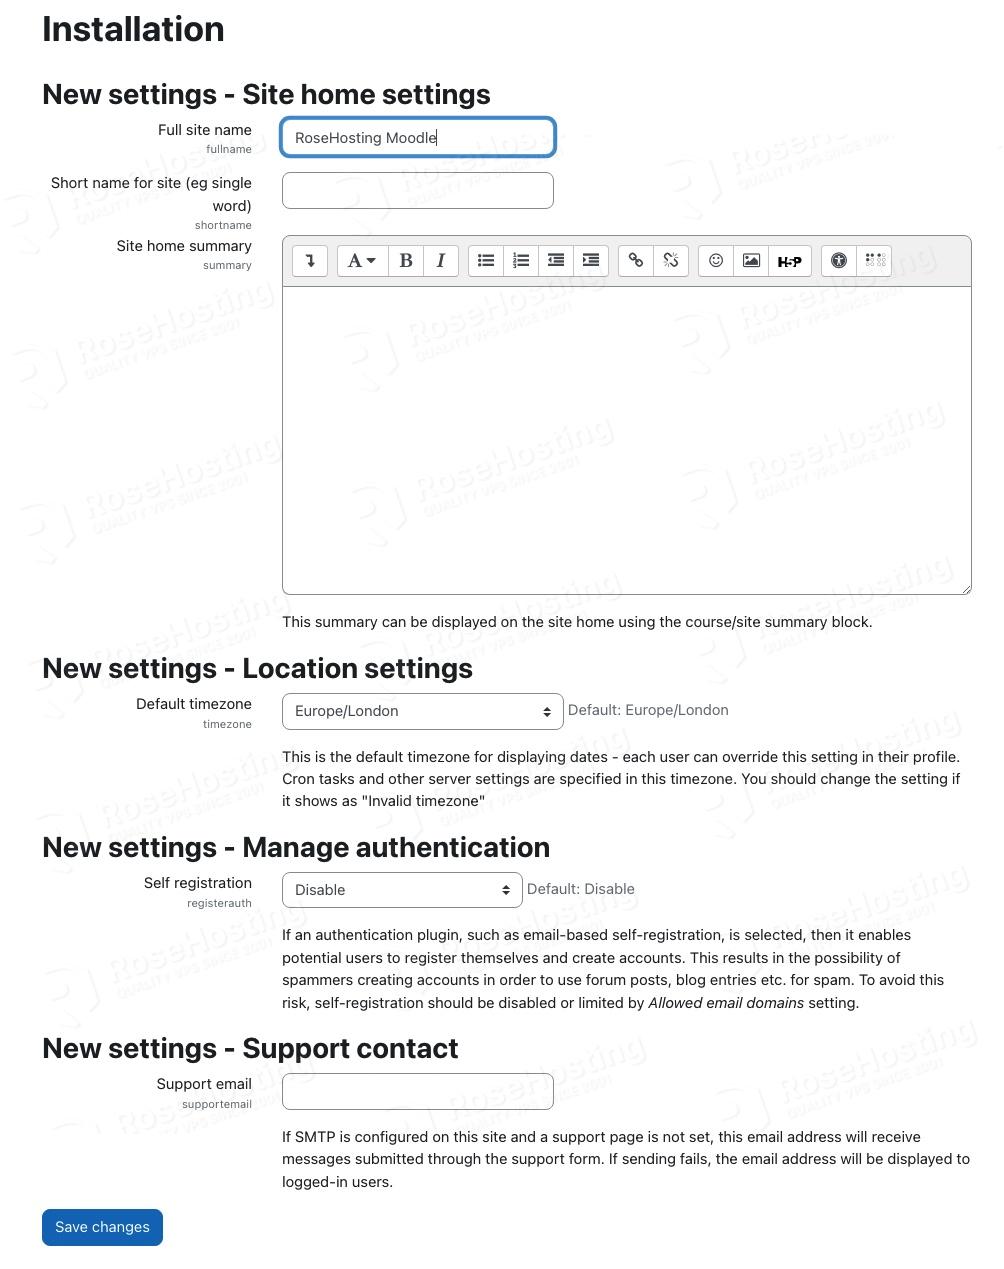
Make sure to fill them all, then click on the Save changes button.
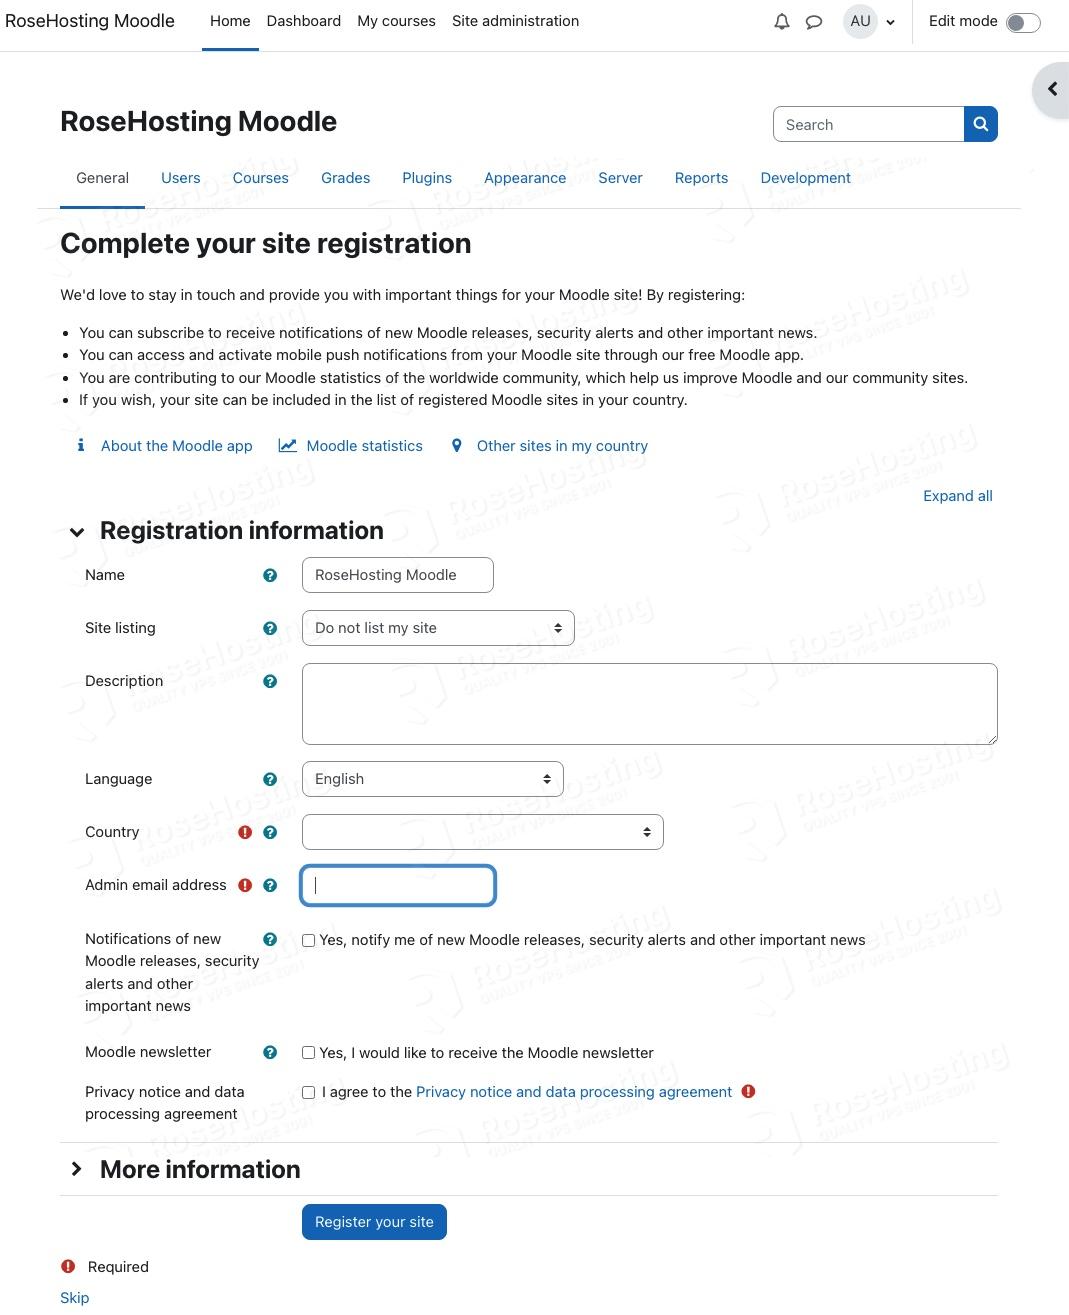
You can fill them and continue or skip the registration

Finally, you will be brought to the dashboard
Step 8. Install Cron
To make Moodle run properly, we need to configure Moodle cronjobs. Without setting it up, your Moodle website might not run properly.
# crontab -u apache -e
Append this line to the file editor.
* * * * * /usr/bin/php /var/www/html/moodle/admin/cli/cron.php >/dev/null
Save the file, then exit.
We trust that our article today successfully demonstrated how to install Moodle on AlmaLinux 9 in a straightforward and effective manner.
We would now like to hear from you. Is there a detail you think we overlooked or a step you are unsure about that needs further clarification? Do you have suggestions for other guides or topics you’d like us to explore?
Please feel free to share your thoughts in the comment section below.
Hi,
i just finished this installation and there is a permission error as i included here:
https://moodle.org/mod/forum/discuss.php?d=451609
please help
Warning: include(/opt/moodle/install/lang/pcm/langconfig.php): Failed to open stream: Permission denied in /opt/moodle/lib/classes/string_manager_install.php on line 224
Warning: include(): Failed opening ‘/opt/moodle/install/lang/pcm/langconfig.php’ for inclusion (include_path=’/opt/moodle/lib/pear:.:/usr/share/pear:/usr/share/php’) in /opt/moodle/lib/classes/string_manager_install.php on line 224
Please make sure that the file permissions are set correctly.