
In this tutorial, we will show you how to install Yarn on an Ubuntu 16.04 Cloud VPS, as well as go over some of the basics with using Yarn.
 Yarn is a Javascript package manager, serving as an alternative to NPM. It is an open-source project and was built by a team at Facebook. There are many advantages when using Yarn, such as:
- Offline Installation
- Faster download, packages are installed in parallel
- Support for multiple registries
As you can see, the interesting feature is the offline installation. Once you have installed a package, it will be cached and we can create another project from scratch without being connected to the internet, which in turn will save our bandwidth usage.
Usually, a project requires some dependencies and every time we install them to start a project, the “npm install” command would consume your bandwidth. When using Yarn, the download is done just once. Let’s begin installing Yarn.
Prerequisites:
- Ubuntu 16.04 Cloud VPS
- A system user with root privileges, or access to the root user account
Step 1. Log in to your Server via SSH and Update the System:
ssh root@server_ip -p port_number
Make sure to replace “server_ip” and “port_number” with their respective values.
Once you are logged in, run the following command to and make sure all installed packages are updated to the latest available version
apt-get update && apt-get upgrade
Step 2. Install Yarn
There are several ways to install Yarn – each of which we’ll be going through in this tutorial.
Method 1: Install Yarn Using the APT Package Manager
This is the easiest way to install Yarn. First, we need to add the Yarn repository. Use the following command to add the Yarn repository and import the repository’s GPG key.
echo "deb https://dl.yarnpkg.com/debian/ stable main" | tee /etc/apt/sources.list.d/yarn.list
curl -sS https://dl.yarnpkg.com/debian/pubkey.gpg | apt-key add -
Once added, we can update the package list and install Yarn.
apt update
apt install yarn
Now, let’s check the Yarn version that we just installed:
yarn -v
If you see the following message when checking yarn version, it means you don’t have Node.js installed on your system.
Yarn requires Node.js 4.0 or higher to be installed.
To install Node.js, you can run the following command:
apt install nodejs
Now, you can run the command to check the Yarn version again:
yarn -v
![]()
Now you have Yarn installed on your server using the APT package manager.
Method 2: Install Yarn Using the Official Installation Script
The Yarn team also provides us with a shell script to do the installation without having to go through the hassle of adding a repository just for one package.
curl -o- -L https://yarnpkg.com/install.sh | bash
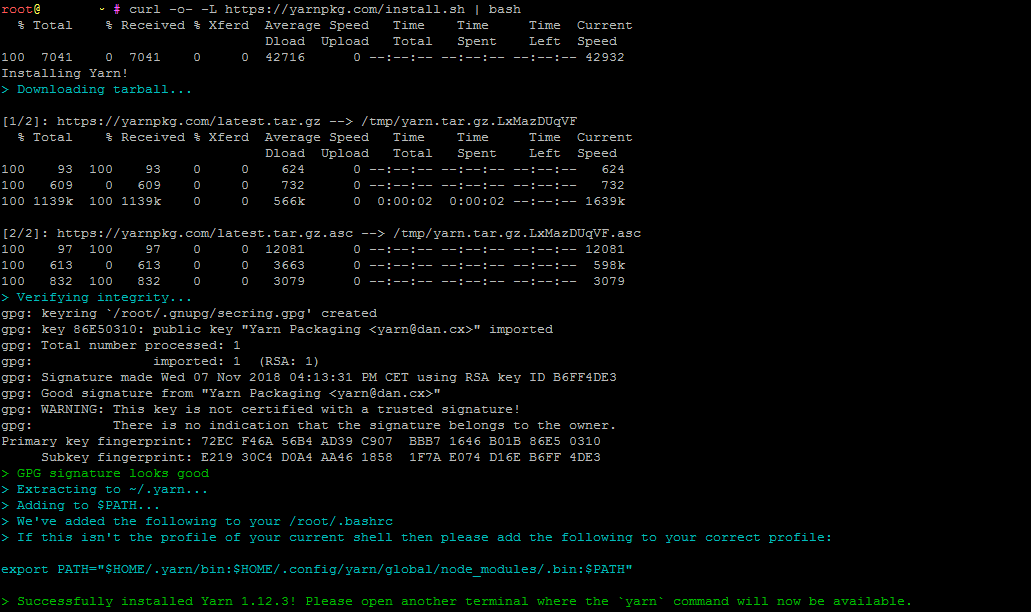
This installation procedure will put all files under the user’s home directory, so it’s only available for the user you ran the script from.
Method 3: Install Yarn Using npm
You can use npm command to install Yarn globally with this command, however, this installation method is not recommended by the Yarn team:
npm install yarn -g
The following message is a note on Yarn installation https://yarnpkg.com/en/docs/install#alternatives-stable
Note: Installation of Yarn via npm is generally not recommended. When installing Yarn with Node-based package managers, the package is not signed, and the only integrity check performed is a basic SHA1 hash, which is a security risk when installing system-wide apps.
How to Use Yarn
Now that you have successfully installed Yarn on your Ubuntu 16.04 Cloud VPS, it is time to use Yarn.
Create a Project
You can create a new Yarn project with this command:
yarn init <span style="color: #ff0000;">new_project_name</span>
You can replace new_project_name with your desired project name.
Once issued, you will be prompted with several questions, you can answer them with their default values by pressing the [ENTER] key.
yarn init v1.12.3
question name (root):
question version (1.0.0):
question description:
question entry point (index.js):
question repository url:
question author:
question license (MIT):
question private:
success Saved package.json
Done in 15.75s.
Now, under your working directory, you will see a package.json file.
Add a Dependency
To add a dependency to your new Yarn project, you can issue this command:
yarn add package_name
Upgrade a Dependency
To upgrade the dependency, you can invoke this command:
yarn upgrade package_name
Install Dependencies
To install the dependencies stated in your package.json file, you can run this command under your working directory:
yarn
or
yarn install
That is it. Yarn has been successfully installed on your Ubuntu 16.04 server, and now you know a few of the basic commands needed to use it.
 Of course, you don’t have to install Yarn on Ubuntu 16.04 if you use one of our Cloud VPS Hosting services, in which case you can simply ask our expert Linux admins to install Yarn on Ubuntu 16.04 for you. All of our plans include fully-managed support that’s available 24×7 – just ask for help and we will take care of your request immediately.
PS. If you liked this post on how to install Yarn on Ubuntu 16.04, please share it with your friends on the social networks using the share buttons, or simply leave a reply below. Thank you.