In this tutorial, we are going to provide you with step by step instructions on how to set up WordPress error logs in wp-config. The wp-config.php file in WordPress may help you find and fix problems in WordPress scripts, WordPress themes and plugins and give you feedback on what is wrong with your website.
This install guide assumes that Apache is already installed and configured on your virtual server.
1. Install WordPress
Download the latest version of WordPress available at https://wordpress.org/download and extract the WordPress archive on the server:
cd /opt/
wget https://wordpress.org/latest.zip
unzip latest.zip
mv wordpress /var/www/html/your-domain.com
2. Set up ownership
All files have to be readable by the web server, so set a proper ownership:
chown -R www-data: -R /var/www/html/your-domain.com/
3. Create MySQL Databse
Create a new MySQL database and user:
mysql -u root -p
mysql> SET GLOBAL sql_mode='';
mysql> CREATE DATABASE wpdb;
mysql> CREATE USER 'wpuser'@'localhost' IDENTIFIED BY 'y0uR-pa5sW0rd';
mysql> GRANT ALL PRIVILEGES ON wpdb.* TO 'wpuser'@'localhost';
mysql> FLUSH PRIVILEGES;
mysql> quit
Do not forget to replace ‘y0uR-pa5sW0rd’ with a strong password.
4. Create Virtual Host
Create a new virtual host in Apache. Make sure the new Apache virtual host configuration contains the ‘AllowOverride All’ directive to allow .htaccess file to be used. For example, create a new Apache configuration file named ‘your-domain.conf’ on your virtual server:
touch /etc/apache2/sites-available/your-domain.conf
ln -s /etc/apache2/sites-available/your-domain.conf /etc/apache2/sites-enabled/your-domain.conf
vi /etc/apache2/sites-available/your-domain.conf
5. Configure Virtual Host
Then, add the following lines:
<VirtualHost *:80>
ServerAdmin [email protected]
DocumentRoot /var/www/html/your-domain.com
ServerName your-domain.com
ServerAlias www.your-domain.com
<Directory /var/www/html/your-domain.com>
Options FollowSymLinks
AllowOverride All
Order allow,deny
allow from all
</Directory>
ErrorLog /var/log/apache2/your-domain.com-error_log
CustomLog /var/log/apache2/your-domain.com-access_log common
</VirtualHost>
Remove the 000-default.conf file:
rm /etc/apache2/sites-enabled/000-default.conf
6. Restart Apache
Restart the Apache web server for the changes to take effect:
service apache2 restart
7. Configure wp-config.php
Set the MySQL database username, database name and password in wp-config.php:
cd /var/www/html/your-domain.com
mv wp-config-sample.php wp-config.php
Edit the wp-config.php file and replace the following lines:
/** The name of the database for WordPress */
define('DB_NAME', 'database_name_here');

/** MySQL database username */
define('DB_USER', 'username_here');

/** MySQL database password */
define('DB_PASSWORD', 'password_here');
with:
/** The name of the database for WordPress */
define('DB_NAME', 'wpdb');

/** MySQL database username */
define('DB_USER', 'wpuser');

/** MySQL database password */
define('DB_PASSWORD', 'y0uR-pa5sW0rd');
Open http://your-domain.com and finish the WordPress installation.
8. Enable Error Logs in WordPress
Enabling error logs in WordPress is fairly easy. Edit the wp-config.php file and add these lines at the end:
vi wp-config.php
@ini_set('log_errors','On');
@ini_set('error_log','/var/www/html/your-domain.com/error.log');
@ini_set('display_errors','Off');
touch error.log
9. Track Error Logs in Real Time
To track the errors in real-time, use the following command:
tailf /var/www/html/your-domain.com/error.log
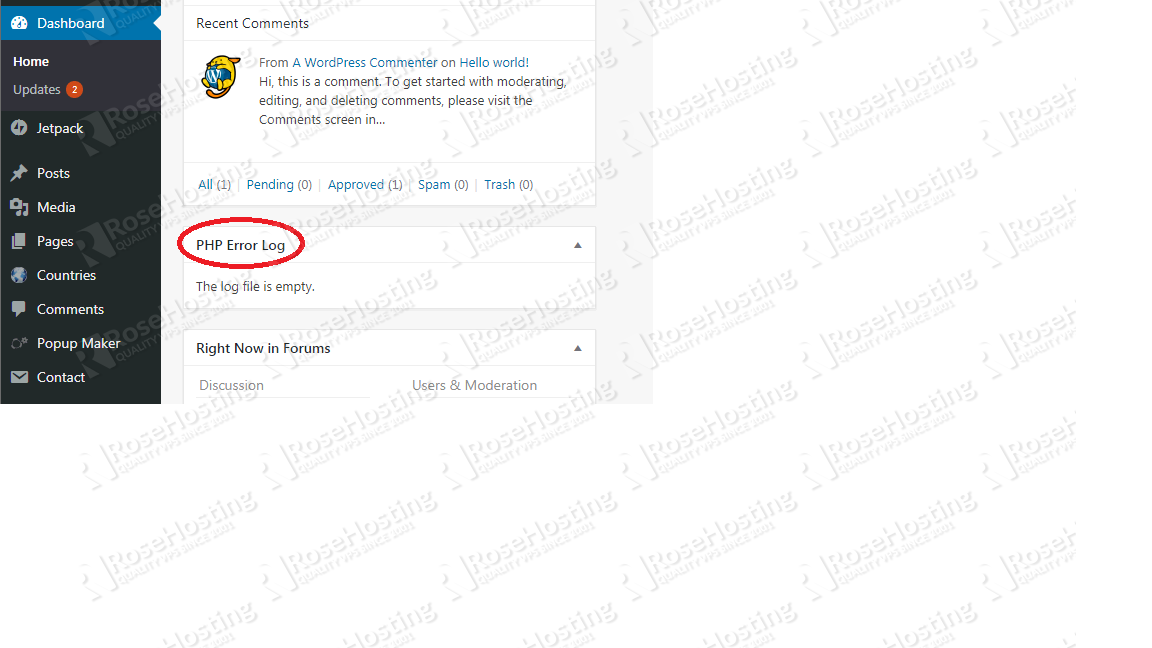
In order to track the errors through the WordPress back-end, install the Error Log Monitor WordPress plugin. Error Log Monitor adds a dashboard widget that displays the errors from the error log, and can also send email notifications about newly logged errors.
10. Enable WordPRess Debugging
Or, enable WordPress Debugging. Edit the wp-config.php file, locate the following line define(‘WP_DEBUG’, false) and modify/add these lines:
vi wp-config.php
// define('WP_DEBUG', false);

define('WP_DEBUG', true);
define( 'WP_DEBUG_LOG', true );
define( 'WP_DEBUG_DISPLAY', false );
This will create a debug.log file in the wp-content directory.
Always set ‘WP_DEBUG_DISPLAY’ to false on a production site. If ‘WP_DEBUG_DISPLAY’ option is set to true, and WordPress debugging are enabled, WordPress will show the debug messages in the web pages as they are generated. This could lead to disclosure of sensitive information about the website and server setup.
Of course, you don’t have to Set Up WordPress Error Logs in wp-config, if you use one of our managed hosting plans for WordPress, in which case you can simply ask our expert Linux admins to set up wordpress error logs in wp-config.php for you. They are available 24×7 and will take care of your request immediately.
PS. If you liked this post, on how to set Up WordPress Error Logs in wp-config please share it with your friends on the social networks using the buttons below or simply leave a comment in the comments section. Thanks.
Well, this is nice information! Thanks for sharing this as it would help many users to know about important information about WordPress. Knowing about this, we are looking forward to implementing things accordingly.