
Codiad is a web-based IDE framework which allows fast and interactive development. It has very useful features like support for more than 40 languages, error checking and notifications, editor screen splitting, advanced searching tools, auto-complete and many many more. In this tutorial we are going to show you how to install Codiad on a Linux Cloud VPS with Nginx, MySQL and PHP-FPM.
First of all, connect to your server via SSH and update all your system software to the latest version available.
# apt-get update && apt-get -y upgrade
Once the update process is completed you can go ahead and install Nginx. You can do that using the following command:
# apt-get install nginx
The installation should take few moments. Then start and enable Nginx on boot using the commands below:
# service nginx start
# update-rc.d nginx enable
The next step is to install MySQL server on your Ubuntu Cloud VPS. Use the following command:
# apt-get install mysql-server
Now, proceed with the MySQL secure installation by running the command:
# mysql_secure_installation
Follow the on-screen messages as follows:
Enter current password for root (enter for none):
OK, successfully used password, moving on...

Set root password? [Y/n] y
New password:
Re-enter new password:
Password updated successfully!
Reloading privilege tables..
 ... Success!

Remove anonymous users? [Y/n] y
 ... Success!

Disallow root login remotely? [Y/n] y
 ... Success!

Remove test database and access to it? [Y/n] y
 - Dropping test database...
ERROR 1008 (HY000) at line 1: Can't drop database 'test'; database doesn't exist
 ... Failed!  Not critical, keep moving...
 - Removing privileges on test database...
 ... Success!

Reload privilege tables now? [Y/n] y
 ... Success!
Start your MySQL server and enable the service on boot:
# service mysql start
# update-rc.d mysql enable
To install PHP-FPM you can use the command:
# apt-get install php5-fpm php5-mysql
You have now successfully installed the LEMP stack on your Ubuntu 14.04 Cloud. Now, lets download and install Codiad. Navigate to the ‘/var/www/’ directory on your server:
# cd /var/www/
Download the latest version of the software. The latest version of Codiad at the moment of writing this tutorial is v2.7.4.
# wget https://github.com/Codiad/Codiad/archive/v.2.7.4.zip
Unzip the archive:
# unzip v.2.7.4.zip
Rename the directory and change the ownership:
# mv Codiad-v.2.7.4/ codiad
# chown www-data: -R codiad/
Create an Nginx configuration file for Codiad:
nano /etc/nginx/sites-available/yourdomain.com
Enter the following content:
server {
    #listen   80; ## listen for ipv4; this line is default and implied
    #listen   [::]:80 default ipv6only=on; ## listen for ipv6

    root /var/www/codiad;
    index index.php index.html;

    # Make site accessible from http://localhost/
    server_name www.yourdomain.com yourdomain.com;

    location / {
        # First attempt to serve request as file, then
        # as directory, then fall back to index.html
        try_files $uri $uri/ /index.html;
    }

    error_page 404 /404.html;

    # redirect server error pages to the static page /50x.html
    error_page 500 502 503 504 /50x.html;
    location = /50x.html {
        root /usr/share/nginx/www;
    }

    # pass the PHP scripts to FastCGI server listening on 127.0.0.1:9000
    location ~ \.php$ {
        fastcgi_split_path_info ^(.+\.php)(/.+)$;
        # NOTE: You should have "cgi.fix_pathinfo = 0;" in php.ini

        # With php5-cgi alone:
        # fastcgi_pass 127.0.0.1:9000;
        # With php5-fpm:
        fastcgi_pass unix:/var/run/php5-fpm.sock;
        fastcgi_index index.php;
        include fastcgi_params;
    }
}
Please note, you should replace ‘yourdomain.com’ with your actual domain name.
Enable the configuration and restart the Nginx service:
# ln -s /etc/nginx/sites-available/yourdomain.com /etc/nginx/sites-enabled/yourdomain.com
# service nginx restart
You can now open your web browser and enter your domain name into the search bar. You should see the Codiad initial setup screen:
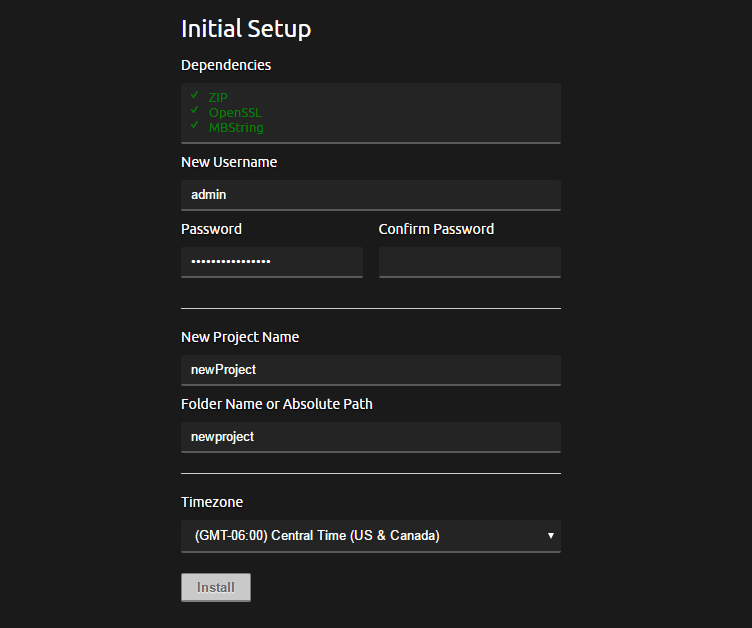
Here you can set up your username, password and your first project.
Of course you don’t have to do any of this if you use one of our Linux Cloud VPS hosting services, in which case you can simply ask our expert Linux admins to install Codiad for you. They are available 24×7 and will take care of your request immediately.
PS. If you liked this post please share it with your friends on the social networks using the buttons on the left or simply leave a reply below. Thanks.